How to Fix a Car Brake Light Switch Step by Step
Fixing a car brake light switch is a straightforward repair that can restore safety to your vehicle and prevent rear-end collisions. This guide walks you through every step, from diagnosing a faulty switch to testing the replacement, so you can do the job yourself in under an hour.
Simply put, a faulty brake light switch leaves your brake lights off when you press the pedal or keeps them stuck on. Replacing the switch takes about 30 minutes with basic hand tools. This repair restores proper brake light function, keeps you legal on the road, and costs far less than a shop visit.
Key Takeaways
- Fixing a car brake light switch usually means replacing it with a new part for around $10–$40.
- You can diagnose a bad switch by checking for symptoms like non-working brake lights, stuck-on lights, or cruise control failure.
- The brake light switch is typically located above the brake pedal arm inside the driver footwell.
- Testing with a multimeter confirms whether the switch is electrically functional before you replace it.
- Proper adjustment of the new switch ensures the brake lights activate at the right pedal pressure.
What Is a Car Brake Light Switch and How Does It Work?
A car brake light switch is a small electrical component mounted near the brake pedal arm. When you press the brake pedal, the switch closes an electrical circuit that sends power to the rear brake lights. When you release the pedal, the switch opens the circuit and the lights turn off.
This switch is a normally open momentary contact device. That means it stays open (off) when the pedal is at rest. Pressing the pedal pushes a plunger or lever inside the switch, closing the contacts and completing the circuit.
Modern vehicles use this same basic design, though some have a normally closed configuration that works in reverse.
The switch plays a role beyond just lighting up the rear lamps. It also sends a signal to the cruise control system to disengage when you brake, and it communicates with the shift interlock so you can move the transmission out of Park. A failed switch can affect all these systems at once.
Important: Some vehicles use a two-circuit brake light switch with separate contacts for the brake lights and the cruise control. If your cruise control stops working but the brake lights still function, the secondary circuit inside the switch may be faulty.
How the Switch Connects to Your Vehicle Electrical System
The brake light switch sits between the brake pedal and the vehicle fuse box. It receives constant battery voltage from a fuse in the under-dash or engine bay fuse panel. When activated, it passes that voltage through the turn signal switch and out to the rear brake light bulbs.
Most modern cars route the brake light signal through the body control module (BCM) or a dedicated brake light relay. This design allows the computer to monitor bulb health and activate emergency flashing if you brake hard. The basic switch function remains the same regardless of the additional electronics.
- The switch receives 12V DC power from a dedicated fuse (usually 10A or 15A).
- Pressing the pedal completes the circuit and sends voltage to the rear bulbs.
- The same signal triggers the center high-mount stop lamp (CHMSL).
- Some vehicles send the signal through a relay before reaching the bulbs.
- The switch also provides a signal to the ABS and stability control modules.
- Aftermarket trailer wiring splices into the brake light circuit at the rear harness.
Common Symptoms of a Faulty Brake Light Switch
A failing brake light switch shows clear warning signs. Recognizing these early can save you from being pulled over or getting rear-ended. The symptoms often appear gradually, so pay attention if you notice any change in how your brake lights behave.
The most obvious symptom is that your brake lights do not come on when you press the pedal. You may discover this when a friend tells you, when you fail a vehicle inspection, or when a police officer pulls you over. Less obvious is the opposite problem — brake lights that stay on all the time, draining your battery and confusing drivers behind you.
| Symptom | Likely Cause | What to Check First |
|---|---|---|
| Brake lights never come on | Switch stuck open or internal failure | Fuse, then switch continuity |
| Brake lights stay on constantly | Switch stuck closed or misadjusted | Switch plunger binding or pedal pad missing |
| Brake lights work intermittently | Worn internal contacts or loose connector | Connector tightness and switch resistance |
| Cruise control stops working | Secondary switch circuit failure | Multimeter test of both circuits |
| Shift interlock not releasing | No brake signal to BCM | Switch signal wire voltage |
Additional symptoms include the ABS or traction control warning light turning on, a brake light warning on the dashboard, or the engine not starting because the computer does not detect the brake pedal being pressed. Some vehicles require the brake pedal signal to engage the starter.
Warning: Driving with a failed brake light switch is dangerous and illegal. Other drivers cannot see your braking intention, increasing the risk of rear-end collisions. If your brake lights are stuck on, you risk draining the battery and causing an electrical fire in extreme cases.
Tools and Parts You Need to Fix a Car Brake Light Switch
Before you start the repair, gather the right tools and replacement parts. Most modern brake light switches are inexpensive and widely available at auto parts stores or online. Having everything ready before you begin makes the job go smoothly and prevents mid-repair trips to the store.
The specific tools required depend on your vehicle, but the list below covers nearly every make and model. You likely already own most of these items. The only specialized tool is a multimeter, which you can buy for under $20 at any hardware store.
- New brake light switch — matched to your vehicle make, model, and year (check part number)
- Flathead screwdriver — for prying clips and releasing the wiring connector
- Phillips head screwdriver — for mounting screws if the switch uses them
- Multimeter — to test continuity and voltage before and after replacement
- Flashlight or work light — the footwell is dark and cramped
- Needle-nose pliers — for pulling connectors and holding small clips
- Knee pad or foam mat — for comfort while working under the dash
How to Choose the Right Replacement Switch
Not all brake light switches are the same. Your vehicle uses a specific design that matches the pedal assembly and electrical connector. Using the wrong switch can cause poor fitment, intermittent operation, or no operation at all.
To find the correct part, check your owner manual for the recommended part number, or look up the switch by your vehicle VIN at any major auto parts retailer. Online stores like RockAuto, AutoZone, and Amazon let you enter your vehicle info to filter compatible parts.
| Vehicle Type | Typical Switch Price | Common Part Brands |
|---|---|---|
| Domestic cars (Ford, Chevy, Dodge) | $12–$25 | ACDelco, Motorcraft, Standard Motor Products |
| Asian imports (Toyota, Honda, Nissan) | $15–$35 | Denso, Hitachi, Beck/Arnley |
| European cars (BMW, Audi, Mercedes) | $20–$50 | Febi Bilstein, OEM, VDO |
OEM (original equipment manufacturer) switches cost more but guarantee exact fit and long life. Aftermarket switches are cheaper and often work just as well, but check customer reviews for fitment issues on your specific model.
Step 1: Locate the Brake Light Switch
The brake light switch is always mounted near the brake pedal arm. Get in the driver seat and position yourself so you can see under the dashboard above the pedal area. Use your flashlight to look up behind the pedal arm where it connects to the brake booster pushrod.
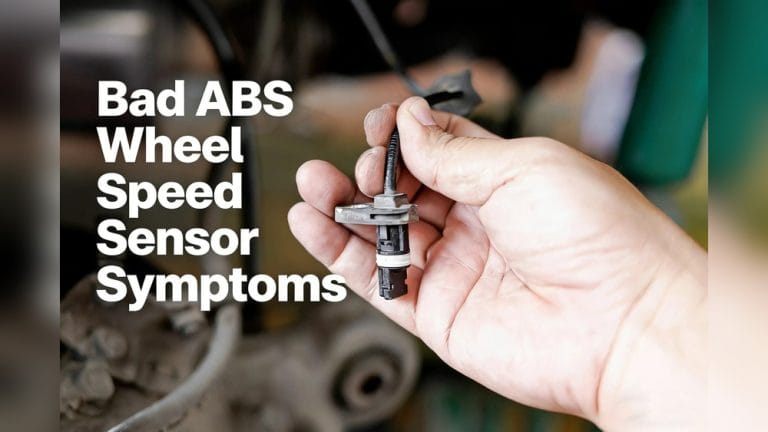
The switch looks like a small plastic block with a button or plunger on one side. It has a two- or four-wire electrical connector plugged into it. The switch body clips or screws into a metal bracket attached to the pedal support structure.
- Move the driver seat all the way back to give yourself working room.
- Lie on your back with your head near the brake pedal.
- Shine the flashlight upward behind the pedal arm about 6–12 inches above the pedal pad.
- Identify the small plastic component with wires going into it — that is the brake light switch.
- Check for a lock tab or retaining clip that holds the switch in the bracket.
- Note the switch orientation before removing it so you install the new one the same way.
Tip: If you cannot see the switch easily, use your phone camera in selfie mode with the flashlight on to peek into tight spaces. This trick works better than contorting your body to get direct eye access.
Step 2: Check the Switch for Damage or Wear
Before you remove the switch, inspect it for obvious physical damage. A cracked housing, melted plastic, or a broken plunger means the switch must be replaced. Even if the outside looks fine, internal wear can cause intermittent electrical failure.
Gently press the switch plunger with your finger while watching the brake lights (have a helper stand at the rear of the car, or use a mirror or phone camera). If the plunger moves freely but the lights do not respond, the internal contacts are likely worn out.
- Check for cracks or broken mounting tabs on the switch body.
- Look for signs of melting or heat damage around the electrical terminals.
- Press the plunger and listen for a distinct click — a quiet or mushy click indicates wear.
- See if the switch moves or wobbles in its bracket — loose mounting causes intermittent operation.
- Inspect the connector for bent, corroded, or pushed-back pins.
- Verify that the brake pedal pad is not missing or worn — a missing pad changes pedal travel and switch actuation.
If the switch appears physically intact, move to electrical testing. Physical damage is a clear replacement signal, but a switch that looks perfect can still fail internally. Never skip electrical testing based on appearance alone.
Step 3: Test the Switch with a Multimeter
Electrical testing confirms whether the brake light switch is the actual problem or if the issue lies elsewhere in the circuit. Set your multimeter to continuity mode (the symbol that looks like a sound wave) or resistance mode (Ω).
Unplug the electrical connector from the switch. Touch one multimeter probe to each of the two terminals on the switch. With the plunger released (pedal not pressed), the meter should show no continuity or infinite resistance.
Press the plunger in (simulating the pedal pressed) and the meter should show continuity or near-zero resistance.
- Set multimeter to continuity (buzzer) mode or resistance (200Ω range).
- Disconnect the switch wiring harness from the switch body.
- Touch probes to the two switch terminals — plunger released = no continuity.
- Press the plunger fully with your finger — plunger pressed = continuity.
- Release and press several times to check for intermittent contact.
- If the switch has four terminals, test both circuit pairs separately.
Warning: Some brake light switches are normally closed — they show continuity at rest and break continuity when pressed. Check your vehicle wiring diagram to confirm the switch type before concluding it is bad. Installing a normally open switch in a normally closed circuit causes the exact opposite behavior.
According to the Automotive Aftermarket Suppliers Association (AASA), approximately 12 percent of all brake light failures are caused by the switch itself, while 45 percent are due to bad bulbs and 22 percent are fuse-related. Testing the switch first saves you from replacing parts you do not need.
Step 4: Replace the Brake Light Switch
If the switch fails the continuity test, replacement is the fix. Removing the old switch is usually simple — most designs use either a quarter-turn lock or a push-clip retention system. Never force the switch out, as breaking the plastic bracket means a more expensive repair.
For twist-lock switches, grasp the switch body and rotate it clockwise or counterclockwise about a quarter turn until it releases from the bracket. For push-clip designs, squeeze the locking tabs with your fingers or pliers and pull the switch straight out. Some switches have a threaded body that screws into the bracket.
- Twist-lock: Rotate 90 degrees counterclockwise and pull out.
- Push-clip: Squeeze tabs and pull straight back.
- Screw-in: Unscrew with your fingers — no tool needed.
- Bolted: Use a 10mm socket or screwdriver to remove the mounting screws.
Install the new switch in the reverse order of removal. For adjustable switches, push the plunger all the way in, then pull it back out until you hear a click as it sets to the correct length. For fixed switches, simply clip or screw the new one into place and reconnect the wiring harness.
Important: After installing the new switch, press the brake pedal by hand several times to confirm the plunger follows the pedal arm correctly. If the switch clicks but the pedal arm does not contact it properly, the brake lights will not work.
Step 5: Test the Brake Lights After Replacement
Testing after replacement is the most crucial step. A new switch that is misadjusted or not plugged in fully leaves you with the same problem you started with. Always verify function before putting the dashboard covers back and calling the job done.
Turn the ignition to the ON position (engine does not need to be running). Press the brake pedal and check that all three brake lights — left, right, and center high-mount — illuminate brightly. Release the pedal and confirm all lights turn off completely.
- Turn ignition key to ON (run position, not accessory).
- Press brake pedal firmly and check all rear brake lights.
- Release pedal and confirm all lights turn off completely.
- Have a helper watch while you press and release several times.
- Check the dashboard brake light indicator if your vehicle has one.
- Test cruise control operation on a safe road if equipped.
Tip: If the new switch does not work, double-check the electrical connector orientation. Some connectors have a keyed shape and only plug in one way, but forcing them backward can bend pins or short the circuit.
Common Mistakes When Fixing a Car Brake Light Switch
Even experienced DIYers make mistakes when replacing a brake light switch. The most common error is not adjusting the switch plunger to the correct length. If the plunger is too short, the pedal arm never contacts it and the lights stay off.
If it is too long, the lights stay on all the time.
Another frequent mistake is buying the wrong switch for the vehicle. Brake light switches vary by connector shape, mounting style, and electrical configuration (normally open vs. normally closed).
Always verify the part number against your vehicle before purchasing.
- Incorrect adjustment — failing to set the plunger depth causes lights that stay on or off.
- Wrong switch type — normally open vs. normally closed mismatch causes reverse behavior.
- Forgetting the fuse — a blown brake light fuse prevents any switch from working.
- Loose connector — not clicking the harness fully onto the switch causes intermittent operation.
- Skipping the multimeter test — replacing a good switch wastes money and does not fix the actual problem.
- Ignoring the brake pedal pad — a worn or missing pad changes pedal travel and switch engagement.
- Over-tightening mounting screws — cracking the switch housing ruins the new part.
The National Highway Traffic Safety Administration (NHTSA) reports that brake light failure contributes to an estimated 1.5 percent of all rear-end collisions in the United States each year. That number translates to roughly 20,000 preventable crashes annually. Taking the time to fix a car brake light switch correctly keeps you and everyone behind you safer.
Frequently Asked Questions
Can I drive with a bad brake light switch?
Driving with a faulty brake light switch is unsafe and illegal in most jurisdictions. If the brake lights do not work, drivers behind you cannot see when you are braking, which greatly increases the risk of a rear-end collision. If the lights stay stuck on, you risk draining your battery and confusing other drivers.
How much does it cost to fix a car brake light switch?
The brake light switch part itself costs between $10 and $50 depending on your vehicle make and model. Doing the repair yourself costs only the price of the part plus basic tools. A shop charges between $50 and $150 for labor, bringing the total to $60–$200 for a professional repair.
Do I need to disconnect the battery to replace a brake light switch?
Disconnecting the battery is not strictly required for replacing a brake light switch, but it is a good safety practice. The switch operates at 12V DC, which is low voltage, but unplugging the battery prevents accidental short circuits if your tools contact live terminals. Disconnect the negative terminal for extra caution.
How do I know if my brake light switch is bad or if the bulbs are blown?
Check the bulbs first because they fail more often than the switch. Remove the rear tail light assembly and inspect the brake light filaments. If the bulbs look good, use a multimeter to test for voltage at the bulb socket with the brake pedal pressed.
No voltage points to a switch or wiring problem, while voltage but no light means a bad bulb or ground issue.
Can a bad brake light switch drain the battery?
Yes, a stuck-on brake light switch keeps the brake lights illuminated even when the car is parked and off. Those bulbs draw current continuously, draining the battery overnight or over a few days. If you return to a dead battery and notice the brake lights were left on, suspect a faulty switch or a misadjusted plunger.
Final Thoughts
Fixing a car brake light switch is one of the easiest and most rewarding DIY car repairs you can do. It costs little, takes under an hour, and directly improves your safety on the road. Always test the new switch thoroughly before buttoning everything back up.
Regular brake light checks — once a month — catch switch and bulb issues early and keep your vehicle road-legal. See also how to stop car brake squeaking for good proven methods .
Products related to this article
Sponsored / affiliate links. As an Amazon Associate I earn from qualifying purchases. I may earn additional commission from eligible campaigns.