You can often make car lights clear again by cleaning off the hazy oxidation. This involves a multi-step process using cleaning agents and polishing techniques. Restoring them improves both looks and driving safety.
Understanding Why Car Lights Get Hazy
So, why do car headlights turn cloudy and yellow? It’s a common problem. Most modern headlights are made of a strong plastic called polycarbonate.
This plastic is great because it’s tough and clear. But it has a weak spot. It can get damaged by the sun.
The sun’s rays have ultraviolet (UV) light. UV light breaks down the plastic over time. Think of it like a sunburn for your headlights.
To protect them, car makers put a special coating on the outside. This coating is supposed to block the UV rays.
But this coating wears off. Rain, wind, road salt, and just everyday driving chip away at it. Once the coating is gone, the bare plastic is exposed.
Then, the UV light starts to attack the plastic itself. This causes a chemical change. It makes the plastic brittle and cloudy.
This cloudy layer is what we call oxidation.
It’s not just the sun, though. Small scratches from car washes, dust, and debris also add up. These tiny nicks and cuts trap dirt.
They also make the surface rough. A rough surface doesn’t reflect light well. It scatters it.
That’s why your lights seem dimmer.
The color change, often to yellow, happens because of the breakdown of the plastic. It’s like how paper turns yellow when it gets old and is exposed to light. The plastic molecules are changing.
They absorb and reflect light differently.
My Own Headlight Nightmare
I remember this one time, a few years back. I had a sedan, a great car, but the headlights were starting to look terrible. They were so foggy I could barely see the road marking at night.
It was a bit scary, honestly. I was driving on a country road one evening, and the fog on the lights made everything blurry. I felt a real surge of panic.
I’d seen those kits at the auto parts store, but I always thought they were too complicated. Or maybe they wouldn’t work on my car. I kept putting it off.
Then one rainy night, I was coming home, and I almost missed a deer that had darted out. That was it. I knew I had to do something right away.
The dim lights were a real danger.
Why Clear Headlights Matter
Safety First: Clear headlights improve visibility at night. This helps you see the road and avoid accidents. They also make your car more visible to others.
Car Appeal: Bright, clear lights make your car look newer and well-maintained. It boosts the car’s overall look.
Legal Issues: In many places, headlights that are too dim or hazy can be illegal. You might fail an inspection or get a ticket.
This experience really pushed me to learn how to fix them. I started reading everything I could find. I talked to mechanics.
I tried different methods. Some worked better than others. But I found a way that made a big difference without costing a fortune.
It felt really good to fix it myself.

The Step-by-Step Process to Clear Headlights
The good news is that you can often restore your headlights with simple tools and products. You don’t need a lot of special skills. The process basically involves removing the damaged outer layer of plastic and then protecting the new, clear surface.
Here’s what you’ll need:
- Masking tape (painter’s tape works best)
- Cleaning cloths or microfiber towels
- A mild soap or car wash solution
- Sandpaper (various grits, usually starting around 1000 and going up to 3000)
- A spray bottle with water
- A polishing compound or rubbing compound
- A sealant or clear coat (UV protectant)
Step 1: Clean the Headlights
First, wash the headlights thoroughly. Use your car wash soap and water. This removes any loose dirt and grime.
You want a clean surface to work on. Dry them completely with a clean cloth.
Step 2: Tape Off the Edges
This is super important. You need to protect the paint around the headlights. Use your masking tape.
Stick it carefully along the edges where the headlight meets the car’s body. Make sure you create a good seal. You don’t want to scratch your paint.
Why Taping Is Essential
Paint Protection: Sandpaper and compounds can damage your car’s paint. Tape creates a barrier.
Sharp Lines: It gives you a clean edge when you’re done. The restored headlight will look like it came that way.
Control: It helps you focus your work only on the headlight lens.
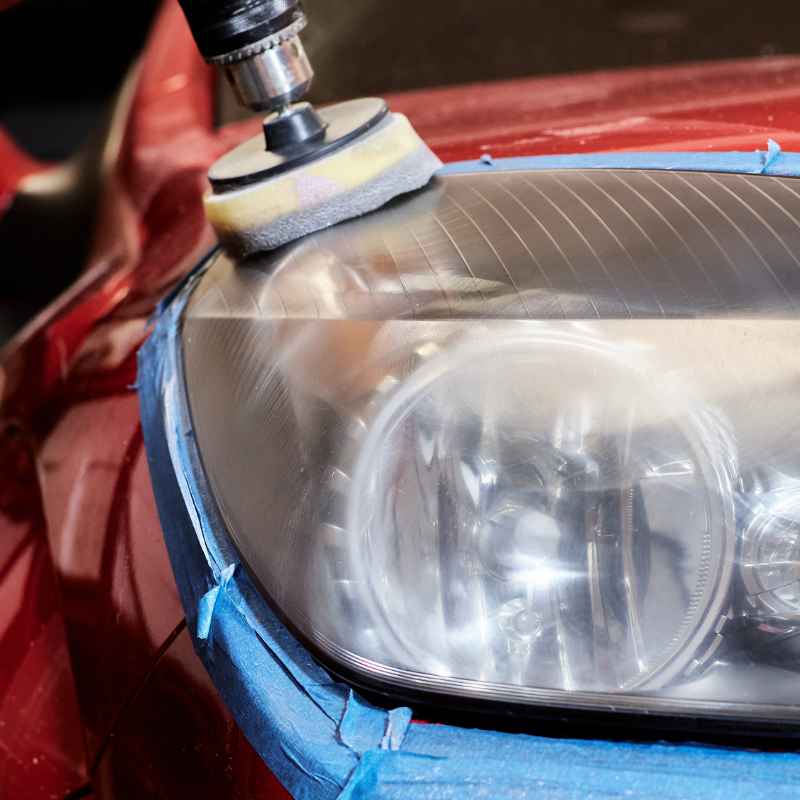
Step 3: Start Sanding (Wet Sanding)
This is where the magic begins. You’re going to remove that damaged, hazy layer. Start with your coarsest grit sandpaper.
For most kits, this is around 1000 grit. You’ll be doing what’s called wet sanding.
Dip the sandpaper in your spray bottle of water. Or, you can keep a steady stream of water running over the headlight as you sand. Sand in one direction.
For example, always sand horizontally. Apply gentle, even pressure.
The headlight will start to look milky or white. That’s good! You’re removing the oxidation.
Keep sanding until the entire surface is covered. Rinse the headlight and your sandpaper often. Then, switch to a finer grit sandpaper, like 1500 or 2000 grit.
Repeat the wet sanding process. Do the same for 3000 grit sandpaper.
Each finer grit will make the surface smoother. It will start to look clearer, but still a bit dull. Don’t worry, the next step brings back the shine.
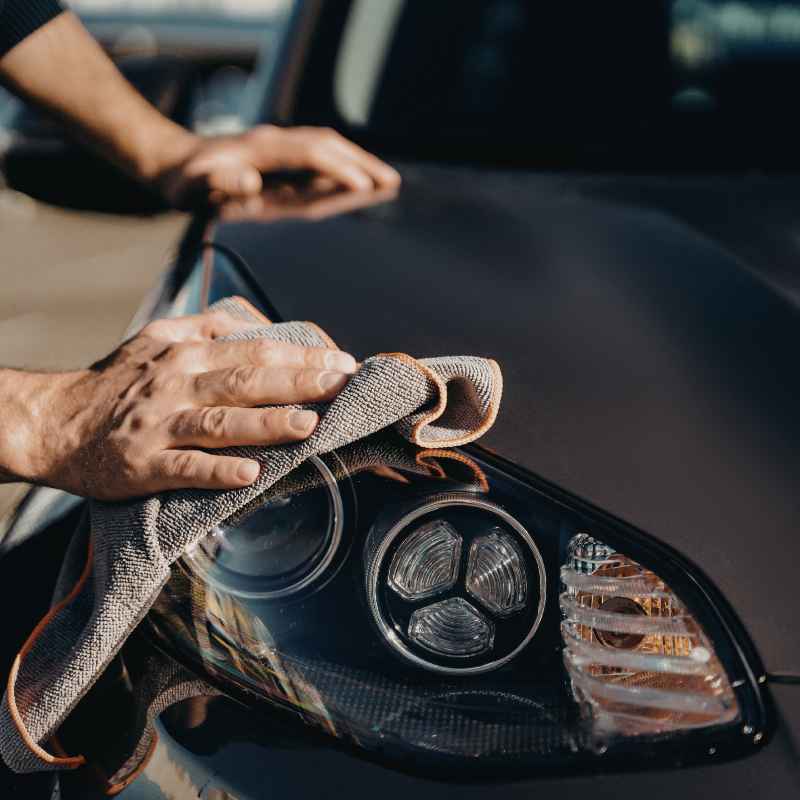
Step 4: Polish the Surface
Now it’s time to polish. This removes the fine scratches left by the sandpaper. It brings back the clarity.
Put a small amount of polishing compound or rubbing compound onto a clean cloth or a polishing pad. If you have a power buffer, even better, but a good cloth works too.
Rub the compound onto the headlight. Work in small sections. Use firm, circular motions.
You’ll see the plastic start to become shiny again. It might take a few minutes of polishing per headlight. You’re essentially buffing out the dullness.
Wipe away the excess compound with a clean cloth. You should start to see a big difference. The headlights will look much clearer than before.
Understanding Sandpaper Grits
Coarse (e.g., 1000 grit): Removes heavy oxidation and scratches. Makes the surface rough.
Medium (e.g., 1500-2000 grit): Smooths out the marks from the coarse grit. Reduces roughness.
Fine (e.g., 3000 grit): Creates a very smooth surface, ready for polishing. Removes fine scratches.
Key: Always move to a finer grit after sanding with a coarser one.
Step 5: Apply a UV Protectant Sealant
This is the most crucial step for long-term results. The plastic is now clear, but it’s unprotected. Without a new layer of protection, the sun will just damage it again quickly.
You need to apply a UV sealant or a clear coat specifically made for headlights.
Follow the product instructions carefully. Some sealants are a wipe-on formula. Others might require a few thin coats.
Apply it evenly. Make sure you cover the entire plastic lens. Let it cure properly.
This might take a few hours.
This sealant acts like a new sunscreen for your headlights. It will protect the clear plastic from the sun’s damaging rays. It also helps repel dirt and water, keeping them clearer for longer.
Exploring Different Types of Headlight Restoration Kits
You can buy pre-made headlight restoration kits. These are really handy. They usually contain everything you need.
This often includes the different grits of sandpaper, polishing compound, and a sealant.
Some kits are very basic. They might just have a compound and a sealant. Others are more advanced.
They might include special applicators or even instructions for using power tools. The effectiveness can vary based on the kit’s quality and your effort.
I’ve used a few different ones over the years. Some gave me amazing results that lasted over a year. Others were okay, but the haze came back faster.
The key seems to be the quality of the sealant applied at the end.
Common Kit Components
- Masking Tape: For protecting paint.
- Sandpaper: Usually a few grits (1000, 2000, 3000).
- Polishing Compound: To restore shine after sanding.
- UV Sealant/Clear Coat: The protective layer.
- Applicator Pads/Cloths: For applying products.
There are also DIY methods. Some people use toothpaste. Toothpaste has a mild abrasive.
It can sometimes help with very light haziness. But it’s usually not enough for moderate to severe oxidation. It also doesn’t offer any UV protection, so the haze returns quickly.
Another common household item people talk about is baking soda paste. Similar to toothpaste, it’s a mild abrasive. It can offer a very temporary fix.
It’s better to use products designed for headlight restoration for a lasting result.
For very bad cases, professional restoration might be an option. This is usually done by detail shops. They have specialized tools and products.
It costs more, but they can often achieve a near-perfect finish. They also ensure a good, long-lasting sealant is applied.
Real-World Scenarios: When to Restore
You’ll see headlight haziness appear in different situations. It depends on where you live and how you use your car.
Sunny Climates: If you live somewhere with intense sun, like Arizona or California, your headlights will likely get hazy faster. The UV rays are stronger and more constant. This happens even if you park in the shade.
Road exposure is constant.
Coastal Areas: Salt in the air and mist can also contribute to headlight degradation. The salt can act as an abrasive and degrade the protective coating.
High Mileage Drivers: If you drive a lot, your headlights are exposed to more sun, weather, and road debris. This means they will age faster. Even on a daily commute, the wear and tear adds up.
Factors Speeding Up Haze
- Constant Sun Exposure: UV rays are the main culprit.
- Harsh Weather: Rain, snow, hail, and extreme temperatures stress the plastic.
- Road Debris: Small rocks and sand can scratch the surface.
- Chemicals: Road salt, harsh car washes, or bug spray can damage coatings.
- Poor Quality Plastic: Some car manufacturers use less durable plastics.
Car Age: It’s natural for headlights to degrade over time. Most cars start showing signs of haziness after 5-10 years. However, some can develop it sooner.
The appearance of the haze can also vary. Sometimes it’s just a light cloudiness. Other times, the plastic turns very yellow and looks almost opaque.
The severity of the haze will tell you how much effort is needed.
What This Means for You and Your Driving
The biggest impact of hazy headlights is on your safety. Dim lights mean you can’t see as far ahead. This is dangerous on dark roads.
It makes it harder to react to sudden obstacles like animals or pedestrians.
Reduced visibility also means other drivers might not see you as well. This is especially true in twilight or poor weather conditions. This can increase the risk of accidents.
Clear headlights are not just about looks; they are a critical safety feature.
Beyond safety, there’s the aesthetic aspect. Clear headlights make your car look much better. They give it a refreshed appearance.
It’s like giving your car a mini-makeover. This can also help with resale value. A well-maintained car with clear lights is more attractive to buyers.
In some areas, police officers can issue tickets for headlights that are too dim or damaged. This is because they are considered a safety issue. You might also fail a vehicle inspection if your headlights aren’t up to standard.
Restoring them ensures you pass these checks.
Quick Checks for Your Headlights
- Shine a Light: Park your car and shine the headlights on a wall. See if the beam is bright and focused.
- Visual Inspection: Look closely at the plastic. Is it cloudy, yellow, or scratched?
- Night Drive: Pay attention during your night drives. Do you feel like you can’t see well enough?
- Compare: If possible, compare your headlights to a newer car of the same model.
Simple Tips for Keeping Your Headlights Clear Longer
Once you’ve restored your headlights, you’ll want to keep them looking good. There are a few simple things you can do:
Apply a Good Sealant: This is the most important step. Make sure the sealant you use offers strong UV protection. Reapply it every 6-12 months, depending on your climate and product.
Many kits come with a sealant you can reapply.
Wash Your Car Regularly: Gentle washing removes dirt and grime that can scratch or dull the plastic. Avoid automatic car washes with harsh brushes. If you use them, try to find ones that use cloth or touchless systems.
Use a Car Cover: If you park your car outside a lot, a good car cover can protect the headlights and paint from the sun’s UV rays. This is especially helpful in very sunny climates.
Be Careful with Pressure Washers: While handy, avoid spraying directly at the edges of the headlights at high pressure. This can sometimes force water or debris under the protective coating.
Avoid Harsh Chemicals: When cleaning your car, be mindful of the chemicals you use. Some strong degreasers or solvents can damage the plastic or the sealant. Stick to pH-neutral car wash soaps.
Maintenance Schedule
Initial Restoration: Once, when they are hazy.
Sealant Reapplication: Every 6-12 months.
Regular Washing: Every 1-2 weeks.
Deep Clean: As needed, with gentle products.
Frequently Asked Questions
How long does a headlight restoration typically last?
The lifespan of a headlight restoration can vary a lot. It depends on the products used, how well the sealant was applied, and your driving environment. A good restoration with a quality UV sealant can last anywhere from 6 months to 2 years.
Reapplying the sealant every 6-12 months will help them last longer.
Can I use regular car wax on my headlights after restoring them?
While car wax adds shine, it doesn’t offer the strong UV protection that a dedicated headlight sealant does. Regular wax will wear off very quickly and won’t protect the plastic from sun damage. It’s best to use a product specifically designed for headlight protection.
What’s the difference between a rubbing compound and a polishing compound?
Rubbing compound is more abrasive than polishing compound. Rubbing compound is used to remove deeper scratches and oxidation, similar to the coarser sandpaper. Polishing compound is finer and is used after sanding to bring back a smooth, clear shine.
For headlight restoration, you often use both, or a product that combines them.
My headlights are cracked. Can I restore them?
Headlight restoration kits are designed for plastic that is hazy or yellowed. If your headlights have large cracks or are physically broken, restoration won’t fix that. In such cases, you’ll likely need to replace the entire headlight assembly.
Small chips or hairline fractures might be sealed, but major damage requires replacement.
Is it worth buying a professional headlight restoration kit or should I try a DIY method?
Professional kits often contain higher-quality chemicals and sealants. They can provide better and longer-lasting results. However, a good quality DIY kit or carefully chosen individual products can also work very well if you follow the steps precisely.
The key is the quality of the UV sealant.
How often should I wash my car to maintain clear headlights?
Washing your car regularly is important. Aim for at least once every two weeks. This removes abrasive dust, dirt, and road grime that can dull or scratch the headlight lenses.
Use a gentle car wash soap and a soft cloth for the best results.
Conclusion
Seeing those foggy, yellowed headlights on your car can be a real bummer. But as we’ve explored, you have the power to bring them back to their clear, bright glory. It takes a little time and effort, but the results are incredibly rewarding.
You’ll gain safer driving at night and a car that looks so much better. Don’t let hazy headlights dim your drive any longer!