It’s a bummer when a car headlight is out. Especially the low beam. You might be driving at night.
Or in bad weather. Suddenly, one side is dark. This is not just annoying.
It can be unsafe too. You need both lights to see the road. And for others to see you.
Many drivers wonder why their car headlight won’t work on low beam. It’s a common problem. But there are simple answers.
And often, easy fixes. This guide will walk you through it. We will cover the main causes.
We’ll talk about how to check them. We’ll also share when it’s time for help.
The low beam on your car headlight might not be working due to a burnt-out bulb, a blown fuse, a faulty relay, or damaged wiring. Checking these components systematically can help pinpoint the issue.
Why Your Car Headlight Low Beam Isn’t Working
Headlights are vital for driving safely. Your car has two main beams. There’s the low beam.
This is for normal driving. It lights up the road ahead. But it doesn’t blind other drivers.
Then there’s the high beam. This is for when you need more light. It shines farther.
But you must turn it off for oncoming cars. Or cars in front of you.
When only the low beam on one side is out, it’s often a specific issue. It means the high beam might still work. Or the other headlight’s low beam is fine.
This helps narrow down the problem. It’s not usually a total electrical failure.
Let’s break down the common culprits. We’ll start with the simplest things. Then move to more complex checks.
Knowing these can save you time and money.
A Personal Story: The Night My Low Beam Went Out
I remember one night clearly. I was heading home from a friend’s house. It was a bit late.
The sky was dark. I noticed something felt off. I looked at my car’s dashboard.
No warning lights. But as I drove, I realized. The right headlight seemed… dim.
Then, it just went out completely. The high beam on that side still worked. But the normal driving light was gone.
My first thought was panic. Driving with one headlight is risky. I could get pulled over.
Worse, I might not see a hazard. I started to feel a knot of worry. What if it was something hard to fix?
I’m not a car expert. But I knew I had to figure it out quickly.
I pulled over safely. I popped the hood. I wasn’t sure where to even start.
The engine looked like a big, complex mess. I felt a bit lost. But I remembered seeing advice online.
Usually, it’s something simple. That thought gave me a little hope. I decided to tackle it step-by-step.
Headlight System Basics
Headlight Bulb: The part that makes light. Most cars use halogen or LED bulbs.
Fuse: A small safety device. It protects the electrical circuit. If too much power flows, it blows.
Relay: A switch. It uses a small electric current. It controls a larger one.
Like for the headlights.
Wiring: The “road” for electricity. It connects all parts.
Headlight Switch: The control on your dashboard. You turn it on there.
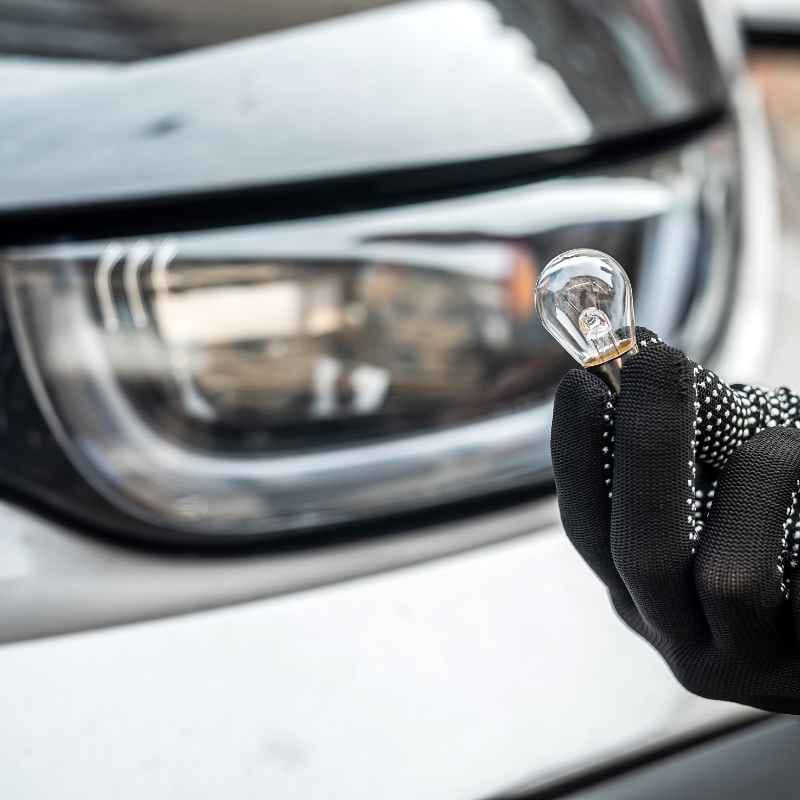
Checking the Most Likely Cause: The Bulb
The most common reason a headlight stops working is a burnt-out bulb. Bulbs don’t last forever. They get hot.
They vibrate. Over time, they wear out. Think of it like a light bulb in your house.
It will eventually stop glowing.
Your headlights have separate bulbs for low and high beams. Or, some bulbs have two filaments. One for low, one for high.
If the low beam filament burns out, that light is gone. But the high beam filament might still be okay. This explains why one beam works and the other doesn’t.
How to Check the Bulb:
- Identify the Bulb Type: Your car’s manual will tell you what kind of bulb you need.
- Access the Bulb: This is often the tricky part. Some cars make it easy. Others require removing parts. Like the battery or air filter. Again, check your manual.
- Remove the Old Bulb: Usually, there’s a clip or a twist-lock mechanism. Be gentle.
- Inspect the Bulb: Look at the filament inside. If it’s broken or looks melted, it’s bad.
- Install the New Bulb: Be very careful not to touch the glass part of a new halogen bulb. Oils from your fingers can cause it to overheat and break.
- Test: Put the new bulb in. Turn on your headlights. See if the low beam works.
Replacing a headlight bulb can be a DIY job. But sometimes it’s difficult. If you’re not comfortable, a mechanic can do it fast.
They have the tools and know-how.
Quick Bulb Check Steps
1. Safety First: Turn off your car. Let the engine cool.
2. Find Your Manual: It has bulb numbers and location tips.
3. Locate the Headlight Assembly: Look behind the headlight unit.
4. Remove Access Panel (if any): Some cars have a small cover.
5. Disconnect Wiring: Gently pull the electrical connector off.
6. Release Bulb Holder: Look for clips or a twist ring.
7. Replace Bulb: Use the correct new bulb. Don’t touch glass.
8. Reassemble and Test: Put everything back. Turn on lights.
Blown Fuses: The Silent Saboteur
Fuses are like the bodyguards of your car’s electrical system. They are small. They sit in a fuse box.
Each fuse protects a specific circuit. Like the headlights. If something goes wrong, like a short circuit or too much power, the fuse “blows.” This means the wire inside melts.
It breaks the circuit. It stops the flow of electricity.
Your car usually has a few fuse boxes. One is often under the dashboard. Another might be in the engine bay.
Your owner’s manual is your best friend here. It shows you where the fuse boxes are. It also labels each fuse.
How to Check Fuses:
- Find the Fuse Box: Check your manual for its location.
- Locate the Headlight Fuse: The manual will have a diagram. Look for the fuse for the low beams. It might be labeled “Head Lamp Low,” “LH Low,” or similar.
- Remove the Fuse: You can often pull them out with your fingers. Some cars come with a small fuse puller tool.
- Inspect the Fuse: Look closely at the metal wire inside the plastic body. If the wire is broken or looks burnt, the fuse is blown.
- Test: Install the new fuse. Turn on your headlights.
It’s common for a fuse to blow if there was a problem with the bulb. Or the wiring. If a new fuse blows right away, there’s a bigger issue.
That means the problem isn’t just the fuse. It could be a short in the wiring. Or a problem with the headlight switch or relay.
Fuse Box Quick Guide
Fuse Box Location: Usually under the dash or in the engine bay.
Fuse Puller: A small tool often provided with your car.
Amperage Rating: The number on the fuse. Match it exactly.
Visual Check: Look for a broken wire inside the fuse.
Replacement: Use a new fuse of the same rating. Never higher.
Faulty Relays: The Electrical Gatekeepers
Relays are like small, electrically controlled switches. They let a low-current circuit control a high-current circuit. For headlights, a relay is often used.
The headlight switch in your car uses a little bit of power. It tells the relay to close. When the relay closes, it sends a lot of power to the headlights.
If the relay fails, it won’t send power. Even if the switch is on. And the fuse is good.
And the bulb is good. Relays can fail over time. They have moving parts and electrical components.
These can wear out.
How to Check a Relay:
- Locate the Relay: Your car’s manual will show you where the headlight relay is. It’s often in the same fuse box area.
- Identify the Relay: It will be a small black box. It might be labeled “Headlight Relay.”
- Swap Test: The easiest way to test a relay is to swap it. Find another identical relay in the fuse box. One that controls something less important. Like fog lights (if you don’t use them). Or a horn relay. Swap them. Then test your headlights.
- Test Result: If the headlights now work, the original relay was bad. If the problem remains, the relay is likely not the issue.
Swapping relays is a smart trick. It lets you test a component without needing special tools. Just make sure the relays are the same type.
And the same amperage.
Relay Swap Explained
Find Identical Relays: Look for two relays that look exactly the same.
Identify Function: One is for headlights. The other is for something else.
Remove Both: Gently pull them straight out.
Swap Positions: Put the “other” relay in the headlight spot. Put the headlight relay in the other spot.
Test Headlights: Turn on your car and lights.
Interpret Results: If headlights work now, the original relay was bad. If not, the relay is likely fine.
Wiring Issues: The Hidden Problems
Sometimes, the problem isn’t the bulb, fuse, or relay. It’s the wires connecting them. Wires can get damaged.
They can rub against metal parts. They can get chewed by small animals. They can corrode over time, especially in wet climates.
A damaged wire can stop power from reaching the bulb. Or it can cause a short circuit. This can blow fuses.
Or damage other parts.
How to Check Wiring:
- Visual Inspection: Look at the wiring harness that goes to the headlight. Follow it as far as you can. Look for any obvious damage. Like frayed insulation, cuts, or melted spots.
- Check Connections: Make sure the connector to the headlight bulb is clean and tight. Ensure it’s not corroded.
- Wiggle Test: With the car on (and a helper to watch the light), gently wiggle the wiring. See if the light flickers or comes on. This can indicate a loose connection or a break. Be very careful doing this.
Wiring problems can be the hardest to diagnose. They often require a multimeter. This tool measures voltage.
It helps trace the electrical path. If you find damaged wiring, you might need to repair or replace the harness. This is often best left to a professional.
Wiring Inspection Tips
Follow the Path: Trace wires from the headlight to the fuse box.
Look for Abrasion: Wires rubbing on metal can break.
Check for Rodent Damage: Chewed wires are a common problem.
Inspect Connectors: Make sure they are clean and fit snugly.
Beware of Corrosion: Green or white powdery stuff means bad connections.
Headlight Switch or Body Control Module (BCM)
Less often, the problem could be with the headlight switch itself. This is the knob or lever you use to turn on your lights. If the internal contacts in the switch get dirty or worn, they might not send power correctly.
Especially to the low beam circuit.
In modern cars, many functions are controlled by a Body Control Module (BCM). This is a computer. It manages things like lights, wipers, and locks.
If the BCM has a software glitch or a hardware failure related to the headlight circuit, it could cause issues. This is a more complex fix.
How to Check:
- Headlight Switch: Sometimes, wiggling the switch can help. If the lights flicker on and off as you move the switch, it might be the issue. Replacement is usually required.
- BCM: Diagnosing a BCM problem usually needs a professional scan tool. It can read error codes. It can test the module’s functions. This is not a DIY repair for most people.
When to Suspect the Switch or BCM
Intermittent Light Issues: If lights come on and off randomly.
Multiple Electrical Glitches: Other car features acting strange too.
No Power to Headlight Circuit: Even with good bulb, fuse, and relay.
Warning Lights: Specific BCM error codes on the dashboard.
Real-World Scenarios and Context
Let’s think about where and why this happens. Headlights are exposed to the elements. Rain, snow, road salt, and debris can all take a toll.
This is why corrosion and physical damage to wiring are common.
In colder climates, the constant freeze-thaw cycles can make plastic brittle. This affects headlight housings and wiring insulation. Road salt can accelerate corrosion on electrical connectors.
This can lead to poor conductivity.
Some cars have complex headlight designs. Integrated LED systems or advanced HID (High-Intensity Discharge) lights have different failure points than simple halogen bulbs. These might have ballasts or control modules that can fail.
User behavior also matters. Constantly driving with high beams on can overheat certain components. Or lead to premature bulb wear if the high beam filament is used excessively.
However, for low beam issues specifically, it’s more about the component’s lifespan and the environment it operates in.
Environmental Factors Affecting Headlights
Moisture: Can cause corrosion on connectors and inside the housing.
Road Salt: Highly corrosive, speeds up electrical contact degradation.
Temperature Extremes: Heat can degrade wiring insulation. Cold can make it brittle.
Vibration: From driving on rough roads, can loosen connections or break filaments.
Impacts: Small stones or debris can damage the headlight lens or housing.
What This Means for You: When to Worry
A burnt-out bulb is usually a minor inconvenience. A blown fuse is also often a quick fix. These are the most common scenarios.
And they are generally safe to address yourself or with minimal help.
You should start to worry more if:
- New Fuse Blows Immediately: This indicates a short circuit or a more serious electrical problem.
- Multiple Headlight Issues: If both low beams go out, or high beams also fail, it points to a bigger system problem.
- Wiring Damage is Visible: Frayed, melted, or chewed wires require careful attention.
- No Power Detected: If you’ve checked the bulb and fuse, and there’s still no power to the headlight connector, the issue might be deeper (relay, switch, BCM).
- You’re Uncomfortable: Working with car electrical systems can be tricky. If you’re not sure, it’s always safer to ask a professional.
For many drivers, the goal is safe and reliable transportation. Knowing when a problem is simple versus complex helps you decide how to proceed. Don’t hesitate to seek help if you’re unsure.
Simple Checks to Perform
1. Check the Bulb: Is it burnt out?
2. Check the Fuse: Is it blown?
3. Check Connections: Are wires securely plugged in?
4. Consult Your Manual: It’s the best guide for your specific car.
Quick Fixes and Helpful Tips
When dealing with a non-working low beam, remember these tips:
- Always Use the Right Bulb: Check your owner’s manual for the exact type and wattage. Using the wrong bulb can damage your car’s electrical system or not fit properly.
- Handle New Bulbs Carefully: For halogen bulbs, avoid touching the glass. Use a clean cloth or gloves.
- Keep Spare Fuses: It’s a good idea to keep a small assortment of common fuses in your glove box.
- Invest in a Fuse Puller: They make removing tight fuses much easier and safer for your fingers.
- Don’t Ignore Warning Lights: If your car’s dashboard lights up, pay attention to it.
- Consider LED Upgrades: Many cars can be upgraded to LED headlights. They last much longer. They offer brighter light. Check local laws about LED conversions.
- Clean Headlight Lenses: Over time, lenses can become cloudy. This reduces light output. A headlight restoration kit can help.
Pro-Tip: Brightness Matters
Halogen Bulbs: Offer good brightness but have a shorter lifespan (around 500-1000 hours).
LED Bulbs: Last much longer (20,000+ hours). They are more energy-efficient and brighter.
HID Bulbs: Very bright, also long-lasting. Require a ballast to ignite.
Correct Beam Pattern: Ensure your new bulbs are aimed correctly. Poor aiming can cause glare or insufficient light.
Frequent Questions About Headlight Low Beams
Why does only one headlight low beam work?
This usually means the bulb for that specific low beam has burnt out. Or, the fuse or relay for that side’s low beam has failed. In most cars, each headlight has its own circuit for the low beam.
Can I drive with one headlight out?
It is illegal in most places to drive with a burnt-out headlight. It significantly reduces your visibility. It also makes it harder for other drivers to see you.
It’s best to fix it as soon as possible.
How long does a headlight bulb last?
Halogen headlight bulbs typically last between 500 and 1,000 hours of use. This can vary based on driving conditions and bulb quality. LED headlights last much longer, often tens of thousands of hours.
What is the difference between low beam and high beam?
The low beam is designed for normal driving. It illuminates the road ahead without blinding oncoming drivers. The high beam shines farther and brighter but should only be used when there are no other cars around.
My headlight bulb looks okay, but the low beam is still out. What else could it be?
If the bulb appears intact, check the fuse and the relay for that headlight. Wiring issues or a faulty headlight switch are also possibilities. A professional diagnosis might be needed.
How do I know if I have a bad headlight switch?
If your headlights are intermittent, flicker, or only work when you jiggle the switch, the switch might be failing. Sometimes, other dashboard lights or functions controlled by the switch may also act up.
Should I upgrade to LED headlights?
Upgrading to LED headlights can provide better visibility and a longer lifespan. However, ensure you purchase quality LEDs designed for your vehicle. Poorly designed LEDs can cause glare or light scattering, which is unsafe.
Conclusion
A car headlight not working on low beam is a common issue. It often boils down to a few key things. A burnt-out bulb is the most frequent cause.
But blown fuses, faulty relays, and wiring problems are also strong contenders. By following a step-by-step approach, you can often pinpoint the cause.
Remember to consult your car’s manual. It’s packed with specific information for your vehicle. Safety first.
If you’re unsure about any step, it’s always wise to ask for professional help. Keeping your headlights in good working order is crucial for safe driving.