How to Replace a Car Light Bulb Safely
Check the owner’s manual, switch the lights off, and disconnect the battery only if the manual calls for it or the housing sits close to live wiring and the connector is hard to isolate. Replace the bulb only with the type and wattage specified for the vehicle. A rushed swap can crack a brittle housing, blow a fuse, or leave you with a new bulb that still does not light. This guide covers safe removal and installation, plus a step-by-step check of fuses, connectors, grounds, sockets, and module faults when the new bulb fails.
What you’ll need


- Owner’s manual or bulb chart with the exact lamp position and bulb code
- Correct replacement bulb for that position: headlight, taillight, brake light, or turn signal
- Protective gloves for halogen bulbs and better grip on small parts
- Flashlight
- Trim tool or a small screwdriver for clips, dust caps, or access panels
- Dielectric grease only if the vehicle maker allows it for the connector
- Clean cloth and a safe place to set removed fasteners
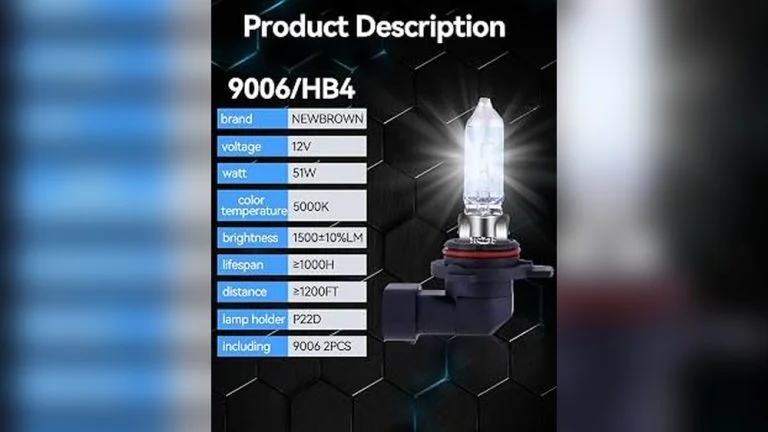
Match the bulb to the lamp position before opening anything. Headlight bulbs, rear lamp bulbs, brake lights, and turn signals can use different bases and connector styles, and halogen, LED, and HID bulbs do not always install the same way.
How do you prepare the car safely?
Turn the vehicle off, switch the lights off, and let the lamp cool before touching the housing. Disconnect the battery only if the manual calls for it or if the connector is hard to isolate near exposed wiring.
Prepare the work area
- Park on level ground and set the parking brake.
- Turn the ignition off and remove the key or switch the fob away from the car.
- Switch the lamp off at the stalk or dash.
- Wait for the lamp to cool fully before reaching behind the housing.
- Wear gloves before touching a halogen bulb or any brittle trim.
Confirm the exact bulb
Read the bulb chart in the owner’s manual or on the lamp cover, not just the old bulb. The chart should give the exact specification, lamp location, and any procedure notes such as a twist-lock socket, retaining clip, or separate access panel.
How do you reach the bulb housing?
Follow the access path built into your vehicle. Many headlight bulbs sit behind a dust cap under the hood. Rear lamps may be reached through the trunk or hatch trim. Some front lamps require a wheel-well liner or a small service opening.
Headlight back access
Open the hood and find the rear of the headlamp housing. Look for a dust cap, a twist-lock socket, or a metal retaining clip. If the space is cramped, move only the nearby trim the manual allows.
Trunk or tail lamp access
Open the trunk or tailgate and remove the access panel or trim cover that lines up with the lamp. Rear lamp assemblies often use a small bulb holder that twists out from the back of the housing.
Wheel-well or liner access
Turn the steering wheel for more space, then remove only the liner fasteners the manual identifies. This route is common on some headlight and side-marker bulbs, but it can hide sharp edges and brittle clips.
How to remove the old bulb
Release the cap or clip first, then unplug the connector straight back. Do not twist or pry the bulb base unless the design is a twist-lock socket. If the bulb shatters, stop and remove all fragments before installing the replacement.
- Remove the dust cap, bulb cover, or access panel.
- Unclip the retaining spring or rotate the twist-lock socket as designed.
- Press the connector locking tab and pull the connector off squarely.
- Lift the bulb straight out without forcing the base.
- If glass breaks, use gloves and eye protection, then clear fragments from the housing before proceeding.
Remove a broken bulb safely
Suppose a halogen bulb snaps while you are pulling it from the socket. Do not shake the housing or push the shards deeper. Pick out loose glass with gloved fingers or nonmetallic tools, then inspect the socket and connector for heat damage before fitting a new bulb.
How to install the new bulb
Install the replacement only after you confirm the base, connector style, and lamp position match the removed part. Halogen bulbs need clean glass and a secure seat. LED replacement bulbs can need a specific polarity or driver module. HID capsules should be handled with extra care because the system uses high voltage.
Seat the bulb without force
- Line up the locating tabs with the socket or housing slots.
- Insert the bulb straight in until it seats fully.
- Reattach the retaining clip or twist-lock socket.
- Reconnect the electrical plug until the locking tab clicks.
- Refit the dust cap or access cover so the seal sits flat.
Check the connector and seal
Inspect the electrical connector for corrosion, burn marks, and a loose or broken locking tab. Check the gasket or cap seal for cracks, flattening, or dirt that could admit moisture. A bulb that is installed correctly can still fail if the connector is loose or the housing takes on water.
How do you test the light after replacement?
Test the lamp right after reassembly. Run the low beam or high beam if you replaced a headlight, then check turn signal, brake light, or tail lamp function for rear bulbs. Watch the dash for a warning symbol or bulb-out message.
Run the function check
- Switch the lamp on from the driver’s seat.
- Check the replaced bulb and the matching side if the vehicle uses paired lamps.
- Activate the turn signal or press the brake pedal if that was the bulb you changed.
- Look for flicker, dim output, or delayed ignition.
- Confirm the dash warning clears or does not appear.
A common first-timer mistake is fitting a rear brake bulb, closing the trunk, and only then discovering the connector was not latched. The fix is simple if the lamp was just installed: reopen the access panel, reseat the plug, and repeat the brake-light check before reassembling trim.
Bulb troubleshooting checklist

If the new bulb still does not work, move from the most visible problem to the more hidden one. This checklist covers the failures that most often survive a bulb swap.
| Symptom | Likely cause | Safe next step | Stop/seek-help threshold |
|---|---|---|---|
| New bulb does not light at all | Wrong bulb base or wrong connector style | Compare the old bulb and the manual’s bulb code; confirm the locating tabs and plug shape match | Stop if the housing design does not match the replacement bulb or the socket will not accept the base without force |
| Bulb shattered during removal | Brittle glass or seized socket | Remove all glass fragments, then inspect the socket and housing for damage before retrying | Stop if shards are stuck in a deep socket or the housing is cracked |
| Light flickers or cuts out | Corroded socket pins | Check the pins for green or white corrosion, clean only if the maker allows it, and reseat the connector firmly | Stop if the pins are pitted, loose, or heat-damaged |
| Connector feels soft, discolored, or smells burnt | Melted connector | Do not force the plug; inspect for heat damage and replace the connector or lamp pigtail as required | Stop if plastic has deformed, the latch will not hold, or wiring insulation is damaged |
| Bulb will not lock into place | Wrong bulb base | Compare the base profile and tab spacing with the manual, then obtain the exact part | Stop if the bulb only fits when pushed or twisted against the housing |
| Condensation or water inside the lamp | Moisture in the housing | Check the cap gasket, housing seam, and drain path; dry the lamp and correct the seal before reassembly | Stop if the housing has standing water or a cracked lens |
Common mistakes
Touching halogen glass leaves oil spots that can shorten bulb life. Forcing a mismatched base can crack the housing or bend the retaining clip. Reusing a damaged cap seal invites moisture, and a wet lamp can fail again even after a new bulb is installed.
When to stop and get help
Hand the job to a shop if the access is too tight to reach without prying, the socket is seized, the connector is melted, or the housing is cracked. That is often the case on vehicles with HID systems, module-controlled LED lamps, or rear assemblies that require bumper or trim removal.
Say your headlight uses a dust cap behind the battery tray and the retaining clip will not move with light finger pressure. Stop there. A shop can remove nearby parts without cracking the housing, and that is safer than forcing a clip that already feels bound.
Prevention
Keep the correct bulb code in the glove box and replace bulbs in pairs only when the manual recommends it. Matching the part number and rechecking the cap seal after every install reduces repeat failures from heat, moisture, and loose connectors.
Frequently asked questions
Where to get car light bulb changed?
Use a dealer, an independent repair shop, or a tire and service center if the access is tight, the connector is damaged, or the lamp assembly must come apart to reach the bulb. Bring the VIN or bulb chart so the shop can match the exact part.
Products related to this article
Sponsored / affiliate links. As an Amazon Associate I earn from qualifying purchases. I may earn additional commission from eligible campaigns.