How to Diagnose a Blown Car Light Fuse
A blown car light fuse is confirmed when the fuse is open or has no power on one side; if the fuse is intact, trace the feed, relay, ground, or connector. Guessing wrong can waste time, pop another fuse, or send you replacing parts that were never faulty. This guide gives a simple decision tree to separate a bad fuse from a bad feed, relay, ground, or corroded connector before you replace anything.
Car light fuse basics


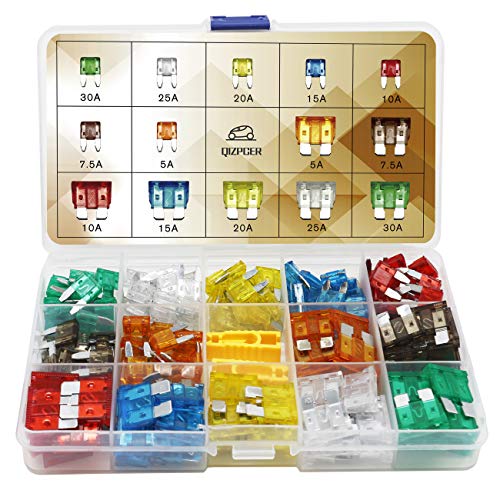
An automotive blade fuse typically has a plastic body with two metal prongs and a thin internal link. It protects vehicle wiring from overcurrent and short-circuiting, so a failed light circuit usually means the fuse opened for a reason. Replace it with the same amperage rating printed on the fuse.
A blown fuse can take out interior lights, the radio, indicators, or climate control. A car may have multiple fuse boxes, sometimes as many as four, and they may be under the hood, under the dash, in the glovebox, under the back seats, or in the boot. The cover often carries a diagram or legend.
What you’ll need
- Owner’s manual
- Test light with a grounding clamp and probe
- Fuse puller, often stored in the fuse box
- Needle-nose pliers as a backup
- Replacement fuse with the same amperage rating
- Flashlight
- Clean metal point for grounding
How to tell if the fuse is blown
The quickest check is a visual inspection plus a power test. A good fuse has an unbroken thin metal wire inside, while a broken or two-piece wire means it has blown. A fuse can also look fine and still fail electrically, so do not stop at appearance.
-
Find the correct fuse. Use the owner’s manual and the fuse-box legend to identify the exact light circuit. If the vehicle has several fuse boxes, check each one listed for that circuit before you pull anything.
-
Inspect the fuse body. Pull the fuse with the fuse puller or needle-nose pliers. Look for a broken internal strip, darkened plastic, or a gap in the metal link. If the link is open, the fuse is blown.
-
Confirm with power. Keep the key in KOEO (ignition on, engine off) if that circuit needs power to test. Probe both test points on the top of the fuse with a grounded test light; a working fuse lights on both sides. One-sided power points to a blown fuse.
Say your dome light is dead after the car sits in the driveway. If the fuse box diagram shows that dome light circuit on a 10-amp blade fuse, a lit test light on only one side of the fuse means the fuse is open, not that the bulb is automatically bad.
How to test the fuse and circuit
Use the test light to sort out three different problems: a blown fuse, no feed to the fuse, or a fuse that is fine while the fault sits downstream. A test light is usually grounded to the battery negative terminal, a bolt, or unpainted metal. You do not need to remove the fuse to test it.
-
Ground the test light. Clip the lead to battery negative or a clean metal bolt. A poor ground can mimic a dead circuit, so make the connection first.
-
Probe both fuse holes. Touch the probe to each test point on the top of the installed fuse with the circuit live. A working fuse lights on both sides. If only one side lights, the fuse is blown.
-
Check for feed loss. If the test light does not light on either side, the fuse may be good and the problem may be upstream. That points to a bad feed, relay, switch, or another power supply issue rather than the fuse itself.
Suppose the parking lights fail only when the headlights are on. If the fuse tests good and both sides light, the next check is the relay and the connector at the lamp or module, not a larger replacement fuse.
Car light fuse decision table
This table separates the most common test results from the next check. Use it before replacing the fuse a second time.
| Symptom | Test result | Likely cause | Next check |
|---|---|---|---|
| One-sided power at the fuse | Test light lights on one hole only | Blown fuse | Replace with a fuse that has the same amperage rating exactly and recheck the circuit |
| No power on either side | Test light stays dark on both holes | No feed, failed relay, switch issue, or wrong fuse slot | Check the fuse designation in the owner’s manual and inspect the upstream feed |
| Fuse visibly broken | Open or two-piece internal strip | Blown fuse | Replace it and watch for repeat failure |
| Fuse intact but light still dead | Fuse tests good on both sides | Bad ground, corroded connector, damaged lamp socket, or module fault | Trace the load side of the circuit to the lamp or module connector |
| Fuse blows immediately after replacement | New fuse opens at once | Shorted wire, shorted component, wrong fuse rating, or pinched harness | Inspect the harness, connector, and lamp socket before another fuse goes in |
| Intermittent failure after rain or vibration | Works, then stops when wet or shaken | Water intrusion, loose terminal, corroded connector, or damaged ground | Inspect seals, connectors, and ground points for green corrosion or looseness |
How to replace the fuse correctly
Replace the fuse only after confirming it is on the correct circuit and the fault is not upstream. The new fuse must match the original amperage rating exactly. Do not install a higher amperage fuse, and do not force the wrong physical size into the slot.
-
Match the rating. Read the amperage on the old fuse and buy the same value. Blade, maxi, and specialty fuses can differ in size and fit even when they look similar.
-
Seat the fuse fully. Push it into the correct slot until it sits flush. A half-seated fuse can create an intermittent contact that looks like a wiring fault.
-
Retest the circuit. Turn the key to KOEO if needed and verify the light works. If the replacement blows again, stop and look for a shorted wire, bad component, or corroded connector.
Common mistakes
- Checking the wrong fuse box when the vehicle has multiple boxes.
- Using a fuse diagram from memory instead of the owner’s manual.
- Assuming a fuse is good because it looks intact.
- Replacing a blown fuse with the wrong amperage rating.
- Skipping the relay, feed, ground, or connector when the fuse tests good.
- Ignoring rain-related or vibration-related faults that point to corrosion or a loose terminal.
- Using pliers that deform the fuse or loosen the terminals.
A common first-timer mistake is replacing a 10-amp fuse with a 15-amp fuse because the slot is empty and the light is out. That may hide the fault for a moment, then damage wiring if the circuit still has a short.
If that didn’t work, try this next
If the fuse is good and the light still does not work, move away from the fuse box and test the rest of the circuit in order. The goal is to separate a bad feed from a bad load, then narrow the fault to a relay, ground, connector, or harness damage.
-
Check the relay. Find the relay identified in the fuse-box legend and swap it only with an identical relay used for the same type of circuit. If the problem follows the relay, replace that relay with the same part type.
-
Inspect the ground. Look for a loose or corroded ground point near the lamp or module. Clean only approved ground points to bare metal, then tighten the fastener so the terminal cannot move.
-
Trace the connector. Unplug the lamp or module connector and look for green corrosion, heat damage, or pushed-back pins. Repair the damaged terminal before fitting another fuse, or the same fault may return.
Picture a tail light that fails only after driving through heavy rain. If the fuse stays good, the next suspect is water entry at the lamp connector or a ground point under the body, not the fuse itself.
Frequently asked questions
How to check fuses in a car
Start with the owner’s manual, then open the fuse box cover and read the diagram or legend. Test only the circuit you are diagnosing. Some vehicles have multiple fuse boxes, so check every listed location before you replace anything.
Products related to this article
Sponsored / affiliate links. As an Amazon Associate I earn from qualifying purchases. I may earn additional commission from eligible campaigns.