How to Check Car Brake Fluid Level in Under 5 Minutes
Anyone who owns or operates a vehicle knows how vital a well-functioning brake system is for safety. Yet, brake fluid—a crucial component—often goes overlooked until a warning light appears or, worse, braking performance deteriorates. Ignoring brake fluid checks can lead to reduced braking efficiency, increased stopping distances, and even catastrophic brake failure. Fortunately, checking your car’s brake fluid level is a task you can perform in under five minutes, requiring no specialized tools or prior automotive experience. This simple maintenance habit can prevent costly repairs, support consistent performance, and, most importantly, keep you and your passengers safe.
In this comprehensive guide, you’ll learn exactly how to check your brake fluid level in five quick steps, what to look for, and how to spot warning signs before they become major issues. Backed by expert advice, real-world examples, and actionable tips, this article is designed for everyone—from first-time drivers to seasoned car enthusiasts.
Whether you’re preparing for a long road trip, responding to dashboard alerts, or simply aiming for proactive vehicle care, you’ll find all the information you need right here.
Key Takeaways
- Checking brake fluid is quick, easy, and essential for safe driving—most people can do it in under five minutes.
- Locate, inspect, and interpret your brake fluid reservoir using clear visual cues and your owner’s manual.
- Low or contaminated brake fluid can lead to reduced braking power or even brake failure.
- Learn to identify common issues and when to seek professional help versus handling simple maintenance yourself.
- Regular checks can extend the life of your braking system and help you avoid costly repairs.
- This guide features real-world examples, actionable tips, and data-driven comparisons for the most effective DIY brake fluid checks.

Credit: www.prestoneuk.com
Why Checking Brake Fluid Matters
The Role Of Brake Fluid In Vehicle Safety
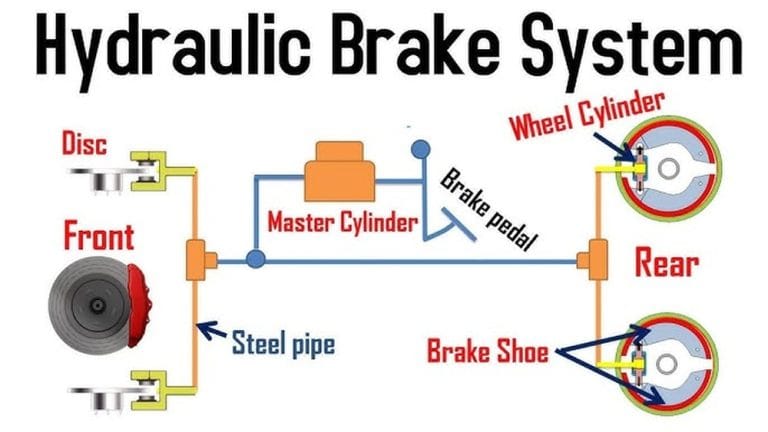
Brake fluid is a hydraulic fluid that transfers force from your brake pedal to the brake calipers, enabling your car to stop efficiently. Without the proper fluid level or quality, the braking system can’t function as designed, putting everyone on the road at risk. According to the National Highway Traffic Safety Administration (NHTSA), brake issues are a leading cause of vehicle accidents, with fluid neglect being a preventable factor.
Hydraulic brake systems rely on brake fluid’s incompressibility to ensure that when you press the pedal, the force is instantly transmitted to the brakes. If air or moisture enters the system, the fluid becomes compressible, leading to a spongy pedal and diminished stopping power.
Brake fluid also lubricates internal components and helps prevent corrosion, further reinforcing its importance.
Consequences Of Low Or Contaminated Brake Fluid
Failing to check or replace brake fluid can result in:
- Reduced braking efficiency: Spongy pedal feel or increased stopping distance. Even a small drop in fluid level can significantly affect braking response, especially in emergency situations.
- Brake failure: In extreme cases, total loss of braking ability. This is especially dangerous during high-speed driving or on steep descents.
- Corrosion: Moisture buildup leads to rust inside the brake lines and components. Corroded brake lines can rupture, causing sudden loss of fluid and braking power.
- Expensive repairs: Damaged master cylinders or ABS systems can cost hundreds or thousands of dollars. A contaminated system might require full replacement of components rather than a simple flush.
Contaminated brake fluid can also damage the rubber seals and hoses in your braking system, leading to leaks and further mechanical issues. These problems often progress silently, with no obvious symptoms until an emergency arises.
How Often Should You Check Brake Fluid?
Experts recommend checking your brake fluid every 3 months or at each oil change, whichever comes first. However, always check your owner’s manual for manufacturer-specific guidelines.
For vehicles used in harsh conditions (extreme heat, cold, or humidity), or those with high mileage, more frequent checks are advisable. Seasonal transitions can also affect fluid condition, as temperature changes may cause condensation within the system.
Example: Real-world Impact
Consider a case where a driver in Chicago experienced a sudden loss of braking power during winter. Upon inspection, a mechanic discovered the brake fluid reservoir was nearly empty due to a slow leak. Regular five-minute checks could have prevented a hazardous situation and a $900 repair bill.
Winter conditions exacerbate brake fluid issues, as freezing temperatures can cause seals to shrink and leaks to worsen. Additionally, road salt and moisture increase the risk of corrosion in brake lines.
External Resources For Further Reading
For additional insights on brake fluid importance, visit the NHTSA Official Website.
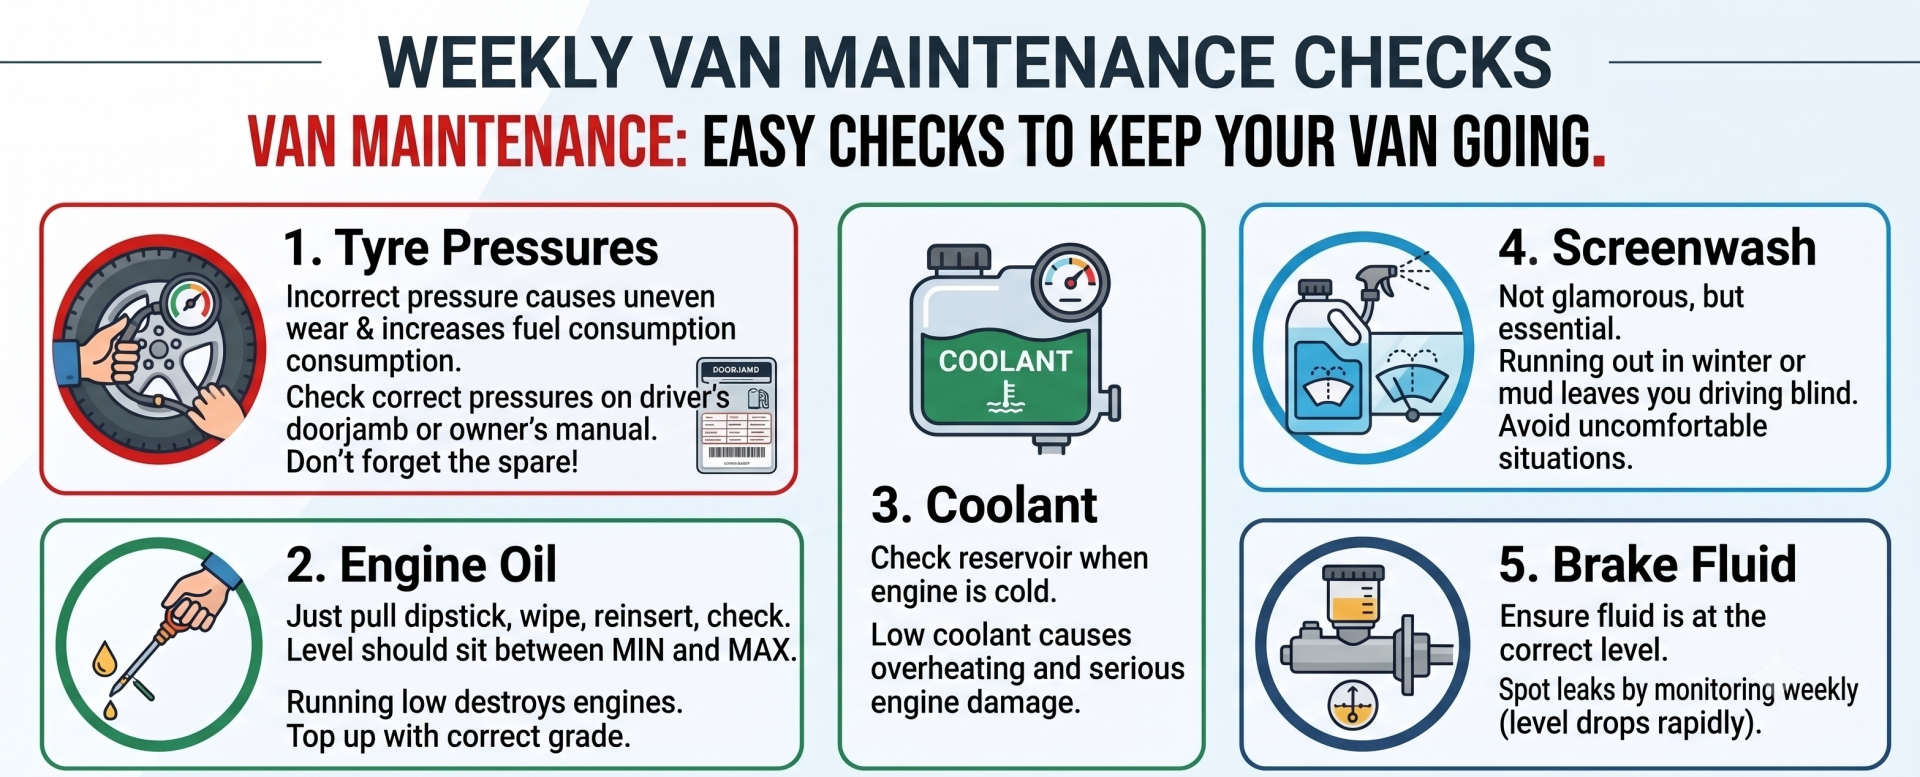
Credit: www.loadsofvans.com
The 5-step Process: How To Check Car Brake Fluid Level In Under 5 Minutes
Performing a brake fluid check is straightforward. Here’s a step-by-step breakdown:
Step 1: Prepare Your Vehicle And Gather Supplies
- Park your car on a level surface and turn off the engine.
- Allow the engine to cool for a few minutes to avoid burns.
- Open the hood using the interior release lever and secure it with the prop rod.
- Have a clean cloth or towel handy.
Pro Tip: Wear disposable gloves to avoid skin contact with brake fluid, which can be irritating.
For additional safety, ensure your car is in “Park” (automatic transmission) or in gear with the parking brake engaged (manual). If you’re working outdoors, avoid windy or rainy conditions to prevent contamination.
Step 2: Locate The Brake Fluid Reservoir
The brake fluid reservoir is typically found:
- Near the back of the engine bay, above the brake pedal on the driver’s side.
- Marked with “Brake Fluid” or a similar label on the cap.
- Refer to your owner’s manual for an exact diagram.
Some vehicles, especially older models, may have reservoirs with metal bodies and screw-on caps, while modern cars feature translucent plastic containers for easy inspection. Always double-check the labeling, as confusing the brake fluid reservoir with those for coolant or windshield washer fluid can cause severe damage.
Example: On a 2017 Honda Accord, the reservoir is a translucent plastic container with a black cap labeled “DOT 3 Only.”
Step 3: Assess The Fluid Level
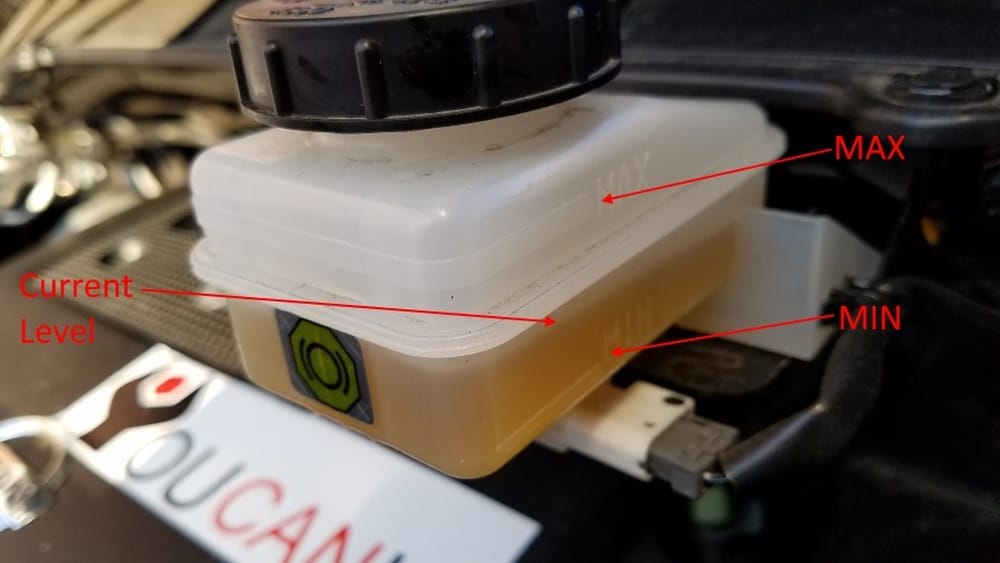
- Visually inspect the side of the reservoir.
- Look for “MIN” and “MAX” lines or indicators.
- The fluid should be between these marks.
If the fluid is below the “MIN” line, it’s time to take action.
Some reservoirs may have a sensor or float mechanism that triggers a warning light if fluid levels drop too low. However, visual checks are still important, as sensors can fail or provide inaccurate readings. For vehicles with poor visibility, use a flashlight to illuminate the reservoir.
Step 4: Evaluate Fluid Condition
- Examine the color and clarity through the plastic reservoir.
- Healthy fluid: Clear or light amber.
- Contaminated fluid: Dark brown, black, or cloudy.
Over time, brake fluid absorbs moisture, which can turn the fluid cloudy or milky. Debris, rust flakes, or a burnt smell are clear signs of internal damage or severe contamination.
Comparison Table: Brake Fluid Color and What It Means
| Fluid Color | Condition | Recommended Action |
|---|---|---|
| Clear/Light Amber | Good | No action needed |
| Yellow/Brown | Aging | Plan to replace soon |
| Dark Brown/Black | Contaminated | Replace immediately |
| Cloudy/Milky | Water-contaminated | Flush system |
Some vehicles may use DOT 4 fluid, which starts as a slightly darker amber than DOT 3. Always compare against what’s normal for your vehicle.
Step 5: Re-seal And Clean Up
- Ensure the reservoir cap is tightly closed.
- Wipe any spilled fluid immediately, as brake fluid can damage paint.
- Close the hood securely.
Brake fluid’s corrosive properties mean that even a small spill can cause paint to bubble or peel. After cleaning, dispose of any used towels or gloves responsibly.
Real-world Example: Diy Success
A New York commuter noticed a firmer brake pedal after topping off low brake fluid during a routine check. This quick action prevented a more expensive ABS repair.
Routine checks can also help identify trends, such as gradual fluid loss, which may signal worn pads or slow leaks. Keeping a log of fluid checks is beneficial for long-term vehicle health.
Additional Resource
For more on brake system maintenance, check the Carfax Brake Fluid Guide.
Interpreting Results: What Your Brake Fluid Level Tells You
When Fluid Is At The Correct Level
If your brake fluid is at the recommended level and appears clear, your system is likely in good condition. Continue to monitor regularly.
Consistent fluid levels over time indicate a sealed, healthy system. If you notice only minor drops in fluid after brake pad replacements, this is normal and expected.
When Fluid Is Low
Common causes for low brake fluid:
- Worn brake pads: As pads wear, caliper pistons extend further, reducing fluid in the reservoir.
- Leaks: Check for wet spots under the car or around brake lines.
- Recent brake work: Some fluid loss is normal after repairs or bleeding brakes.
Action: Top off with the correct fluid type if the level is just below “MIN” and no leaks are found. Always use the type specified in your owner’s manual (e.g., DOT 3, DOT 4).
If fluid levels drop rapidly or you notice puddles under your car, refrain from driving and seek immediate repairs. Leaks often occur at connection points, such as the master cylinder, calipers, or brake hoses.
When Fluid Is Discolored Or Contaminated
Contaminated fluid reduces braking performance and can damage components. Signs include:
- Darker color
- Cloudiness
- Debris inside the reservoir
Action: Schedule a brake fluid flush with a trusted mechanic.
A brake fluid flush involves draining the old fluid, cleaning the reservoir, and refilling with fresh fluid. Most mechanics also bleed the brake lines to remove air bubbles and ensure optimal hydraulic performance.
Case Study: Fleet Maintenance Example
A delivery company implemented weekly brake fluid checks across its fleet. Result: a 40% reduction in brake-related downtime and maintenance costs over 12 months.
This proactive approach also improved driver safety and reduced liability risks, illustrating the value of regular checks for businesses and individuals alike.
Table: Common Causes And Solutions For Brake Fluid Issues
| Symptom | Possible Cause | Recommended Solution |
|---|---|---|
| Low Fluid | Worn pads, leaks | Inspect pads, check for leaks, top off fluid |
| Dark Fluid | Contamination, aging | Flush and replace fluid |
| Milky Fluid | Water contamination | Complete flush required |
| Rapidly dropping fluid | Major leak | Stop driving, seek immediate repair |
External Resource
For a technical breakdown, visit the Wikipedia Brake Fluid Page.

Credit: www.reddit.com
5 Things To Check (and Why Each Matters)
1. Fluid Level
Why it matters: Low fluid can indicate leaks or worn pads. Consistent levels mean your system is likely sealed and functioning properly.
How to check: Inspect the reservoir and ensure the fluid is between the “MIN” and “MAX” lines.
Tip: If you need to add fluid frequently, have your brake system inspected.
2. Fluid Color And Clarity
Why it matters: Color indicates age and contamination. Healthy fluid should be clear or light amber.
How to check: Compare fluid against the color chart in the previous section.
Tip: If fluid is dark or cloudy, schedule a flush.
Some vehicles may have brake fluid sensors that detect contamination, but visual inspection remains the gold standard.
3. Reservoir Condition
Why it matters: A cracked, leaky, or corroded reservoir can allow moisture and debris to enter, leading to contamination.
How to check: Look for cracks, leaks, or wetness around the reservoir and cap.
Tip: Replace a damaged reservoir immediately.
Plastic reservoirs can degrade over time, particularly in hot climates. Inspecting for brittleness or discoloration helps catch issues early.
4. Cap Seal Integrity
Why it matters: The cap prevents dirt and moisture from entering the hydraulic system. A faulty cap can accelerate contamination.
How to check: Inspect the cap for cracks or worn seals.
Tip: Always tighten the cap securely after checking fluid.
If the cap’s gasket is missing or damaged, replace it to maintain a moisture-proof seal.
5. Warning Lights And Dashboard Alerts
Why it matters: Modern cars have sensors to detect low fluid or pressure issues. Ignoring alerts can lead to dangerous driving conditions.
How to check: Pay attention to brake warning lights or ABS indicators on your dashboard.
Tip: If a warning light stays on after topping off fluid, seek professional diagnostics.
Dashboard warnings may also indicate issues with the ABS system, which relies on proper fluid levels for safe operation.
Example: Preventing Brake Failure
A case in California: a driver ignored a brake warning light for weeks, assuming it was a faulty sensor. Eventually, brake failure occurred due to a slow fluid leak. Prompt attention to dashboard alerts can prevent such outcomes.
Ignoring dashboard warnings is one of the most common causes of preventable brake system failure. Most modern vehicles have self-diagnostic systems that alert drivers to potential issues before they become critical.
External Resource
For a full list of dashboard warning lights, visit the Consumer Reports Guide.
Common Mistakes And How To Avoid Them
Using The Wrong Fluid Type
Automakers specify the exact brake fluid type (like DOT 3, DOT 4, or DOT 5) for good reason. Using the wrong type can cause poor performance or internal damage.
- Check the reservoir cap or owner’s manual for specifications.
- Never mix DOT 5 (silicone-based) with DOT 3/4 (glycol-based).
Mixing incompatible fluids can cause internal separation, reducing hydraulic efficiency and possibly damaging seals. Always use fresh, unopened fluid from a reputable brand.
Opening The System Unnecessarily
Opening the brake fluid reservoir exposes it to moisture and contaminants. Only open it when checking levels, and never leave it open for extended periods.
Brake fluid is hygroscopic, meaning it absorbs water from the air. Even a brief exposure can increase water content, lowering boiling point and risking vapor lock during heavy braking.
Overfilling The Reservoir
Topping off brake fluid above the “MAX” line can cause overflow and paint damage when brakes heat up.
Overfilled reservoirs may also cause pressure buildup, leading to leaks or cap failure.
Ignoring Leaks
Spotting wetness under your car or around brake lines always warrants immediate inspection. Even small leaks can lead to catastrophic failure.
Common leak points include calipers, wheel cylinders, and master cylinder seals. Brake fluid is often clear or light amber, so check for unusual puddles or drips.
Real-world Example
An amateur DIYer topped off DOT 3 fluid in a system requiring DOT 5, leading to a full brake system replacement. Always verify the correct fluid type.
This costly mistake illustrates the importance of double-checking manufacturer specs and consulting with professionals if unsure.
Data Table: Brake Fluid Types And Compatibility
| Fluid Type | Base | Boiling Point (Dry/Wet) | Compatible Systems |
|---|---|---|---|
| DOT 3 | Glycol | 205°C/140°C | Most US/Japanese vehicles |
| DOT 4 | Glycol | 230°C/155°C | European/performance vehicles |
| DOT 5 | Silicone | 260°C/180°C | Classic cars (not ABS) |
| DOT 5.1 | Glycol | 260°C/180°C | High-performance/ABS systems |
DOT 5. 1, while similar in boiling point to DOT 5, is glycol-based and compatible with ABS systems, unlike DOT 5.
External Resource
For manufacturer recommendations, visit the Bosch Auto Parts.
Pro Tips For Efficient, Safe Brake Fluid Checks
Organize Your Workspace
Before you start, set up your tools, gloves, and a light source. Having everything within reach streamlines the process.
A clutter-free workspace reduces the risk of contamination and accidental spills. Consider placing a protective mat under the hood area to catch drips.
Work In Daylight Or Use A Flashlight
Proper lighting ensures you can accurately see fluid levels and color.
Natural light is best, but a quality LED flashlight works well in garages or during nighttime checks. Avoid using colored lights that could distort fluid appearance.
Record Your Checks
Maintain a maintenance log with the date, fluid condition, and any observations. This helps track trends and identify problems early.
Many drivers use smartphone apps or notebooks to track fluid checks, oil changes, and other maintenance. Consistent records aid in diagnosing recurring issues.
Use Only Sealed Brake Fluid
Brake fluid absorbs moisture from the air. Always use fluid from a sealed container, and discard old bottles.
If the container has been open for more than a few months, don’t use it, as the fluid may be compromised. Always purchase brake fluid from reputable suppliers.
Do Not Reuse Contaminated Rags
Brake fluid is hygroscopic (absorbs water). Using dirty rags can introduce contaminants.
Dispose of used cloths and gloves promptly, and avoid using them for other maintenance tasks. Cross-contamination can affect brake system performance.
When To Involve A Professional
- Persistent low fluid levels
- Repeated warning lights
- Visible leaks or damaged components
Professional service ensures correct diagnosis and safe operation.
Mechanics have specialized tools for diagnosing leaks, testing fluid quality, and flushing brake systems. If you’re unsure about your findings, err on the side of caution.
Example: Preventative Maintenance Pays Off
A rideshare driver in Atlanta began logging monthly brake fluid checks. This simple habit caught a slow leak early, saving $700 in repairs and preventing service interruptions.
Routine checks also help maintain the resale value of your car, as documented maintenance reassures buyers and dealers.
Further Reading
For DIY maintenance guides, see the Haynes Brake Fluid Tutorial.
Frequently Asked Questions
How Often Should I Check My Car’s Brake Fluid?
It’s best to check your brake fluid every 3 months or at each oil change. If you notice any changes in pedal feel, unusual noises, or dashboard warning lights, check immediately. Always follow your manufacturer’s maintenance schedule for optimal results.
Some newer vehicles have maintenance reminders that include brake fluid checks—always pay attention to these notifications.
What Type Of Brake Fluid Does My Car Use?
Brake fluid type is specified in your owner’s manual and usually on the reservoir cap. Common types include DOT 3, DOT 4, and DOT 5. Never mix types, as this can compromise braking performance. If in doubt, consult a professional or reference your vehicle’s documentation.
If you’ve lost your owner’s manual, most automaker websites provide downloadable versions or online lookup tools.
Can I Drive If My Brake Fluid Is Low?
Driving with low brake fluid is dangerous and not recommended. Low fluid can cause reduced braking power or complete brake failure. Top off only with the correct fluid and have your system inspected for leaks or worn components immediately.
Even short trips with low fluid levels can risk your safety, especially if you encounter sudden stops or need emergency braking.
What Does It Mean If My Brake Fluid Is Dark Or Cloudy?
Dark or cloudy brake fluid indicates contamination (often from moisture, debris, or aging). Contaminated fluid should be flushed and replaced as soon as possible to maintain safe braking performance and protect your system.
Contaminated fluid also lowers the boiling point, increasing the risk of vapor lock—a dangerous condition where brakes lose effectiveness during heavy use.
Is It Safe To Add Brake Fluid Myself?
Yes, adding brake fluid is generally safe if you follow instructions, use the correct type, and maintain cleanliness. Always avoid overfilling, never open the system in a dusty environment, and wipe up any spills promptly. If you’re unsure or uncomfortable, seek help from a qualified mechanic.
If your car has ABS or complex electronic brake systems, it’s wise to consult a professional for anything beyond basic fluid checks.
Checking your car’s brake fluid level in under five minutes is one of the simplest yet most impactful maintenance tasks you can do. This small investment of time supports safer driving, preserves the longevity of your braking system, and helps you avoid costly surprises.
By following the five-step process, staying alert to warning signs, and acting promptly when issues arise, you’ll keep your vehicle reliable and your journeys worry-free. For deeper technical guidance and further resources, don’t hesitate to explore authoritative automotive sites and consult professionals when needed.
Safe travels!
Products related to this article
Sponsored / affiliate links. As an Amazon Associate I earn from qualifying purchases. I may earn additional commission from eligible campaigns.