
How to Change AC Compressor on 2014 Chevy Silverado Diy (Step-by-Step Guide)
Changing the AC compressor on your 2014 Chevy Silverado involves safely discharging the refrigerant, removing the old unit, installing the new one, and then properly recharging the system. For the general recharge steps and pressure specs, see our AC recharge guide. This DIY guide covers the essential steps for a successful replacement.
Understanding Your 2014 Chevy Silverado’s AC Compressor
The AC compressor is the heart of your truck’s air conditioning system. It’s a pump that moves refrigerant through the system. Think of it like the engine for your AC. It takes low-pressure refrigerant gas and squeezes it into a high-pressure gas. This high-pressure gas then moves on to the condenser, where it cools down and turns into a liquid. Without a working compressor, your AC won’t be able to cool the air inside your truck.
This part is crucial because it’s driven by the engine’s serpentine belt. When your engine is running, the belt spins the compressor pulley. Inside the compressor, a clutch engages and disengages the pump mechanism. This clutch is controlled by the AC system itself. When you turn on your AC, the system tells the clutch to engage, and the compressor starts pumping. When you turn the AC off, the clutch disengages, and the compressor stops working.
Why AC Compressors Fail
AC compressors can fail for several reasons. Sometimes, they just wear out over time. This is normal for any mechanical part. Other times, problems in the AC system can lead to compressor failure. For instance, if the system is low on refrigerant, the compressor can overheat and seize. Debris or moisture getting into the system can also cause damage. A leaking seal can let refrigerant escape and moisture enter, which is bad news for the compressor’s internal parts.
One common issue is a failing clutch. The clutch can wear out, slip, or stop engaging altogether. If the clutch is the only problem, it can sometimes be
Signs of a Failing AC Compressor
- Warm Air: The most obvious sign. Your AC blows warm air even on the coldest setting.
- Strange Noises: Grinding, squealing, or clicking sounds coming from under the hood when the AC is on.
- AC Clutch Not Engaging: You might hear a click when you turn the AC on, but the pulley on the compressor doesn’t spin with the belt.
- Leaking Refrigerant: Oily residue around the compressor or AC lines can indicate a leak.
- Sudden AC Failure: The AC works one moment and stops working completely the next.
My Own AC Compressor Scare
I remember one sweltering summer day, about five years ago. I was driving my old pickup truck, and the AC just gave up. I mean, it went from blowing decent cold air to just… air. Hot, humid air. My first thought was, “Oh no, this is going to cost a fortune.” I could feel the sweat starting to bead up on my forehead. I pulled over and popped the hood.
I’m not a mechanic, but I know my way around a basic engine. I could see the AC compressor pulley, and I tried turning on the AC. I heard the usual “thunk” of the clutch engaging, but the pulley itself didn’t spin with the rest of the compressor. It just sat there, motionless, while the belt spun around it. That was my first clue. Then, I noticed a faint, burnt smell. That was a bad sign. I knew then it was more than just a simple recharge. I was stuck driving with the windows down for the rest of the trip, feeling pretty defeated and worried about the bill waiting for me at the shop. That day taught me the importance of understanding these parts, even if you aren’t doing all the work yourself.
Preparing for the DIY AC Compressor Replacement
Before you even think about touching your 2014 Chevy Silverado’s AC system, preparation is key. This isn’t a quick oil change. You need the right tools, a safe space, and a clear understanding of the process. Safety is the absolute top priority here. Refrigerant is under pressure and can cause serious harm if released improperly.
First, you’ll need to get the old refrigerant out of the system. You cannot just vent it into the air. That’s illegal and bad for the environment. You need a special tool called a refrigerant recovery machine. Most DIYers don’t have these. This is where many people decide to take their truck to a shop, at least for this step. They can safely recover the refrigerant for a small fee. If you are going to do it yourself, make sure you have the proper equipment and understand the regulations in your area.
Next, gather your tools. You’ll need a good set of wrenches and sockets, including a torque wrench. You’ll also need a way to flush the AC system. When a compressor fails, it can send tiny metal particles throughout the system. If you don’t flush these out, they can damage your new compressor. You’ll need new AC oil and refrigerant, specifically what your 2014 Silverado calls for. Check your owner’s manual or the sticker under the hood for the correct type and amount.
Essential Tools and Supplies
- New AC Compressor: Make sure it’s the correct one for your 2014 Chevy Silverado.
- Serpentine Belt: It’s a good idea to replace this while you’re there.
- AC System Flush Kit: To clean out debris.
- Refrigerant: The correct type and amount for your truck.
- AC Oil: Compatible with your new compressor and refrigerant.
- O-Rings and Seals: For all AC line connections.
- Wrenches and Socket Set: Including deep sockets.
- Torque Wrench: Crucial for proper tightening.
- Safety Glasses and Gloves: Always protect yourself.
- Rags and Shop Towels: For cleaning up spills.
- Drain Pan: For catching any residual fluids.
- Vacuum Pump and Manifold Gauge Set: For evacuating and charging the system.
- Refrigerant Recovery Machine: If you plan to recover the old refrigerant yourself.
Step-by-Step: Changing the AC Compressor on Your Silverado
This is the core of the job. Take your time, follow each step carefully, and don’t rush. It’s better to take longer and do it right.
Step 1: Safety First – Recover Refrigerant
As mentioned, this is the most critical and potentially hazardous step. If you aren’t comfortable or don’t have the right equipment, have a professional recover the refrigerant. If you are doing it, connect the recovery machine to your AC system’s service ports (low-pressure and high-pressure sides). Follow the machine’s instructions to safely remove all the refrigerant. Store it properly or have it disposed of by a certified recycler.
Step 2: Disconnect the Battery
Before you do any work under the hood, disconnect the negative terminal of your truck’s battery. This prevents any accidental electrical shorts and adds another layer of safety.
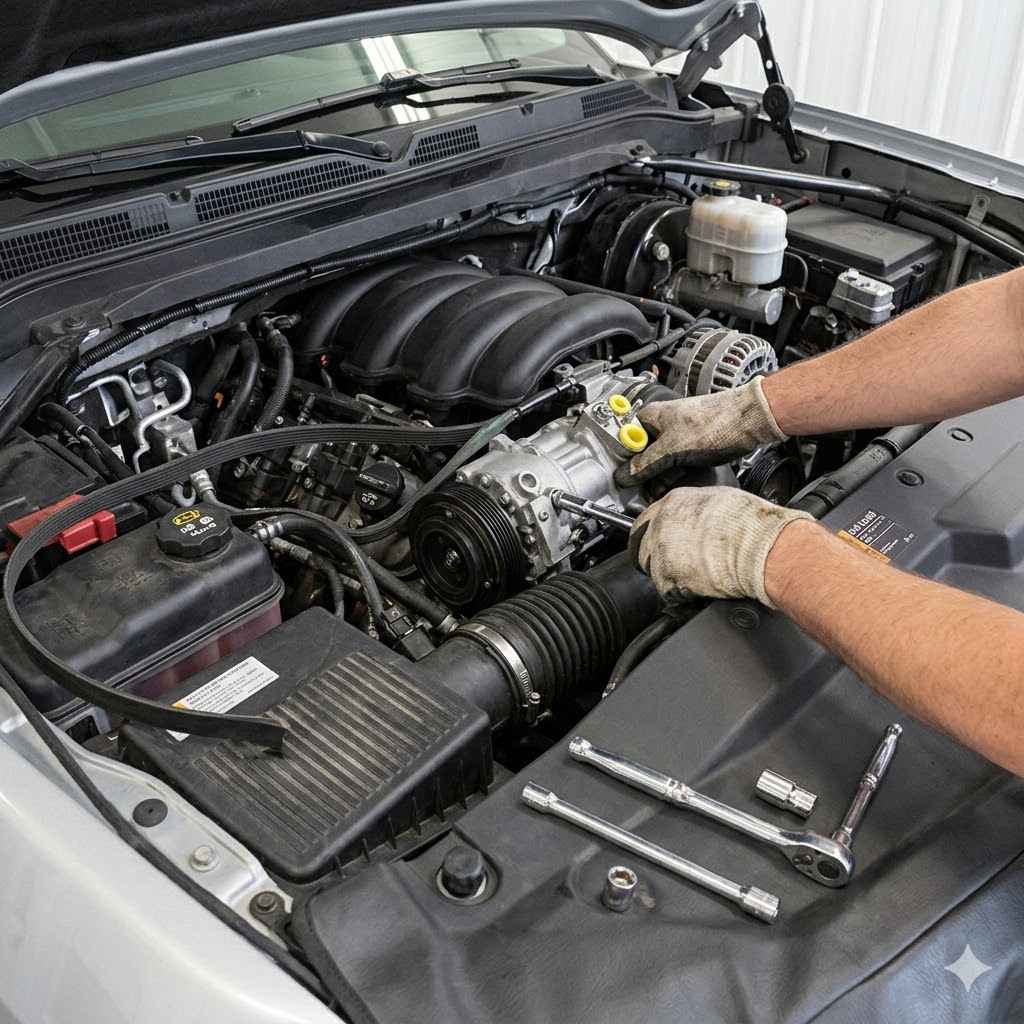
Step 3: Locate and Remove the Serpentine Belt
The AC compressor is driven by the serpentine belt. You’ll need to relieve the tension on the belt to remove it. Locate the belt tensioner pulley. Using a wrench or a socket with a breaker bar, rotate the tensioner to release the belt’s tension. Carefully slip the belt off the AC compressor pulley and any other pulleys it’s wrapped around. It’s a good idea to note or take a picture of the belt’s routing so you can put it back on correctly.
Step 4: Disconnect AC Lines
There are typically two AC lines connected to the compressor: a high-pressure line and a low-pressure line. These lines are usually held on by bolts. Before you unbolt them, be aware that there might be a small amount of residual pressure. Slowly loosen the bolts. You might hear a hiss. Be prepared for a small amount of oil to drip out. Have your rags ready. Once the bolts are removed, gently pull the lines away from the compressor. You might need to use a bit of force, but don’t bend or damage the lines.
You’ll also find an electrical connector attached to the AC compressor clutch. Disconnect this by pressing the release tab and pulling it apart.
Step 5: Remove the Old AC Compressor
The AC compressor is usually mounted to the engine block with a few bolts. These can be in hard-to-reach places. You might need an extension for your socket. Once all the mounting bolts are removed, carefully lift the old compressor out. It can be a bit heavy, so be careful not to drop it or strain yourself.
Contrast: Normal vs. Concerning Noises
Normal AC Sounds
Click: When the clutch engages.
Whoosh: Refrigerant moving.
Fan Hum: Condenser fan running.
Concerning AC Noises
Grinding: Often points to bearing failure.
Squealing: Could be a belt issue or a seized compressor.
Knocking/Rattling: Internal compressor damage.
Step 6: Flush the AC System
This is a vital step that many DIYers skip, leading to premature failure of the new compressor. Remove the Schrader valves from the AC line fittings (if accessible) and use your AC system flush kit. Follow the kit’s instructions. You’ll pump a cleaning solution through the lines, condenser, and evaporator to remove any metal shavings or debris left from the old compressor. After flushing, you need to ensure all the flush fluid is out and the system is dry. This usually involves using compressed air or a vacuum.
Step 7: Install the New AC Compressor
Before installing the new compressor, you need to add the correct type and amount of AC oil. The amount of oil needed often depends on whether you flushed the system and how much oil was lost from the old compressor. Your new compressor might come with oil already in it. Check the manufacturer’s instructions for your specific compressor.
Carefully position the new compressor in place and bolt it down. Tighten the bolts to the manufacturer’s specifications using your torque wrench.
Step 8: Reconnect AC Lines and Electrical Connector
Make sure to replace the O-rings on the AC lines before reconnecting them. These O-rings create the seal for the refrigerant. Use the correct type of O-ring for AC systems. Once the new O-rings are in place, carefully attach the AC lines to the new compressor. Tighten the bolts securely. Reconnect the electrical connector to the compressor clutch.
Step 9: Reinstall the Serpentine Belt
Refer to your notes or picture of the belt routing. Route the new or old serpentine belt around all the pulleys, except for the tensioner pulley. Use your wrench on the tensioner to create slack, and then slip the belt onto the tensioner pulley last. Slowly release the tensioner. Double-check that the belt is seated correctly on all pulleys.
Step 10: Evacuate and Recharge the AC System
This is another step where specialized equipment is needed, and mistakes can be costly. Connect a vacuum pump and manifold gauge set to the AC service ports. Run the vacuum pump for at least 30-60 minutes. This removes all air and moisture from the system. A properly evacuated system is crucial for AC performance and longevity.
After evacuation, close the vacuum line valve and shut off the pump. Watch the gauge for about 15 minutes. If the vacuum holds steady, your system is sealed. If it drops, you have a leak somewhere, and you need to find and fix it before adding refrigerant.
Once you’re sure there are no leaks, connect the refrigerant can to the low-pressure service port (typically via the blue hose on your manifold gauge set). Add the specified amount and type of refrigerant, following the instructions on the refrigerant can and your gauge set. This is where knowing the exact capacity for your 2014 Chevy Silverado is vital. Overcharging or undercharging the system can cause problems.
Step 11: Test the System
Start the truck’s engine and turn on the AC. Let it run for a few minutes. Check the air temperature coming from the vents. Use your manifold gauges to monitor the system pressures (low and high side). They should be within the normal range for your truck. Listen for any unusual noises.
Real-World Considerations for Your Silverado
Working on your 2014 Chevy Silverado’s AC system means dealing with the realities of working on a truck. These vehicles are built to be robust, but that also means access to certain components can be tight. The AC compressor is usually located on the front of the engine, driven by the serpentine belt. On many trucks, this means it’s relatively accessible once the hood is open.
However, other components might be in the way. Things like the power steering pump, alternator, or even the radiator fan shroud could obstruct your access. You might need to temporarily unbolt or remove these to get enough room to maneuver the old compressor out and the new one in. Always refer to a service manual specific to your 2014 Chevy Silverado for exact locations and removal steps of any interfering parts.
The environment also plays a role. If you’re doing this in a hot garage, it can make the job even more uncomfortable. Make sure you have good lighting, especially if you’re working late or your garage isn’t well-lit. Working on a level surface is also important for safety and to prevent tools or parts from rolling away.
What This Means for Your Truck and You
Replacing the AC compressor on your 2014 Chevy Silverado is a significant undertaking, but the payoff is huge: restored cold air and potentially hundreds or even thousands of dollars saved compared to a shop repair. It means you can drive comfortably again, no matter how hot it gets outside.
When is it normal to need a new compressor? Well, AC compressors, like any moving part, have a lifespan. They can last anywhere from 80,000 to over 200,000 miles, depending on how well the AC system is maintained and how often the AC is used. If your truck is in that mileage range and you’re experiencing the symptoms of a failing compressor, it’s likely just normal wear and tear.
When should you worry and perhaps not attempt this yourself? If you’ve never worked on an AC system before, the refrigerant handling and the precise charging requirements can be intimidating. Also, if you find that the underlying cause of the compressor failure was something more serious, like a damaged evaporator or condenser, those repairs are much more complex and might require professional attention.
Simple checks you can do before diving in: Ensure your truck’s engine is cool. Check the serpentine belt for cracks or wear. Look for obvious leaks or damage around the AC components.
Quick Scan: Compressor Health Check
| Symptom | Possible Cause | Action |
|---|---|---|
| No cold air | Low refrigerant, clutch issue, compressor failure | Check for leaks, then compressor. |
| Grinding noise | Bad compressor bearings | Replace compressor immediately. |
| Belt squeal | Loose belt, worn belt, seized compressor | Check belt tension, then compressor. |
| AC blows warm | System leak, compressor issue, electrical fault | Check pressures, then compressor. |
Quick Tips for a Smoother DIY Replacement
If you’re set on doing this yourself, here are a few extra tips that can make the process go more smoothly for your 2014 Chevy Silverado.
Get a Service Manual: A Haynes or Chilton manual for your specific truck model is invaluable. It will have exact torque specs, refrigerant capacities, and detailed diagrams.
Organize Your Parts: Keep all the bolts and small parts organized as you remove them. Use labeled bags or magnetic trays.
Lubricate Threads: A tiny bit of anti-seize on the AC line bolts can help prevent them from seizing up in the future.
Quality Parts Matter: Don’t skimp on the new compressor. A reputable brand will likely last longer and perform better.
Take Breaks: This is a long job. If you feel frustrated or tired, take a break. Come back with a clear head.
Know Your Limits: If at any point you feel unsafe or unsure, stop and seek professional help. It’s better to pay a mechanic for a portion of the job than to cause more damage or get hurt.

Frequently Asked Questions About AC Compressor Replacement
How long does it take to change an AC compressor on a 2014 Chevy Silverado?
For a DIYer with all the tools and parts ready, it can take anywhere from 3 to 6 hours. This includes time for flushing the system and proper evacuation. If you’re not experienced, it might take longer.
Can I just add refrigerant if my AC is blowing warm?
You can add refrigerant as a temporary fix, but it usually means there’s a leak. Adding refrigerant without finding and fixing the leak is not a long-term solution and can be bad for the environment. Plus, a low refrigerant charge can damage the compressor.
What type of refrigerant does a 2014 Chevy Silverado use?
Most 2014 Chevy Silverado models use R-134a refrigerant. However, always confirm this by checking the sticker under your hood or in your owner’s manual. Using the wrong refrigerant can damage the system.
Do I need to replace other parts when changing the compressor?
It’s highly recommended to replace the receiver-drier or accumulator and the expansion valve or orifice tube when you replace the compressor. These parts can trap moisture and debris. Also, replacing the serpentine belt is a good idea while it’s already off.
What is the “clutch” on the AC compressor?
The clutch is an electromagnetic device that connects the compressor pulley to the compressor’s internal mechanism. When you turn on your AC, an electrical signal engages the clutch, making the compressor pump refrigerant. When you turn the AC off, the clutch disengages, and the compressor stops working.
How important is flushing the AC system?
It is extremely important, especially if the old compressor failed internally. A failed compressor can send tiny metal particles and debris throughout the AC system. If you don’t flush these out, they can contaminate the new compressor and cause it to fail prematurely.
Conclusion
Tackling the AC compressor replacement on your 2014 Chevy Silverado is a challenging but rewarding DIY project. It requires careful planning, the right tools, and a strong emphasis on safety. By following these steps, understanding the potential pitfalls, and knowing when to seek professional help, you can bring cool air back to your truck and feel the satisfaction of a job well done. Remember, patience and attention to detail are your best friends throughout this process.