How Do You Bleed Car Brakes Correctly? Full Walkthrough
Bleeding your car’s brakes may sound like a job best left to professional mechanics, but with the right knowledge and a careful approach, it’s entirely possible for a dedicated DIYer to do at home. Brake bleeding is a critical maintenance step that ensures your car’s braking system functions at its best.
Air trapped in the brake lines can cause your brake pedal to feel spongy and significantly reduce your stopping power, putting both your safety and your car’s performance at risk.
This comprehensive guide will walk you through the entire process of how to bleed car brakes correctly, covering everything from the science behind brake hydraulics to step-by-step methods and real-world troubleshooting tips. Whether you’re preparing for your first brake job or looking to sharpen your technique, you’ll find detailed instructions, expert advice, and actionable checklists to guarantee results you can trust.
Key Takeaways
- Bleeding brakes removes air from the brake system, restoring safe and responsive braking.
- The process requires proper tools, safety gear, and a systematic approach for each brake caliper.
- There are several effective methods—manual, pressure, vacuum, and gravity—each with unique pros and cons.
- Regular brake bleeding is essential after fluid changes or repairs, and helps prevent costly system failures.
- Understanding signs of air in the system and common mistakes can save time and improve safety.
- This guide includes step-by-step instructions, comparison tables, and FAQs for confident DIY results.

Credit: coxauto.com.au
Understanding Brake Bleeding: The Fundamentals
Bleeding brakes is essential to ensure that only brake fluid—not air—fills the hydraulic lines responsible for transferring pedal pressure to your wheels. But why does air cause so many problems, and what exactly happens inside your car’s brake system?
The Science Of Hydraulic Braking
Automotive brakes use hydraulic pressure to multiply the force from your foot. When you press the pedal, it pushes brake fluid through the master cylinder and out to the calipers or wheel cylinders, where it clamps the pads or shoes onto the rotors or drums. Brake fluid is not compressible, so every ounce of pressure you apply is transferred directly to the brakes.
However, air is compressible. Even a tiny air bubble in your brake lines means part of your pedal force is wasted compressing the air, not engaging the brakes. This creates a soft or “spongy” pedal feel and, in extreme cases, can cause brake failure.
To further illustrate, imagine trying to push a syringe filled with water (representing brake fluid) versus one filled with air. The water transfers your force directly, while the air compresses, absorbing energy. In a real-world driving scenario, this means your brakes could feel inconsistent or even fail to stop your car effectively in an emergency.
Why And When To Bleed Brakes
You should bleed your brakes whenever:
- The pedal feels soft or sinks further than usual
- Brake lines have been disconnected or replaced
- The brake fluid is being changed (usually every 2 years)
- After significant brake repairs (e.g., caliper or master cylinder replacement)
- You see air bubbles in the fluid reservoir
Ignoring air in the system can lead to reduced braking performance, uneven wear, and potential safety hazards.
It’s also important to note that certain environmental factors can contribute to the necessity of bleeding brakes more frequently. For example, those living in humid climates may experience more rapid brake fluid contamination due to moisture absorption, requiring more vigilant maintenance.
Likewise, aggressive driving, frequent towing, or regular participation in track events can lead to brake fluid degradation and increased air infiltration.
Types Of Brake Bleeding Systems
There are four main methods to bleed brakes:
- Manual bleeding (with a helper): The traditional pedal-pump method.
- Pressure bleeding: Uses a pressurized canister to force fluid through the system.
- Vacuum bleeding: Draws fluid and air out through the bleeder screw.
- Gravity bleeding: Relies on gravity to let old fluid and air drain out.
Each has distinct advantages and limitations, which will be compared later in this guide.
Credit: evparts4x4.com
Tools And Materials: What You Need To Bleed Brakes
Having the right tools is crucial for a safe and efficient brake bleeding job. Here’s a complete list of essentials, plus a comparison table of the most common brake bleeding tools.
Essential Tools And Supplies
- Box-end wrench (typically 8mm, 10mm, or 11mm depending on your car’s bleeder screws)
- Clear plastic tubing (3/16″ inner diameter)
- Catch bottle or container (to collect old fluid)
- Fresh brake fluid (DOT 3, DOT 4, or DOT 5.1—check your owner’s manual)
- Jack and jack stands (never rely on a jack alone)
- Wheel chocks
- Protective gloves and eye protection
- Rags and brake cleaner
- Torque wrench (for reinstalling wheels)
- Penetrating oil (for stubborn bleeder screws)
Having a full set of these tools not only makes the bleeding process easier, but also increases safety and reduces the risk of damaging delicate brake components. For example, using the correct size wrench prevents stripping the bleeder screws, which can otherwise lead to costly repairs or the need for specialized extraction tools.
Specialized Tools (optional But Helpful)
- One-man brake bleeder kit (check valve bottle)
- Pressure bleeder
- Vacuum pump kit
Investing in these tools can streamline the process, especially if you perform regular maintenance or have multiple vehicles. A one-man kit with a check valve can be a lifesaver for solo DIYers, while a vacuum pump is invaluable for stubborn air pockets in the system.
Comparison Of Brake Bleeding Tools
| Tool | Best For | Pros | Cons | Approx. Cost (USD) |
|---|---|---|---|---|
| Manual (with helper) | Most vehicles | Simple, inexpensive | Requires 2 people, risk of air re-entry | $0–$10 |
| Pressure bleeder | Frequent or pro use | One-person, fast, effective | Upfront cost, setup time | $40–$80 |
| Vacuum bleeder | DIY & garages | One-person, good for stubborn air | Potential leaks, may need adapter | $20–$50 |
| Gravity bleeding | Simple systems | Easy, safe, no special tools | Slow, not for ABS | $0–$5 |
Sourcing Quality Brake Fluid
Check your owner’s manual for the correct DOT rating (e.g., DOT 3, DOT 4, DOT 5.1). Never mix different types, as this can cause brake failure. For more on brake fluid standards, see the Wikipedia Brake Fluid Overview.
It’s important to purchase brake fluid from reputable sources, and avoid bottles with broken seals or unknown age. Brake fluid absorbs moisture from the air, which can lower its boiling point and lead to brake fade or corrosion. Always discard unused fluid after opening, and clearly label containers if storing briefly.

Credit: www.efulfillmentservice.com
Step-by-step Guide: How To Bleed Car Brakes
This section covers the standard manual two-person method with detailed steps, then explains how to adapt for pressure, vacuum, and gravity bleeding.
Step 1: Preparation And Safety
- Park on a level surface, engage the parking brake, and chock the wheels.
- Loosen wheel lug nuts, then jack up the car and support it securely on jack stands.
- Remove all four wheels to access the brake calipers or drums.
- Clean around the master cylinder reservoir and remove the cap. Top up with new brake fluid as needed.
Ensuring the vehicle is stable and secure cannot be overemphasized—never work under a car supported only by a jack. Always use jack stands rated for your vehicle’s weight, and position them on solid ground. Before starting, lay out all your tools within easy reach and have a flashlight handy if working in dim conditions.
Step 2: Identify Bleeder Screw Sequence
Most vehicles follow this sequence:
- Right rear (furthest from master cylinder)
- Left rear
- Right front
- Left front
Some cars (especially with ABS or diagonal systems) may differ—always check your service manual or consult the Haynes Brake Bleeding Guide.
Following the correct sequence is crucial for pushing all the air out efficiently. If you start with a closer wheel, air from the further lines can be pushed back into already-bled sections, undoing your work.
Step 3: Attach Tubing And Prepare Catch Bottle
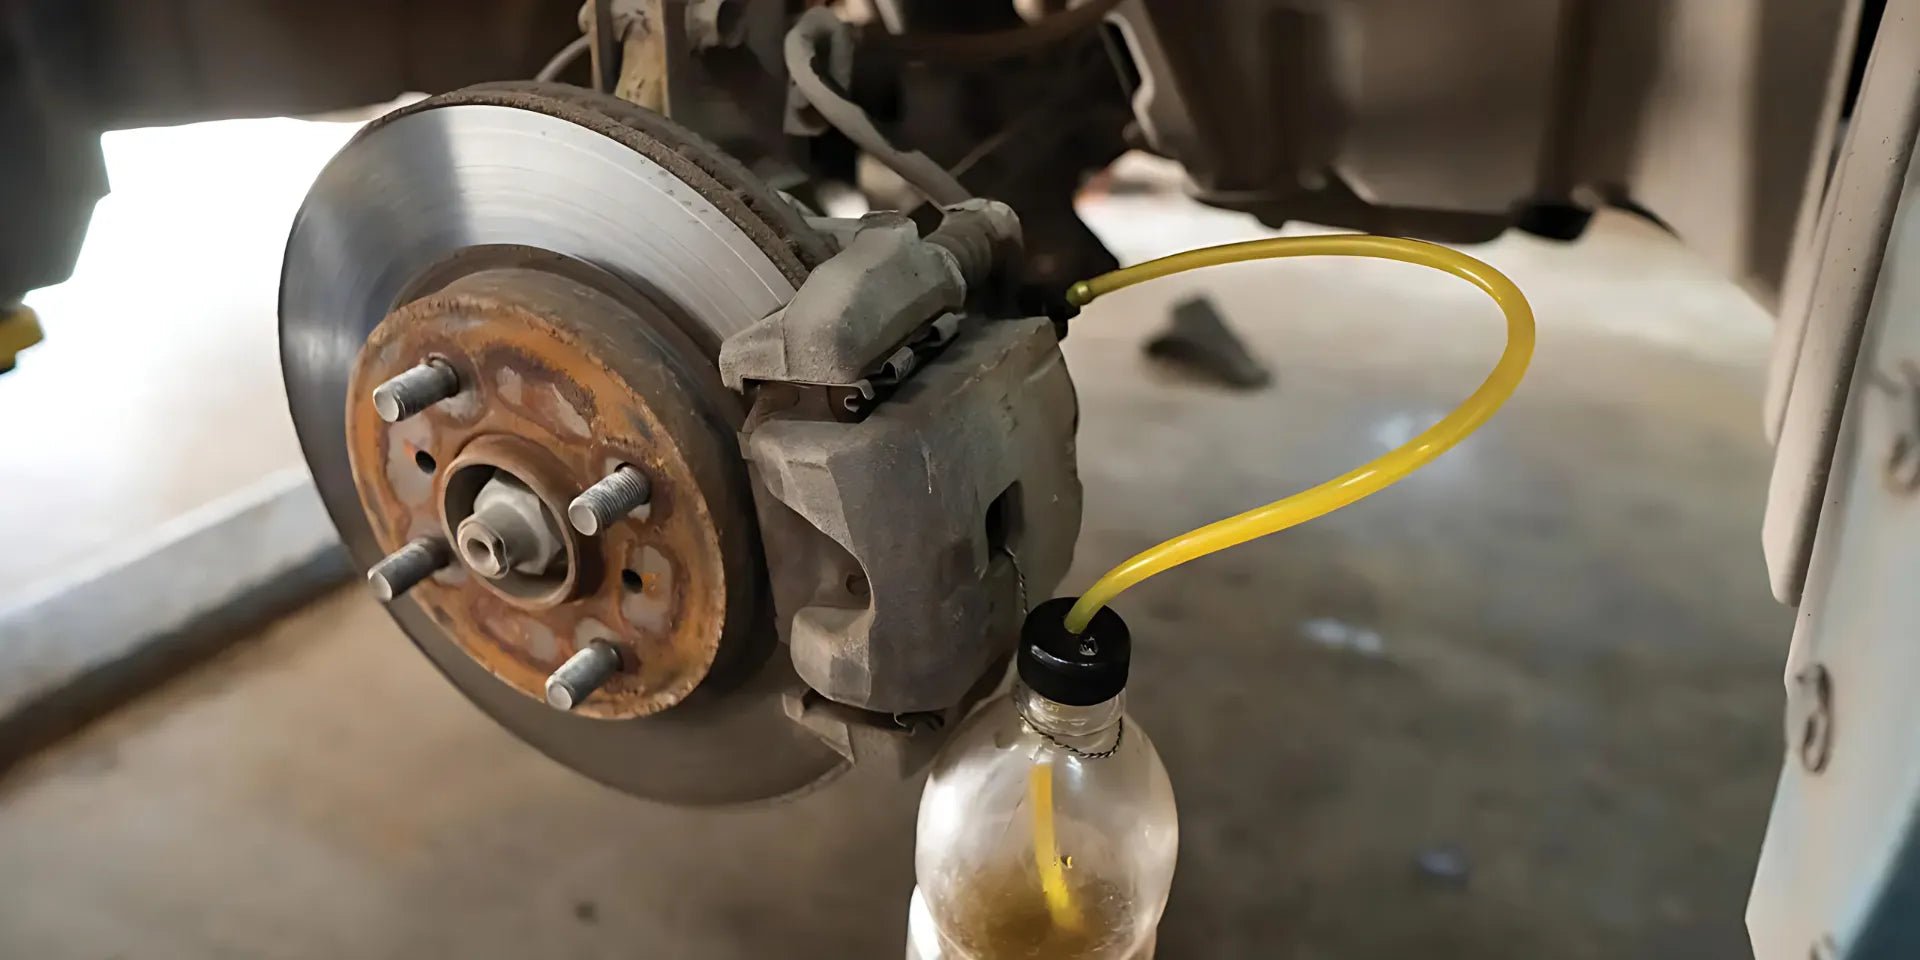
- Place one end of the clear tubing over the bleeder screw nipple.
- Submerge the other end in a partially filled bottle to see air bubbles and prevent backflow.
Using clear tubing is helpful for monitoring the process; you’ll see both the color of the fluid (indicating contamination) and bubbles that show when air is being expelled. Always ensure the tubing is snug on the nipple to prevent leaks or air from being drawn back in.
Step 4: The Bleeding Process
- Instruct your helper to pump the brake pedal slowly several times, then hold it down.
- Open the bleeder screw (~1/4 turn) with your wrench. Fluid and air will flow into the tube.
- Close the bleeder screw before your helper releases the pedal to avoid air being sucked back in.
- Repeat until you see clear fluid without bubbles (typically 3–6 cycles per wheel).
- Check and refill the master cylinder reservoir frequently—never let it run dry.
Patience is key here. If the pedal is released with the bleeder open, air can be drawn back into the system, leading to more work. Always communicate clearly with your helper, using commands like “down,” “hold,” and “up” to avoid confusion.
Step 5: Repeat For All Wheels
Follow the correct sequence for your vehicle. Always keep the master cylinder topped up. After all four brakes are bled, check pedal feel—it should be firm with little travel.
If you notice the fluid coming out is dark or contaminated, you may need to continue bleeding longer. In older vehicles, it’s not uncommon to go through a quart or more before the fluid runs clear.
Step 6: Test And Clean Up
- Inspect for leaks at all connections and bleeder screws.
- Reinstall wheels, torque lug nuts, and lower the vehicle.
- Safely test brakes at low speed before returning to regular driving.
After reassembly, always perform a careful test in a safe area. Pump the brake pedal multiple times to ensure pressure is consistent and firm. Listen for unusual noises and check for any warning lights on the dashboard.
Brake Bleeding Checklist
- [ ] Correct DOT fluid on hand
- [ ] Wheels chocked and car securely supported
- [ ] Bleeder sequence confirmed
- [ ] Clean tools and catch bottle ready
- [ ] Helper available (unless using one-person method)
- [ ] Master cylinder never runs dry
- [ ] All bleeder screws retightened
This checklist should be printed or saved as part of your DIY toolkit. Missing a single step can lead to air re-entering the system or unsafe brakes.
Alternative Bleeding Methods: Pressure, Vacuum, And Gravity
While the manual method is effective, alternative tools can make the job faster, easier, or possible for one person. Here’s how they work and when to use each.
Pressure Bleeding
Pressure bleeders use a hand-pumped or air-powered tank that connects to the master cylinder, forcing fluid through the system.
How To Use:
- Fill the bleeder tank with fresh fluid and pressurize to 15–20 psi.
- Connect to the master cylinder cap.
- Open each bleeder screw in sequence, catching fluid until clear.
- No pedal-pumping required.
Advantages: One-person operation, fast, minimal risk of air entry.
Best for: Frequent DIYers, shops, vehicles with ABS.
Pressure bleeding is highly effective for modern cars, especially those with complex ABS systems. It ensures a steady, controlled flow of fluid and can remove trapped air that manual methods might not address. Many professional mechanics rely on pressure bleeders for their speed and reliability, especially when time is critical.
Vacuum Bleeding
A vacuum pump attaches to the bleeder screw, sucking fluid and air out.
How To Use:
- Attach the vacuum hose to the screw and create a vacuum (often using a hand pump).
- Open the screw and draw fluid until clear.
- Watch for leaks at the screw threads.
Advantages: One-person, great for stubborn air bubbles.
Drawbacks: May draw air around screw threads—seal with grease if needed.
When using vacuum bleeding, it’s a good practice to periodically check for signs of air entering from around the threads rather than from inside the brake system. Applying a small amount of brake grease around the bleeder screw can help maintain a proper seal.
Gravity Bleeding
The simplest method—just open the bleeder screw and let gravity do the work.
How To Use:
- Attach tubing and open the screw.
- Allow fluid to drip until clear and free of bubbles.
- Top up master cylinder frequently.
Advantages: No special tools, safe for basic systems.
Drawbacks: Slowest method, not recommended for ABS or heavily contaminated systems.
Gravity bleeding is ideal when you have plenty of time and a simple brake system. It’s especially useful for classic cars or motorcycles, where the risk of air being trapped in complex ABS units is not present.
Method Comparison Table
| Method | Speed | Ease (1-5) | One-person? | Best For |
|---|---|---|---|---|
| Manual | Medium | 3 | No | Most DIY jobs |
| Pressure | Fast | 4 | Yes | ABS, frequent bleeding |
| Vacuum | Medium | 4 | Yes | One-person, stubborn air |
| Gravity | Slow | 5 | Yes | Simple systems |
For more on advanced brake bleeding strategies, see the Popular Mechanics Brake Bleeding Guide.
Common Problems And Troubleshooting Air In Brake Lines
Even with careful technique, a few common issues can sabotage your results. Here’s how to identify and fix them.
Signs Of Air Still In The System
- Spongy or soft pedal feel
- Pedal sinks to floor under pressure
- Brake warning light illuminated
- Uneven or delayed braking response
If after bleeding, any of these symptoms persist, it’s crucial to address the issue before driving. Sometimes, trapped air can move within the system and cause intermittent problems, making consistent pedal feel a top priority.
Causes And Solutions
Master Cylinder Ran Dry
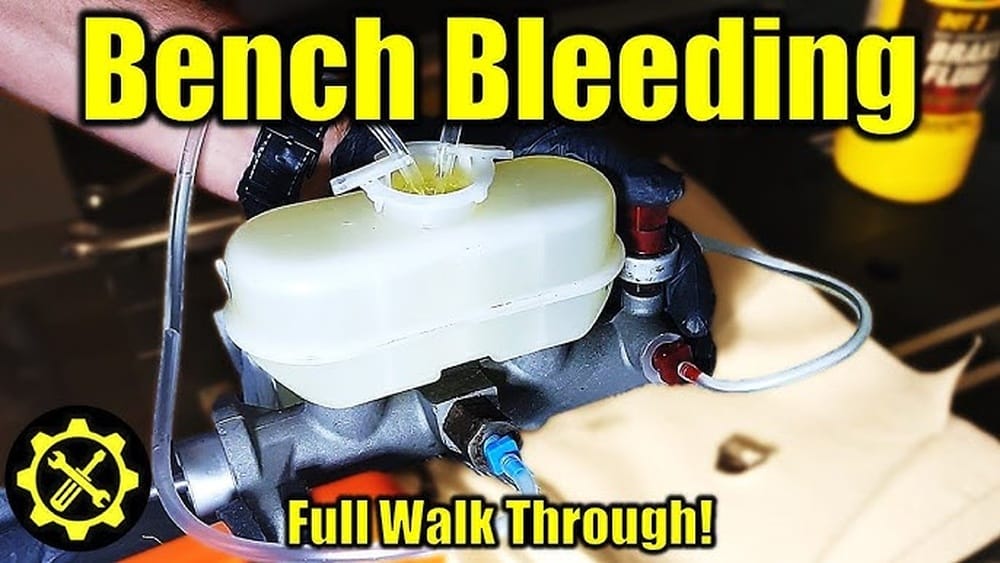
If the reservoir empties during bleeding, air is drawn into the master cylinder, requiring a full system bleed or bench bleeding the master cylinder. For instructions, see the KnowYourParts Master Cylinder Guide.
Bench bleeding can be performed in a vice before installation or, in some cases, on the vehicle using special fittings. This process ensures that no air remains trapped inside the master cylinder itself.
Leaking Bleeder Screw Or Fittings
Air may enter through loose or corroded screws. Always check threads and seals, clean with brake cleaner, and replace damaged hardware.
If you notice brake fluid seeping from the threads or around fittings, tighten to the manufacturer’s torque specification. In severe cases, you may need to replace the affected component to achieve a proper seal.
Abs System Complications
Some modern vehicles require a scan tool to cycle the ABS pump or valves during bleeding. Consult your service manual or the AA1Car ABS Bleeding Resource for details.
Failure to follow proper ABS bleeding procedures can result in air being trapped in the ABS module, which is nearly impossible to remove without electronic cycling.
Wrong Fluid Or Contamination
Mixing DOT types or using old, moisture-contaminated fluid can cause persistent problems. Always use fresh, correct fluid and flush thoroughly.
Visually inspect fluid for cloudiness or discoloration—these are signs of contamination that can affect braking performance and should prompt a full system flush.
Real-world Example: Persistent Soft Pedal
A 2018 Honda Accord owner replaced a rear caliper and bled the brakes using the manual method. The pedal remained soft even after several cycles. Upon inspection, a slow leak at the caliper banjo fitting was found—tightening the bolt and re-bleeding immediately restored pedal firmness.
This highlights the importance of thoroughly checking all connections and fittings for leaks during and after bleeding.
Advanced Tips: Maximizing Safety And Performance
For those seeking to go beyond the basics, these expert strategies can make a meaningful difference in brake reliability and feel.
Bench Bleeding The Master Cylinder
Whenever a master cylinder is replaced or suspected of air entry, bench bleeding is essential. This is performed off the car using short tubes to recirculate fluid until all air is expelled.
Detailed instructions usually come with a new master cylinder, but the process involves mounting the cylinder in a vise, attaching bleed tubes to the ports, and filling with brake fluid. Use a screwdriver or similar tool to slowly depress the piston until no bubbles are seen returning to the reservoir.
Dealing With Abs Brakes
ABS systems can trap air in their pump and valve assemblies. If your car has ABS:
- Use a scan tool to activate the ABS pump during bleeding (if required).
- Some vehicles (e.g., GM, Ford) allow a “self-bleed” by cycling the ignition and pedal.
- Always consult the factory service manual for procedure specifics.
ABS-specific bleeding may also require a longer process or specialized tools. Failing to remove air from the ABS system can result in an intermittent pedal feel or reduced braking effectiveness during emergency stops.
Flushing Versus Bleeding
A brake fluid flush replaces all old fluid with new, while simple bleeding may only remove air. Flushing is recommended every 2 years or 24,000 miles for most cars.
Flushing ensures that all moisture, dirt, and old fluid are removed, not just air. This is especially important in climates with rapid temperature changes, which can exacerbate fluid degradation.
When To Seek Professional Help
- Persistent sponginess after thorough bleeding
- ABS warning light remains on
- Bleeder screws are seized or break off
- No improvement after multiple attempts
In these cases, consult a certified technician or your dealership service center.
Case Study: Track Day Preparation
A 2016 BMW M3 owner preparing for a track event used a pressure bleeder and high-temp DOT 4 fluid to flush all four corners. The result was a firmer pedal and fade-free performance, illustrating the importance of fresh fluid and proper technique in high-performance scenarios.
This example demonstrates how advanced bleeding and fluid choices directly impact braking safety and performance in demanding conditions. For enthusiasts, upgrading to a higher grade fluid and adopting professional bleeding tools can yield noticeable improvements.
Real-world Example: Family Suv Brake Maintenance
A 2012 Toyota Highlander owner noticed longer stopping distances and a soft pedal after a brake job. After following this guide’s manual bleeding steps, the pedal feel improved dramatically and the vehicle passed a safety inspection with flying colors.
This underscores the fact that even daily drivers can benefit significantly from proper brake bleeding. Regular maintenance not only ensures safety but also contributes to vehicle longevity and lower overall operating costs.
Maintenance Schedule And Best Practices
Bleeding your brakes is not just for after repairs—regular maintenance can extend the life of your system.
Recommended Brake Bleeding Intervals
| Driving Condition | Suggested Interval | Notes |
|---|---|---|
| Normal commuting | Every 2 years | Or 24,000 miles |
| Heavy towing/hauling | Annually | Fluid overheats faster |
| Track/racing | Every event | Essential for safety |
| After repairs | Immediately after service | Any time lines are opened |
For more manufacturer-specific maintenance schedules, visit the NHTSA Brake Systems Page.
Best Practices Checklist
- Use only fresh, unopened brake fluid.
- Label and store fluids properly—most absorb moisture once opened.
- Always bleed in the correct sequence for your vehicle.
- Wear gloves and eye protection—brake fluid is caustic.
- Dispose of old fluid responsibly (never down the drain).
- Keep your work area clean to prevent contamination.
- Double-check all fasteners and connections before driving.
Following these best practices not only helps maintain safe braking but can also prevent costly repairs caused by corrosion, moisture, or incorrect fluid usage.
Frequently Asked Questions
What Are The Signs That My Car Needs Brake Bleeding?
Common signs include a spongy brake pedal, increased pedal travel, poor braking response, and visible air bubbles in the fluid reservoir. If you experience any of these, it’s time to check and bleed your brakes.
Can I Bleed Brakes Alone, Or Do I Need A Helper?
You can bleed brakes alone using a pressure bleeder, vacuum bleeder, or a one-man check valve kit. The traditional manual method typically requires a helper to press the brake pedal while you open and close the bleeder screws.
How Much Brake Fluid Do I Need For A Complete System Bleed?
Most vehicles require 1–2 quarts (about 1–2 liters) of brake fluid for a complete bleed and flush. Always buy a bit more than you think you’ll need, and never reuse old fluid.
Is It Safe To Drive If I Suspect Air In My Brake Lines?
No. Air in the brake lines can severely compromise your stopping power, leading to unsafe driving conditions. Always address brake issues immediately for your safety.
How Do I Dispose Of Used Brake Fluid?
Never pour used brake fluid down drains or on the ground. Take it to a local automotive parts store, recycling center, or hazardous waste facility. Many locations accept old brake fluid for free.
Bleeding your car’s brakes is a vital part of keeping your vehicle safe and responsive. By following the correct procedures, using the right tools, and understanding the science behind your braking system, you can restore your car’s stopping power and extend the life of key components. Whether you’re a seasoned DIYer or a first-timer, the peace of mind that comes from firm, predictable brakes is well worth the effort. For further reading and detailed vehicle-specific guides, consult your owner’s manual, reputable automotive repair books, and trusted resources like AutoZone’s Brake Bleeding Guide.
Products related to this article
Sponsored / affiliate links. As an Amazon Associate I earn from qualifying purchases. I may earn additional commission from eligible campaigns.