How to Use Car Tyre Repair Kit: A Quick Guide
Using a car tyre repair kit can be a lifesaver, getting you back on the road quickly when you encounter a puncture. Knowing how to use these kits effectively can save you time, money, and the hassle of calling for roadside assistance. This guide will walk you through the essential steps and considerations for successfully patching a flat tyre.
Simply put, a car tyre repair kit allows you to temporarily fix a puncture, enabling you to drive to a service station. It’s a DIY solution for emergencies, but professional assessment is always recommended afterward.
Key Takeaways
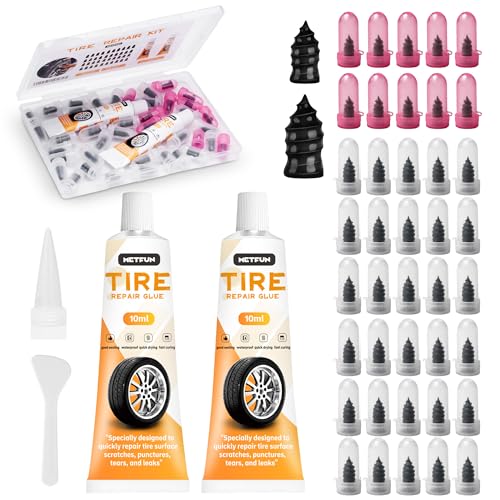
MetFun
MetFun 40 PCS Quick Fix Screw-in Tire…
- 【Perfect Emergency Repair Solution】This kit includes 40 durable rubber repair screws (2 sizes for different punctures) and 2 tubes…
- 【Premium Materials for Safe Repairs】Our tire screw plugs are coated with premium rubber that resists aging and high temperatures.…
- 【2 Sizes for Every Puncture】Choose the right size for your needs: 10 small screws (5.2x12mm) work for small nail punctures, while…
As an Amazon Associate I earn from qualifying purchases.
- Car tyre repair kits are essential for temporary emergency fixes.
- Proper preparation and tool usage are crucial for effective tyre repair.
- Understand the limitations of DIY tyre repair and know when to seek professional help.
- Safety comes first; always use a repair kit in a safe location away from traffic.
What is a Car Tyre Repair Kit?
A car tyre repair kit is a collection of tools and materials designed to seal small punctures in your vehicle’s tyres. These kits are typically found in the trunk or glove compartment and are intended for temporary repairs, allowing you to reach a safe place or a professional tyre shop.
Most kits contain a reamer tool to clean and roughen the puncture hole, an insertion tool to push a rubber plug into the hole, and the rubber plugs themselves, often coated with a sealant. Some kits also include a small air compressor or a means to reinflate the tyre after the repair.
Components of a Standard Tyre Repair Kit
- Reamer Tool: Used to clean out debris and slightly enlarge the puncture for better plug adhesion.
- Insertion Tool (or Needles): A specialised tool to force the repair plug into the tyre’s inner lining.
- Repair Plugs: Sticky, rubbery cords that are inserted into the puncture to seal it.
- Rubber Cement or Sealant: Applied to the plug or hole to enhance the seal and adhesion.
- Tyre Gauge: To check the tyre pressure after repair.
- Mini Air Compressor (Optional): For reinflating the tyre.
- Gloves and Pliers: For safety and ease of removing the puncturing object.
Preparing for Tyre Repair
Before you even touch the repair kit, safety is paramount. You must ensure you are in a safe location, well away from moving traffic. If you are on the roadside, pull over as far as possible onto a stable, level surface.
Turn on your hazard lights immediately.
Once safely situated, you’ll need to locate the puncture. If the tyre is completely flat, you might need to use the mini-compressor (if your kit includes one) or a portable pump to inflate it enough to find the leak. Sometimes, you can hear the hissing sound of escaping air, or you can use a soapy water solution sprayed around the tyre surface to spot bubbles indicating the leak.
Safety Checklist Before Starting
- Park on a level, stable surface, far from traffic.
- Engage the parking brake firmly.
- Turn on hazard lights.
- If on a slope, use wheel chocks if available.
- Ensure good visibility, especially at night or in poor weather.
- Wear gloves to protect your hands.
Step-by-Step: How to Use a Car Tyre Repair Kit
Using a tyre repair kit is a hands-on process that requires careful attention to detail. The goal is to create a robust seal within the tyre’s puncture. Here’s a breakdown of the typical steps involved.
- Locate and Remove the Puncturing Object: First, you need to find what caused the puncture. This is often a nail, screw, or other sharp object. Use pliers to carefully grip the object and pull it straight out. Don’t twist or yank forcefully, as this could enlarge the hole unnecessarily.
- Prepare the Puncture Hole: Take the reamer tool from your kit. better.
- Prepare the Repair Plug: Take one of the rubber repair plugs. Thread it through the eye of the insertion tool, ensuring that about half of the plug protrudes from each side of the tool. Some kits recommend applying rubber cement or sealant to the plug at this stage for extra adhesion.
- Insert the Plug: Align the insertion tool with the puncture hole. Push the tool firmly and steadily into the hole until only about an inch (or the specified amount) of the plug remains outside the tyre. This requires significant force.
- Remove the Insertion Tool: Once the plug is inserted, you need to remove the insertion tool. This should be done smoothly and without twisting. The tool will come out, leaving the repair plug firmly lodged in the tyre.
- Trim Excess Plug: If there’s a significant amount of plug sticking out, carefully trim it flush with the tyre’s tread using a sharp knife or the cutter provided in some kits. Don’t leave a large portion exposed, as it could detach or cause issues.
- Inflate the Tyre: Use your mini-compressor or a portable pump to inflate the tyre to the manufacturer’s recommended pressure. Check the sidewall of your tyre for the correct PSI.
- Check for Leaks: Once inflated, spray the repaired area with a soapy water solution. If you see any bubbles, the repair is not sealing properly, and you should not drive on the tyre.
Common Mistakes to Avoid
Even with a good kit, certain mistakes can compromise the repair. Over-inflating or under-inflating the tyre after repair can cause further damage or ineffective sealing. Also, using the wrong size plug for the puncture can lead to a weak seal.
Warning: Never attempt to repair a tyre with a sidewall puncture or damage. Sidewall repairs are unsafe and can lead to blowouts. Only repair tread punctures.
Mistakes in Tyre Repair
- Attempting to repair sidewall damage.
- Failing to remove the puncturing object completely.
- Not properly cleaning and preparing the puncture hole.
- Using excessive force when removing the insertion tool, dislodging the plug.
- Not checking for leaks after inflation.
- Driving long distances or at high speeds on a repaired tyre without professional inspection.
When to Seek Professional Tyre Service
It’s crucial to understand that a DIY tyre repair kit is intended for temporary fixes. These repairs may not be as durable or reliable as professional patching or plugging from the inside of the tyre. If the puncture is too large, if you’ve tried and failed to get a seal, or if you have any doubts about the repair’s integrity, it’s time to call for professional help.
Professionals can assess the damage more accurately and perform a more permanent repair. They can also check for any secondary damage that might not be visible externally. Driving on a compromised tyre, even after a DIY repair, can be extremely dangerous.
Indications for Professional Repair
- Puncture is larger than 1/4 inch (6mm) in diameter.
- Puncture is located in the tyre’s shoulder or sidewall.
- Multiple punctures in the same tyre.
- The tyre has been run flat for an extended period.
- The DIY repair does not hold air or shows signs of leakage.
- The tyre shows significant wear and tear already.
Types of Punctures and Their Repairability
Not all punctures are created equal, and your ability to repair them using a kit depends heavily on their location and size. The tread area of your tyre is the most forgiving for temporary repairs, but even then, there are limits.
| Puncture Location | Repairability with Kit | Professional Recommendation |
|---|---|---|
| Tyre Tread (Center) | Yes, for small punctures (up to 1/4 inch) | Recommended for a more permanent internal patch/plug. |
| Tyre Tread (Edge) | Limited; may not hold as well as center repairs. | Generally not recommended for permanent repair. Tyre replacement often advised. |
| Tyre Sidewall | No. Dangerous to attempt. | Tyre replacement is mandatory. |
| Tyre Shoulder | No. Highly unsafe to attempt. | Tyre replacement is mandatory. |
The size of the puncture is a critical factor. Most repair kits are designed for punctures that are essentially holes, not slits or tears. A puncture caused by a sharp nail or screw of appropriate size is usually repairable with a kit.
Maintaining Your Tyre Repair Kit
A tyre repair kit is only useful if it’s in good working order and complete. Regularly checking the contents ensures you’re prepared when an emergency strikes. Ensure all components are present and that the rubber plugs are not dried out or brittle.
Important: Always refer to the specific instructions provided with your tyre repair kit, as models and methodologies can vary slightly.
Kit Maintenance Tips
- Store the kit in a cool, dry place, away from extreme temperatures and direct sunlight.
- Check the expiry date of any sealant or cement provided.
- Ensure the tools are clean and free from rust or damage.
- Replace any used items promptly to ensure the kit is always ready.
- Familiarise yourself with the kit’s contents and how to use each item before you need it.
- Consider adding a small, high-quality portable air compressor if your kit doesn’t include one.
Alternatives to Tyre Repair Kits
While tyre repair kits are convenient for emergencies, they are not the only solution. Understanding your options can help you make the best decision based on your situation.
Tyre sealants, often in spray cans, are another common emergency option. These products inject a sealant and propellant into the tyre, aiming to seal small punctures and reinflate the tyre simultaneously. However, they can sometimes interfere with professional tyre repairs later and may not be effective for larger holes.
Comparison of Emergency Tyre Solutions
| Feature | Tyre Repair Kit | Tyre Sealant Spray | Roadside Assistance |
|---|---|---|---|
| Effectiveness for Small Punctures | High | Moderate to High | N/A (they do the repair or tow) |
| Effectiveness for Larger Punctures | Low to None | Low to None | N/A |
| Requires Tyre Removal | No | No | N/A |
| Temporary vs. Permanent | Temporary | Temporary | Can lead to permanent solution (repair or replacement) |
| Potential for Interference with Pro Repairs | Low | High | N/A |
Roadside assistance services, if you have them, offer a more comprehensive solution, typically involving either repairing the tyre on-site or towing your vehicle to a repair shop.
Frequently Asked Questions
What is the maximum size puncture that a car tyre repair kit can handle?
Most DIY tyre repair kits are designed for punctures up to 1/4 inch (approximately 6mm) in diameter. Punctures larger than this, or any damage to the sidewall or shoulder, cannot be safely repaired with a kit and require professional attention or tyre replacement.
Can I leave the repair plug in permanently?
While some plugs might hold for a while, DIY tyre repair kits are intended for temporary use only. It is highly recommended to have the tyre professionally inspected and, if possible, permanently repaired from the inside as soon as you can reach a tyre shop.
What should I do if the repair doesn’t hold air?
If you’ve followed the steps and the tyre still leaks air, the repair is unsuccessful. Do not drive on a flat or leaking tyre. If you have roadside assistance, call them for help.
If not, you may need to use your spare tyre.
How long does a temporary tyre repair typically last?
The lifespan of a temporary repair varies greatly. It could last for several hundred miles, or it might fail quickly. Factors include the size and location of the puncture, the quality of the repair, and driving conditions.
It’s always best to treat it as an emergency measure and seek a permanent solution promptly.
Can I use a tyre repair kit on a tubeless tyre?
Yes, car tyre repair kits are specifically designed for tubeless tyres, which are standard on most modern vehicles. They work by creating a seal within the puncture that prevents air from escaping the tubeless tyre.
Final Thoughts
Mastering how to use a car tyre repair kit can be an invaluable skill for any driver. Remember that these kits provide a crucial temporary solution, allowing you to regain mobility in an emergency. Always prioritize safety, follow the kit’s instructions carefully, and crucially, seek professional tyre inspection and repair as soon as possible afterwards to ensure your ongoing safety on the road. See also how car tires are made the full manufacturing process. See also when are car tires too old to be safe signs to watch for.
Related pick: Check today's price on Amazon See also what do car tire numbers mean a simple visual guide.
Products related to this article
Sponsored / affiliate links. As an Amazon Associate I earn from qualifying purchases. I may earn additional commission from eligible campaigns.