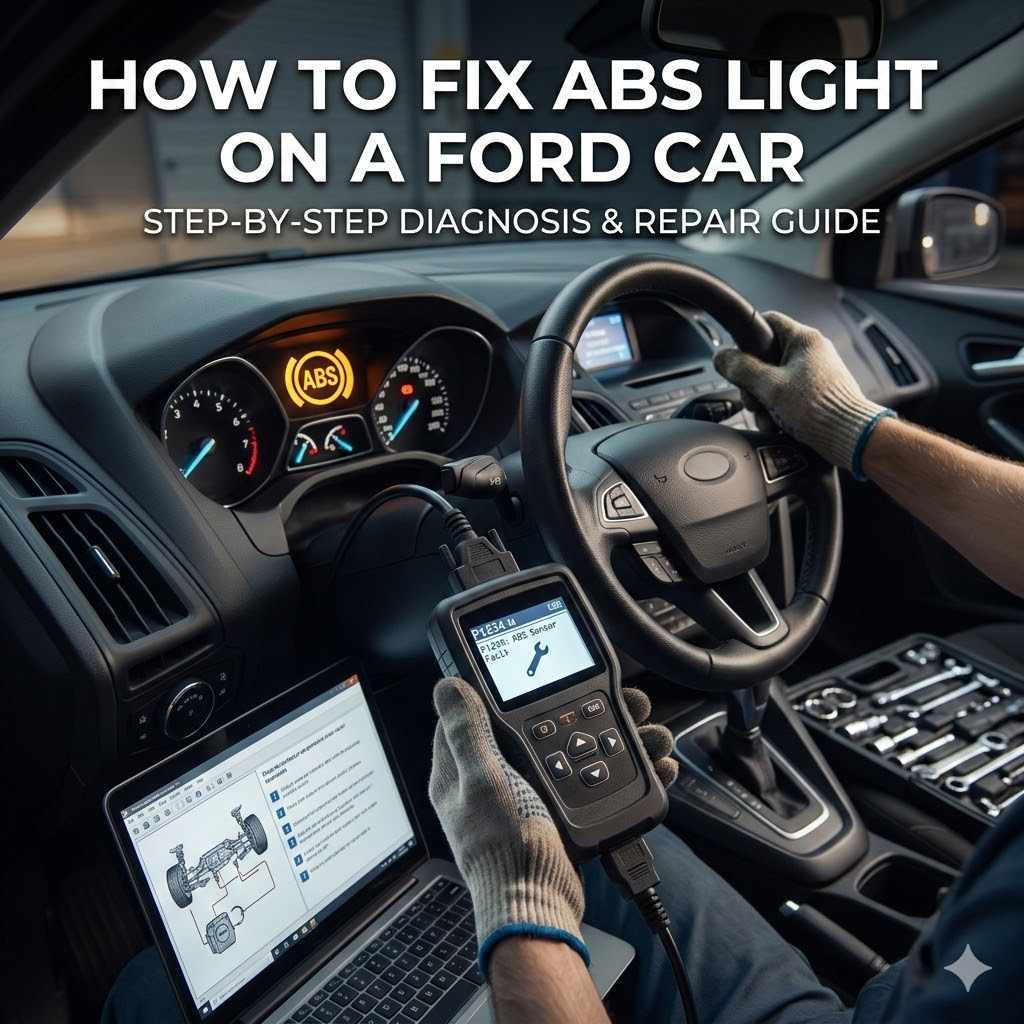
How to Fix ABS Light on a Ford Car
Is that ABS light glowing on your Ford’s dashboard? It can be worrying, especially if you’re not a car expert. Many people find this issue a bit tricky to figure out on their own.
But don’t sweat it! This guide makes How to Fix ABS Light on a Ford Car super simple. We’ll walk you through it step-by-step.
Get ready to get that light off!
Understanding Your Ford’s ABS Light
Seeing your ABS warning light on your Ford can be a bit of a puzzle. This light is a signal that something isn’t quite right with your Anti-lock Braking System. This system is super important for safe driving, especially in sudden stops or slippery conditions.
It prevents your wheels from locking up, letting you steer while braking hard. When the light comes on, it’s a sign that this system might not be working as it should, or there’s a minor glitch.
For many drivers, figuring out why the ABS light is on can seem like a big hurdle. There are several reasons, ranging from a simple sensor issue to something more complex. You might not have the right tools or know where to start looking.
This can lead to a lot of guesswork and worry. We aim to clear up that confusion. We’ll cover the most common causes in plain English.
This way, you can feel more confident about what’s going on and how to address it. Let’s start with the basics of what the ABS system is all about.
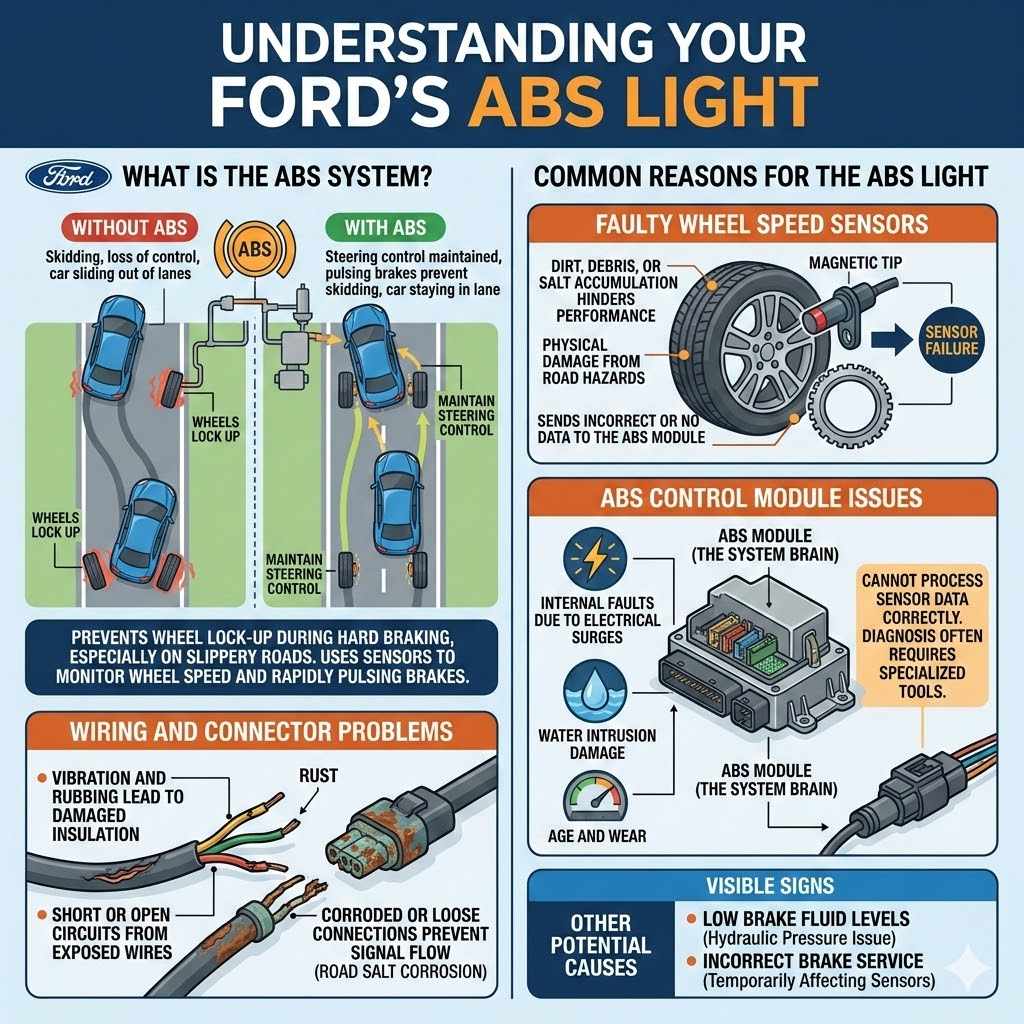
What is the ABS System
The Anti-lock Braking System, or ABS, is a vital safety feature in modern vehicles. Its main job is to prevent your wheels from locking up when you brake hard. This is especially important on wet or icy roads.
When your wheels lock up, you lose the ability to steer. ABS helps you maintain control. It does this by rapidly pulsing the brakes, allowing the tires to keep rotating.
This controlled pulsing gives you steering capability even during an emergency stop.
The system uses wheel speed sensors to monitor how fast each wheel is spinning. When it detects a wheel is about to lock up, it momentarily reduces brake pressure to that wheel. Then, it reapplies pressure.
This rapid cycle happens many times per second. This process ensures optimal braking performance and helps shorten stopping distances in many situations. Knowing this helps understand why a fault in this system would trigger a warning light.
Common Reasons for the ABS Light
Several things can cause your Ford’s ABS light to illuminate. One of the most frequent culprits is a faulty wheel speed sensor. These sensors are located at each wheel and constantly send speed data to the ABS control module.
If one of these sensors gets dirty, damaged, or simply fails, it sends incorrect information or no information at all. This immediately tells the system something is wrong.
Another common issue is a problem with the ABS control module itself. This is like the brain of the ABS system. If it malfunctions, it can’t process the sensor data correctly, leading to the warning light.
Issues with ABS wiring or connectors are also frequent. Corroded or loose connections can interrupt the flow of electrical signals. Sometimes, low brake fluid levels can also trigger the ABS light, as this system relies on hydraulic pressure.
Even something as simple as changing your brake pads can sometimes cause the light to come on if not done correctly, temporarily affecting a sensor.
Faulty Wheel Speed Sensors
Wheel speed sensors are small but mighty components of your ABS system. They are typically mounted near the wheel hub and have a magnetic tip that interacts with a toothed ring attached to the axle or rotor. As the wheel spins, this ring passes by the sensor, creating an electrical pulse.
The frequency of these pulses is directly related to the wheel’s speed. The ABS control module reads these pulses from all four wheels.
If a wheel speed sensor fails, the ABS module receives no data from that wheel, or it receives erratic data. This discrepancy is enough to trigger the ABS warning light. Dust, dirt, salt, and road debris can accumulate on these sensors and their rings, hindering their performance.
Physical damage from road hazards or during brake service can also disable them. Some sensors are more exposed than others, making them prone to damage.
ABS Control Module Issues
The ABS control module is a sophisticated electronic unit that manages the entire ABS system. It receives data from the wheel speed sensors and uses this information to decide when and how to pulse the brakes. If this module develops an internal fault, it can no longer perform its duties correctly.
This can be due to electrical surges, water intrusion, or simply age and wear.
Diagnosing a faulty control module can be more involved than checking sensors. It often requires specialized diagnostic tools to communicate with the module and check for error codes. Sometimes, the module can be repaired, but often it needs to be replaced.
Replacement is usually a job for a qualified mechanic, as it involves programming the new module to your specific vehicle.
Wiring and Connector Problems
The ABS system relies on a network of wires and connectors to transmit electrical signals. These wires run from the sensors, to the ABS module, and to other parts of the braking system. Over time, these wires can become damaged.
This damage can happen from vibration, rubbing against other components, or from road debris. The insulation can wear away, exposing the wires and leading to short circuits or open circuits.
Connectors are where wires join together. These can become loose, corroded, or filled with dirt and moisture. Corrosion is a major problem, especially in areas where road salt is used during winter.
A corroded connector can prevent electrical signals from passing through, just as if the wire were broken. Inspecting these connections carefully is a key step in diagnosing ABS light issues. You might see visible signs of corrosion or damage.
Diagnosing the ABS Light on Your Ford
Before you can fix the ABS light, you need to know what’s causing it. This is where diagnosis comes in. Think of it like being a detective for your car.
You need to gather clues to figure out the problem. For ABS issues, the best clues come from the car’s computer itself. Most modern Fords have an On-Board Diagnostics (OBD-II) port.
This port allows you to plug in a special scanner to read error codes.
These error codes, also known as Diagnostic Trouble Codes (DTCs), are like secret messages from your car’s computer. They point directly to the system or component that is reporting a problem. For example, a code like C1122 might tell you that a specific wheel speed sensor is not performing correctly.
Reading these codes is the most efficient way to narrow down the possibilities. It saves you from randomly replacing parts.
Using an OBD-II Scanner
An OBD-II scanner is an essential tool for diagnosing ABS lights. You can buy one yourself or visit an auto parts store, as many offer free code reading services. The scanner plugs into the OBD-II port, usually located under the dashboard on the driver’s side.
Once plugged in, you turn on the ignition and follow the scanner’s instructions to read the codes. Be sure to note down the exact code numbers and their descriptions.
These codes are standardized, so a P0
Interpreting Error Codes
Interpreting the error codes is the next critical step. For instance, a code like “C1155 – Right Front Wheel Speed Sensor Circuit Malfunction” is very specific. It tells you exactly which sensor to investigate and that the problem is likely with its circuit (wiring, connector, or the sensor itself).
Other codes might point to issues with the ABS pump, solenoid valves, or the ABS control module.
It’s important to understand that a code may indicate a symptom, not necessarily the root cause. For example, a wheel speed sensor code could be caused by a damaged sensor, a corroded connector, or even a damaged tone ring on the axle. So, while the code gives you a starting point, further investigation might be needed.
Some codes might indicate intermittent faults, meaning the problem doesn’t happen all the time. This makes them a bit harder to track down.
Visual Inspection of Components
Even with OBD-II codes, a good old-fashioned visual inspection is often necessary. After you have an idea of the problem area from the codes, get under your car (safely, using jack stands!) and look closely. Pay attention to the ABS components in the area indicated by the code.
For wheel speed sensors, check their physical condition. Look for cracks, damage, or signs of corrosion. Follow the wires leading from the sensor back towards the vehicle’s chassis.
Check the wiring harness for any breaks, chafing, or signs of rodent damage. Inspect the connectors for corrosion, loose pins, or debris. If the code points to an ABS modulator or pump, check for any obvious leaks or damage to those components and their associated electrical connectors.
Sometimes, a piece of road debris might have impacted a sensor or wiring, causing the problem. A thorough visual check can reveal issues that scanners can’t detect on their own.
Inspecting Wheel Speed Sensors and Rings
When inspecting wheel speed sensors, be gentle. They are often made of plastic and can be brittle. Look for any obvious physical damage to the sensor housing.
The crucial part is the tip of the sensor, which faces the toothed ring. Ensure there’s no debris stuck to it. Next, examine the tone ring.
This is a ring with many small teeth around the axle or rotor. Ensure these teeth are not broken, bent, or excessively corroded. Dirt or rust can sometimes build up on the tone ring, affecting the sensor’s reading.
A common issue is a cracked or broken tone ring. If you see any missing teeth or obvious damage to the ring, it will need to be
Checking ABS Wiring Harnesses and Connectors
The wiring harnesses for the ABS system are usually secured along the frame or suspension components. Inspect these wires for any signs of damage. Rubbing against metal parts can wear down the insulation, leading to shorts.
Rodents love to chew on wires, so look for gnawed sections. Pay close attention to where the wires connect to the sensors and the ABS module. These connectors have seals to keep out moisture and dirt, but they can fail.
Carefully uncouple any connectors you suspect might be problematic. Look for signs of corrosion, which usually appears as a greenish or whitish powder. If you see corrosion, you’ll need to clean it thoroughly.
Sometimes, pins inside the connector can get bent or pushed back, preventing a good connection. A small pick or needle can sometimes be used to gently reposition a pin. After cleaning and inspecting, reconnect the connectors securely.
They should click into place.
Simple Fixes for ABS Light Issues
Now that we’ve talked about diagnosing, let’s get to the fixes. Some ABS light problems are surprisingly easy to solve, even for beginners. Often, it’s just a matter of cleaning something up or reconnecting a loose wire.
Other times, it might require replacing a part. We’ll cover some of the most common and straightforward fixes you can try yourself. Remember to always work safely, especially when dealing with your car’s brakes.
The goal here is to empower you to tackle common ABS issues without needing to run to a mechanic for every little thing. We’ll break down each fix into easy steps. This way, you can feel confident in tackling them.
After a fix, you’ll want to clear the error code and see if the light stays off. If it comes back, further diagnosis might be needed. Let’s start with the simplest solutions.
Resetting the ABS Light
Sometimes, the ABS light comes on due to a temporary glitch in the system. This might happen after hitting a big bump or during a sudden braking event. In such cases, a simple reset might clear the light.
The most common way to reset the ABS light is by disconnecting the battery for a short period.
To do this, locate your car’s battery. Use a wrench to loosen the terminal clamp on the negative (-) battery terminal. Remove the clamp completely from the battery post.
Leave it disconnected for about 10-15 minutes. This allows the car’s computer modules to reset. After the time is up, reattach the negative terminal clamp and tighten it securely.
Start your car and see if the ABS light stays off. If the light was on due to a real fault, it will likely come back on.
Disconnecting the Battery
Disconnecting the battery is a straightforward process. First, ensure your car’s ignition is completely off. Open the hood and locate the battery.
It’s usually a rectangular box with two terminals on top. Identify the negative terminal, which is marked with a minus sign (-) and often has a black cable. Use an appropriate wrench (often 10mm or 13mm) to loosen the nut on the negative terminal clamp.
Once loose, carefully lift the clamp off the battery post. It’s important to remove the negative terminal first to avoid accidental short circuits.
Let the battery stay disconnected for the recommended time. This allows capacitors in various electronic modules to discharge, effectively performing a reset. After waiting, reattach the negative terminal clamp to the battery post.
Ensure it’s snug and secure. Reconnecting the positive (+) terminal is not usually necessary for an ABS reset, but it’s good practice to ensure both are properly connected if you disconnected both. After reconnecting, start your engine.
The ABS warning light should be off if the issue was a temporary glitch.
Cleaning ABS Sensors and Connectors
If you’ve identified a specific wheel speed sensor or connector as suspect, cleaning them can often resolve the issue. For wheel speed sensors, start by carefully removing any dirt or debris from the sensor itself and the surrounding area. You can use compressed air to blow away loose dust.
If there’s stubborn grime, you can use a soft brush and a mild cleaner, but be gentle.
For connectors, after disconnecting them, inspect for corrosion or debris. You can use an electrical contact cleaner spray to clean both sides of the connector. These cleaners evaporate quickly and help remove oxidation and contaminants.
For corroded pins, you might need a small wire brush or fine-grit sandpaper to gently clean them. Ensure the pins are straight before reconnecting. A proper connection is crucial for the sensor to send accurate signals.
Steps for Cleaning
Here are the steps for cleaning ABS components:
- Safely lift the vehicle and support it with jack stands.
- Locate the wheel speed sensor for the wheel indicated by your diagnostic codes. It’s usually attached to the wheel hub or steering knuckle.
- Carefully disconnect the electrical connector. You might need to press a small tab to release it.
- Inspect the sensor and the connector for dirt, debris, or corrosion.
- Use compressed air to blow away loose dust from the sensor and the connector.
- If needed, use a soft brush to gently remove stubborn dirt from the sensor tip.
- For connectors, spray electrical contact cleaner into both halves of the connector.
- Allow the cleaner to evaporate completely.
- Gently clean any visible corrosion from the metal pins within the connector using a small wire brush or fine sandpaper.
- Inspect the tone ring (the toothed ring near the sensor) for dirt, rust, or damage. Clean it with a brush and cleaner if necessary.
- Reconnect the electrical connector, ensuring it clicks securely into place.
- Repeat for any other suspect sensors or connectors.
Replacing a Faulty Wheel Speed Sensor
If cleaning doesn’t resolve the issue, and your diagnostic codes point to a specific wheel speed sensor, replacement might be necessary. This is a task many DIYers can handle. The process is similar to removing the sensor for cleaning, but you’ll be installing a new part.
First, purchase the correct
Procedure for Sensor Replacement
Here’s a general procedure for replacing a wheel speed sensor:
- Safely lift the vehicle and place it on jack stands.
- Remove the wheel associated with the faulty sensor.
- Locate the ABS wheel speed sensor and its electrical connector.
- Disconnect the electrical connector.
- Unbolt the sensor from its mounting location. It might be held in by one or two bolts. Sometimes, the bolt itself is the only thing holding it.
- Carefully pull the old sensor out. It might be a tight fit. You may need to gently twist or pry it.
- If the old sensor had a retaining clip or bracket, transfer it to the new sensor.
- Install the new wheel speed sensor into the mounting hole. Ensure it is seated correctly.
- Reinstall the mounting bolt(s) and tighten them securely.
- Reconnect the electrical connector to the new sensor.
- Reinstall the wheel and tighten the lug nuts.
- Lower the vehicle.
- Use your OBD-II scanner to clear the stored ABS error codes.
- Start the car and check if the ABS warning light has turned off.
When to Seek Professional Help
While many ABS light issues can be fixed by a determined DIYer, there are times when it’s best to call in the professionals. If you’ve tried the simpler fixes and the light is still on, or if your diagnostic codes are pointing to something more complex, a mechanic might be your best bet. They have specialized tools and extensive experience with various car systems.
Some problems, like a malfunctioning ABS control module or issues with the ABS pump, often require advanced diagnostic equipment and specialized knowledge. Attempting these repairs without the right tools or expertise could lead to further damage or safety risks. It’s also wise to consult a professional if you’re not comfortable working on your vehicle’s braking system, as safety is paramount.
Complex ABS System Faults
Certain ABS faults are inherently more complex and difficult to diagnose without professional tools. For instance, an issue with the ABS hydraulic modulator assembly can be challenging. This unit contains solenoid valves that control brake fluid pressure to each wheel.
If one of these valves fails, it can affect braking performance unevenly. Diagnosing and repairing this often requires specialized pressure gauges and scan tools capable of testing individual valve solenoids.
Another complex area is internal failures within the ABS control module. While some modules can be repaired, it’s a specialized service.
Abs Pump Issues
The ABS pump is a key component responsible for reapplying brake pressure when the system activates. If the pump itself is failing, or if there’s a leak in the hydraulic system, the ABS light will illuminate. Symptoms of a failing ABS pump can include a loud whining noise from the engine bay during braking, or a spongy brake pedal.
The pump works with the ABS control module and modulator to create the necessary hydraulic pressure.
Diagnosing an ABS pump issue usually involves checking for relevant diagnostic trouble codes, inspecting the pump for leaks, and sometimes testing its electrical operation and pressure output. Replacement of the ABS pump is a significant repair that involves bleeding the entire brake system to remove any air. This is a procedure that requires precision and the correct tools to ensure the ABS system functions properly afterward.
Importance of Professional Diagnostics
Professional mechanics have access to a wealth of resources that the average car owner doesn’t. This includes manufacturer-specific diagnostic software, technical service bulletins (TSBs) that detail known issues and repair procedures, and advanced testing equipment. For example, a technician can perform a “brake bleed” procedure using a specialized scan tool that cycles the ABS pump and valves to ensure all air is purged from the system.
This is critical for proper ABS function after component replacement.
Moreover, safety is always a primary concern. The braking system is a critical safety feature. If you are unsure about any part of the diagnostic or repair process, it’s always safer to have a qualified technician handle it.
They can accurately identify the root cause of the problem and perform the repair correctly, ensuring your ABS system is fully functional and safe to operate.
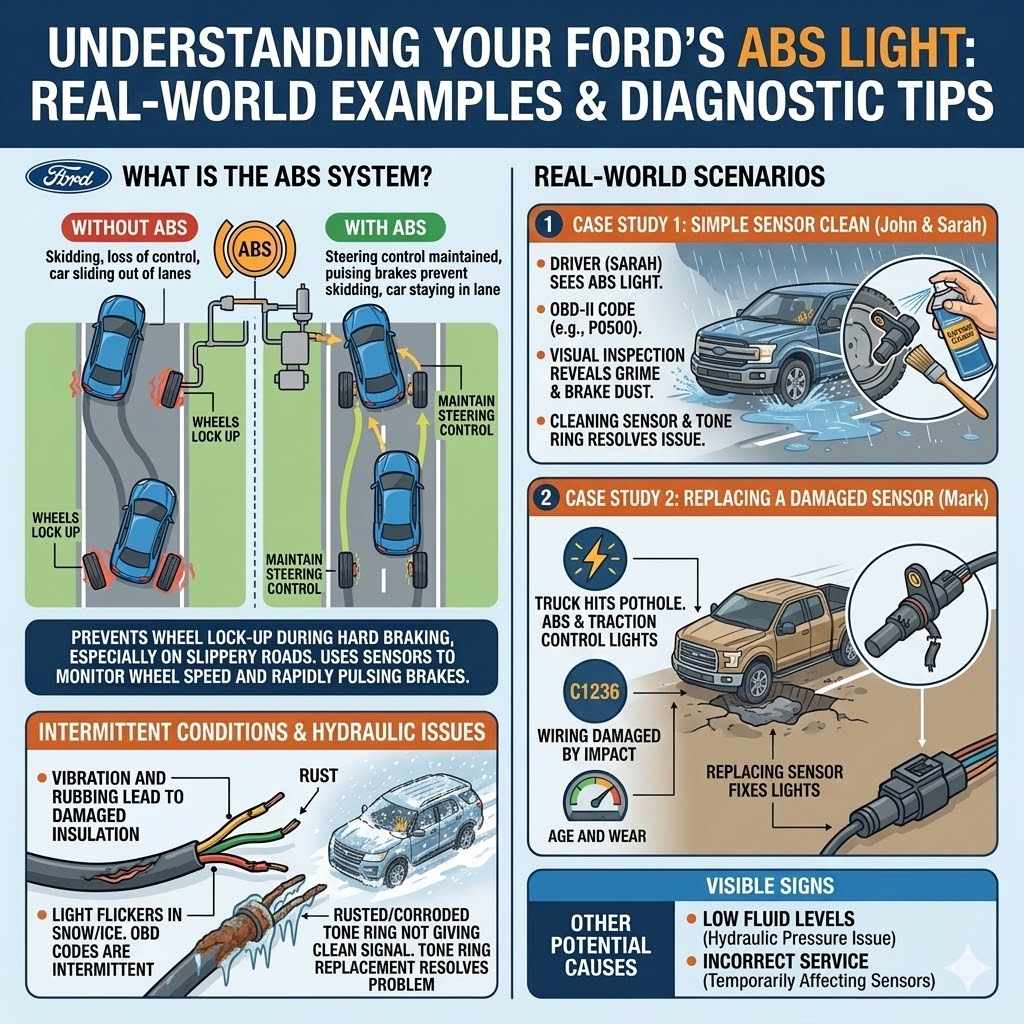
Real-World Examples and Scenarios
Let’s look at some examples of how ABS light issues play out in the real world. Understanding these scenarios can help you recognize similar situations with your own Ford. These examples cover common problems and how they were resolved, giving you a practical perspective on troubleshooting.
Consider John, who noticed his ABS light come on after driving through a large puddle after a heavy rain. The OBD-II scanner revealed a code for the front passenger side wheel speed sensor. After cleaning the sensor and its connector, the light went off and stayed off.
This showed that moisture or debris had temporarily affected the sensor’s performance, a common issue after driving through water.
Example 1 A Simple Sensor Clean
Sarah’s Ford Focus had its ABS light turn on unexpectedly one morning. She used an OBD-II scanner and found a code P0500, which relates to vehicle speed sensor “A” malfunction. After checking online forums, she learned this could often be a wheel speed sensor issue.
She located the front driver’s side wheel speed sensor and saw it was covered in road grime and what looked like brake dust.
She carefully cleaned the sensor with a brush and some electrical contact cleaner. She also cleaned the tone ring behind the rotor. After reconnecting the sensor and clearing the code with her scanner, the ABS light remained off.
This scenario highlights how simple cleaning can resolve what seems like a complex electrical issue. It underscores the importance of a visual inspection before jumping to conclusions about component failure.
Example 2 Replacing a Damaged Sensor
Mark was driving his Ford F-150 when he hit a large pothole. Shortly after, his ABS and Traction Control lights both illuminated. A scan revealed a code C1236 for the rear wheel speed sensor circuit.
Upon visual inspection, he noticed the wiring leading to the rear passenger side wheel speed sensor looked like it had been snagged and pulled, with a small tear in the insulation near the connector. The sensor itself also seemed slightly askew.
He decided to replace the rear passenger side wheel speed sensor. After installing the new sensor and ensuring the wiring was secured properly away from any moving parts, he cleared the codes. Both the ABS and Traction Control lights stayed off.
In this case, the impact from the pothole directly damaged the sensor or its wiring, requiring a replacement part.
Scenario: Snowy Conditions Trigger ABS Light
During a particularly cold winter, David’s Ford Explorer’s ABS light flickered on whenever he drove on icy roads. The problem wasn’t constant, making it harder to diagnose. Diagnostic codes pointed to intermittent issues with the front left wheel speed sensor.
He cleaned the sensor and connector, but the light still came on during snowy conditions. He noticed significant rust buildup on the tone ring for that wheel.
He decided to replace the ABS sensor, thinking it might be more sensitive due to age. However, the light persisted. He then took it to a mechanic who confirmed the tone ring was heavily corroded and not providing a clean signal, especially when iced over.
The mechanic replaced the tone ring, and this finally resolved the intermittent ABS light issue. This illustrates how environmental factors like rust and ice can exacerbate subtle sensor or tone ring problems.
Scenario: Low Brake Fluid Alert
Maria’s Ford Escape suddenly displayed both the ABS light and a brake warning light. She checked her brake fluid reservoir and noticed it was significantly below the minimum fill line. She added the recommended type of brake fluid to the correct level.
After starting the car, both lights went off. This simple check saved her from a more complex diagnosis, as a low fluid level can sometimes trigger the ABS system to report an issue.
While low brake fluid doesn’t directly cause ABS failure, it can affect hydraulic pressure within the braking system. The ABS module monitors these pressures. If the fluid is too low, the system might interpret this as a fault or a precursor to a problem.
This scenario highlights the importance of checking basic fluid levels as part of any brake-related warning light diagnosis.
Frequently Asked Questions
Question: Can I drive with the ABS light on
Answer: Yes, you can generally drive with the ABS light on. Your regular brakes will still work. However, the Anti-lock Braking System will not function, meaning your wheels could lock up during hard braking.
This reduces your ability to steer and control the vehicle. It’s best to get it checked and fixed as soon as possible, especially if you drive in varied weather conditions.
Question: How much does it cost to fix an ABS light
Answer: The cost can vary widely. Simple fixes like cleaning sensors or resetting the light might cost nothing if you do it yourself. Replacing a wheel speed sensor can cost from $100 to $300, depending on the part and labor.
More complex issues like a faulty ABS module or pump can cost anywhere from $500 to over $1000.
Question: Will a loose gas cap cause my ABS light to come on
Answer: No, a loose gas cap typically triggers the Check Engine light, not the ABS light. The ABS light is specifically related to the Anti-lock Braking System. These are two separate systems in your vehicle.
Question: Is it safe to replace ABS sensors myself
Answer: For many DIYers, replacing ABS sensors is a manageable task. It usually requires basic tools like wrenches and a socket set. You’ll also need an OBD-II scanner to clear the error codes afterward.
If you are not comfortable working on your car’s braking system, it’s best to have a professional do it.
Question: How long does it take to reset the ABS light by disconnecting the battery
Answer: Disconnecting the battery for about 10 to 15 minutes is usually enough to reset most electronic modules, including the ABS system. If the ABS light comes back on immediately after starting the car, it indicates a persistent fault that needs further diagnosis and repair.
Summary
Seeing your Ford’s ABS light can seem worrying, but many issues are fixable. Start by understanding your ABS system and what the warning light means. Then, use an OBD-II scanner to get error codes.
These codes will guide your inspection of sensors, wiring, and connectors. Simple fixes like cleaning components or resetting the system can often resolve the problem. If the issue persists or seems complex, don’t hesitate to seek professional help.
Addressing this light ensures your braking system works safely.