7.5 HP Gamefisher Carburetor Fixes and Guide
Fixing a Gamefisher outboard can seem tricky, especially when the carburetor is acting up. Many people find this part confusing. This guide breaks it down into simple steps.
We will show you exactly what to do to get your 7.5 HP Gamefisher running smoothly again. You’ll learn easy ways to fix common carburetor problems. Let’s make your boat ready for the water.
Understanding Your 7.5 HP Gamefisher Carburetor
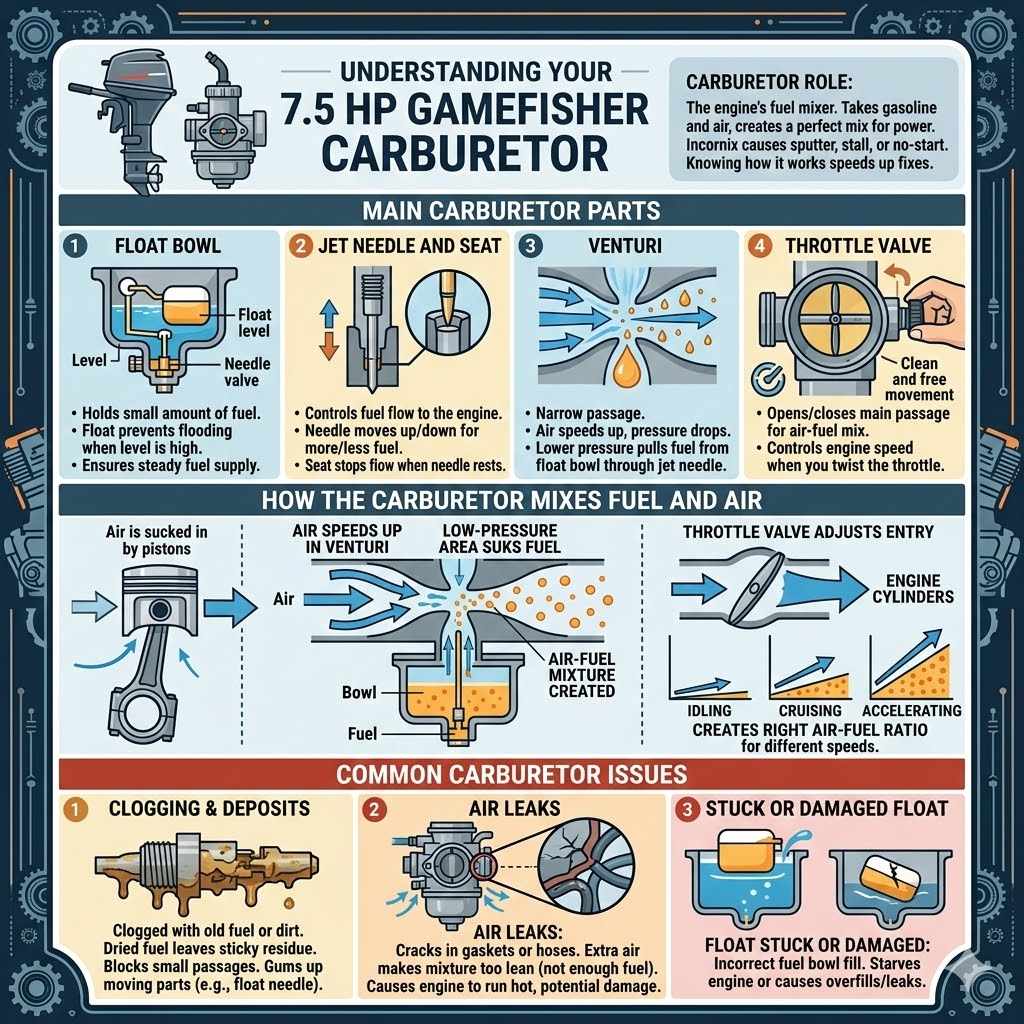
The carburetor on your 7.5 HP Gamefisher is like the engine’s fuel mixer. It takes gasoline and mixes it with air. This perfect mix then goes into the engine to make power.
If this mix is wrong, your engine won’t run well. It might sputter, stall, or not start at all. Knowing how it works helps you fix it faster.
This section explains the basic parts and their jobs.
Main Carburetor Parts
Your carburetor has a few key parts that work together. Understanding these parts is the first step to fixing any issues. We will go over the most important ones so you know what you are looking at.
- Float Bowl
The float bowl holds a small amount of fuel. A float inside the bowl acts like a toilet tank float. It stops fuel from flooding the carburetor when the level gets high enough.
This ensures a steady fuel supply to the engine.
- Jet Needle and Seat
The jet needle controls the flow of fuel into the engine. It moves up and down to let more or less fuel in, depending on how fast the engine is running. The seat is where the needle rests when it’s closed, stopping fuel flow.
- Venturi
This is a narrow passage in the carburetor. As air rushes through it, the speed increases and the pressure drops. This lower pressure pulls fuel from the float bowl through the jet needle, mixing it with the air.
- Throttle Valve
This valve opens and closes the main passage for the air-fuel mix going into the engine. When you twist the throttle, this valve moves, controlling engine speed.
These parts must be clean and move freely for the carburetor to work right. Dirt or damage to any of these can cause problems. Knowing their role makes troubleshooting much easier.
How the Carburetor Mixes Fuel and Air
The process is quite clever. Air is sucked into the carburetor by the engine’s pistons. As this air passes through the narrow venturi, it speeds up.
This speed creates a low-pressure area. This low pressure then sucks fuel from the float bowl, through the jet, and into the fast-moving air. The faster the engine runs, the more air is pulled in, and the more fuel is drawn out.
This creates the right air-fuel ratio for different engine speeds. The throttle valve then adjusts how much of this mixed air and fuel can enter the engine cylinders.
Common Carburetor Issues
Carburetors can get clogged with old fuel or dirt. This is a very common problem with any engine that sits for a while. When fuel dries up, it leaves a sticky residue.
This residue can block the small passages inside the carburetor. It can also gum up the moving parts like the float needle and seat.
Another issue is air leaks. If there are cracks in the gaskets or hoses, extra air can get into the mix. This makes the fuel mixture too lean, meaning there isn’t enough fuel.
A lean mixture can cause the engine to run hot and potentially damage it.
Sometimes, the float itself can get stuck or damaged. If the float bowl doesn’t fill with the right amount of fuel, the engine will starve. Or, if it overfills, fuel can leak out where it shouldn’t.
Troubleshooting Your 7.5 HP Gamefisher Carburetor
When your 7.5 HP Gamefisher engine isn’t running right, the carburetor is often the culprit. This section gives you clear steps to find the problem. We will cover common symptoms and how to check for them.
Symptoms of a Bad Carburetor
You might notice a few things if your carburetor needs attention. The engine might be hard to start. It could also run rough, sputtering or shaking.
Sometimes, the engine will start but then quickly die. You might also see fuel leaking from the carburetor.
If the engine runs okay at full speed but dies when you slow down, this often points to a fuel delivery problem in the carburetor. This could be a clogged idle jet.
An engine that runs fine for a bit and then starts to lose power might have a fuel starvation issue. This could be a partially clogged fuel line or a carburetor float that isn’t letting enough fuel in.
Checking for Clogs
Clogs are the most frequent cause of carburetor problems. Small jets and passages can get blocked by dirt or old fuel deposits. Even a tiny blockage can stop your engine from running correctly.
You will need to take the carburetor apart to clean these out.
Old fuel is a major enemy of carburetors. When fuel sits for a long time, especially with ethanol, it breaks down. This breakdown creates varnish and gum.
These sticky residues can clog fuel passages within minutes.
Many times, the idle circuit is the first to get blocked. This is the part that lets the engine run at low speeds. If the idle circuit is clogged, the engine will be very hard to start or will not run at idle at all.
Fuel Leaks
Fuel leaks are a serious issue. They can be a fire hazard. Leaks usually happen because of a bad seal, a damaged float needle, or a crack in the carburetor body.
A common cause of leaking is a stuck float needle. If the needle doesn’t seal properly against the seat, fuel will keep flowing into the float bowl. This can cause fuel to overflow and leak out of the vent or drip down the outside of the carburetor.
Another cause could be damaged gaskets. The gaskets seal different parts of the carburetor together. If a gasket is torn or brittle, fuel can seep out from the joints.
Air Leaks
Air leaks mean that extra air is getting into the engine where it shouldn’t. This usually happens around the intake manifold, where the carburetor attaches to the engine. It can also happen with cracked fuel lines or vacuum hoses.
An air leak will make your engine run lean. This means there is too much air and not enough fuel. Symptoms of a lean condition include rough idling, sputtering, and the engine running hotter than usual.
In severe cases, it can lead to engine damage.
You can test for air leaks by spraying a bit of starting fluid or carburetor cleaner around suspected areas while the engine is running. If the engine speed changes, you have found a leak.
Cleaning and Rebuilding Your 7.5 HP Gamefisher Carburetor
This is where we get hands-on. Cleaning your carburetor is often the best way to fix problems. If it’s very dirty or parts are worn, you might need to rebuild it.
We will guide you through the steps.
Tools and Supplies You Will Need
Before you start, gather your tools. You will need a set of screwdrivers (flathead and Phillips), pliers, and possibly a small wrench. You will also need a can of carburetor cleaner spray.
A soft brush, like a toothbrush, is useful for scrubbing. It is also a good idea to have a carburetor repair kit. This kit will have new gaskets, O-rings, and a new float needle and seat if needed.
- Screwdrivers (flathead, Phillips)
These are essential for removing and reassembling the carburetor components. Make sure you have a variety of sizes.
- Pliers
Used for gripping small parts or removing stubborn screws.
- Carburetor Cleaner Spray
This aerosol cleaner is specifically designed to dissolve fuel varnish and gum. It is a powerful solvent.
- Soft Brush or Toothbrush
For gently cleaning away residue without scratching delicate parts.
- Carburetor Repair Kit
This is highly recommended. It provides all the necessary seals and small parts that wear out over time.
- Safety Glasses and Gloves
Protect your eyes and skin from chemicals and small parts.
- Container for Parts
To keep screws and small components organized while you work.
Step-by-Step Cleaning Process
First, disconnect the fuel line from the carburetor. Then, carefully remove the carburetor from the engine. Take pictures as you go to help remember how it goes back together.
Start by taking the float bowl off. You will see the float and the needle. Remove these carefully.
Spray carburetor cleaner into all the small passages and jets you can see. Use the brush to scrub any stubborn grime. Make sure to spray cleaner through the main jet and the idle jet.
Use compressed air if you have it to blow out the passages after cleaning. This helps ensure no cleaner or debris is left behind. Reassemble the carburetor with your new parts from the repair kit, making sure all seals are seated properly.
When to Rebuild the Carburetor
If cleaning doesn’t solve the problem, or if you find damaged parts like cracked O-rings or worn gaskets, it’s time for a rebuild. A rebuild means replacing all the wear-prone parts with new ones from a kit.
Carburetor rebuild kits are readily available for most engines. They typically include new gaskets, O-rings, a new float needle, and a seat. Sometimes they also include other small parts like springs or screws.
Rebuilding ensures that all the seals are fresh and the fuel metering components are like new. This is especially important if the carburetor is old or has been sitting with fuel in it for a long time.
Here is a comparison of cleaning versus rebuilding:
| Action | When to Do It | Outcome |
|---|---|---|
| Cleaning | Minor clogs, general grime, routine maintenance | Removes built-up deposits, restores basic function |
| Rebuilding | Worn seals, damaged parts, persistent problems after cleaning | Replaces all critical wear items, restores carburetor to like-new condition |
Example Scenario: Engine Won’t Idle
Let’s say your 7.5 HP Gamefisher starts, but only runs if you keep the throttle wide open. When you try to bring it back to idle, it dies.
This is a classic sign of a clogged idle circuit in the carburetor. The main jet is still letting fuel through, so it runs at higher speeds. But the tiny passage for the idle circuit is blocked, so no fuel gets to the engine at low speeds.
Here’s how you’d fix it:
- Remove the carburetor.
- Remove the float bowl.
- Locate the idle jet. It’s usually a small brass screw or a removable plug with a tiny hole.
- Carefully remove the idle jet. Spray carburetor cleaner through the jet itself and the passage it screws into.
- Use a thin piece of wire (like from a bread tie) to gently poke through the passage to ensure it’s clear.
- Reassemble the carburetor and test.
Adjusting Your 7.5 HP Gamefisher Carburetor
After cleaning or rebuilding, you will likely need to make some adjustments. This ensures the engine runs at its best. The most common adjustments are for idle speed and idle mixture.
Getting these right makes a big difference in how your engine performs.
Idle Speed Adjustment
The idle speed is how fast the engine runs when you are not giving it any throttle. You can usually adjust this with a screw that touches the throttle linkage. Turning this screw changes how much the throttle plate is open at idle.
To adjust idle speed:
- Start the engine and let it warm up.
- Locate the idle speed screw. It’s usually a larger screw that physically stops the throttle plate from closing completely.
- If the engine is idling too fast, turn the screw counter-clockwise to allow the throttle plate to close more.
- If the engine is idling too slow or stalls, turn the screw clockwise to open the throttle plate a bit more.
- Make small adjustments and test the idle speed by letting go of the throttle.
A proper idle speed will be smooth and stable. It should be fast enough to keep the engine running but slow enough that it doesn’t feel like it’s trying to jump out of the water.
Idle Mixture Adjustment
The idle mixture screw controls how much fuel is mixed with air at idle. Getting this right is crucial for smooth idling and good fuel economy.
To adjust the idle mixture:
- With the engine warm and idling at the correct speed, locate the idle mixture screw. This screw often has a spring on it.
- Turn the mixture screw in (clockwise) until the engine starts to run rough or slow down. This means the mixture is becoming too lean.
- Now, slowly turn the screw out (counter-clockwise) until the engine runs rough or slow again. This means the mixture is becoming too rich.
- Find the point in between where the engine idles the smoothest and fastest. This is usually about 1/2 to 1 full turn out from the leanest point.
- You may need to readjust the idle speed screw slightly after adjusting the mixture screw.
This adjustment ensures that the engine gets just the right amount of fuel at idle. It helps prevent stalling and rough running.
Testing After Adjustment
Once you’ve made adjustments, it’s time to test. Take your boat out on the water if possible. See how the engine starts, idles, and accelerates.
Pay attention to any sputtering, hesitation, or stalling. If these issues persist, you might need to fine-tune the adjustments or revisit the cleaning process.
Sometimes, slight adjustments can make a huge difference. A poorly adjusted carburetor can waste fuel and make your engine perform poorly. Proper adjustment makes sure you get the most power and efficiency from your 7.5 HP Gamefisher.
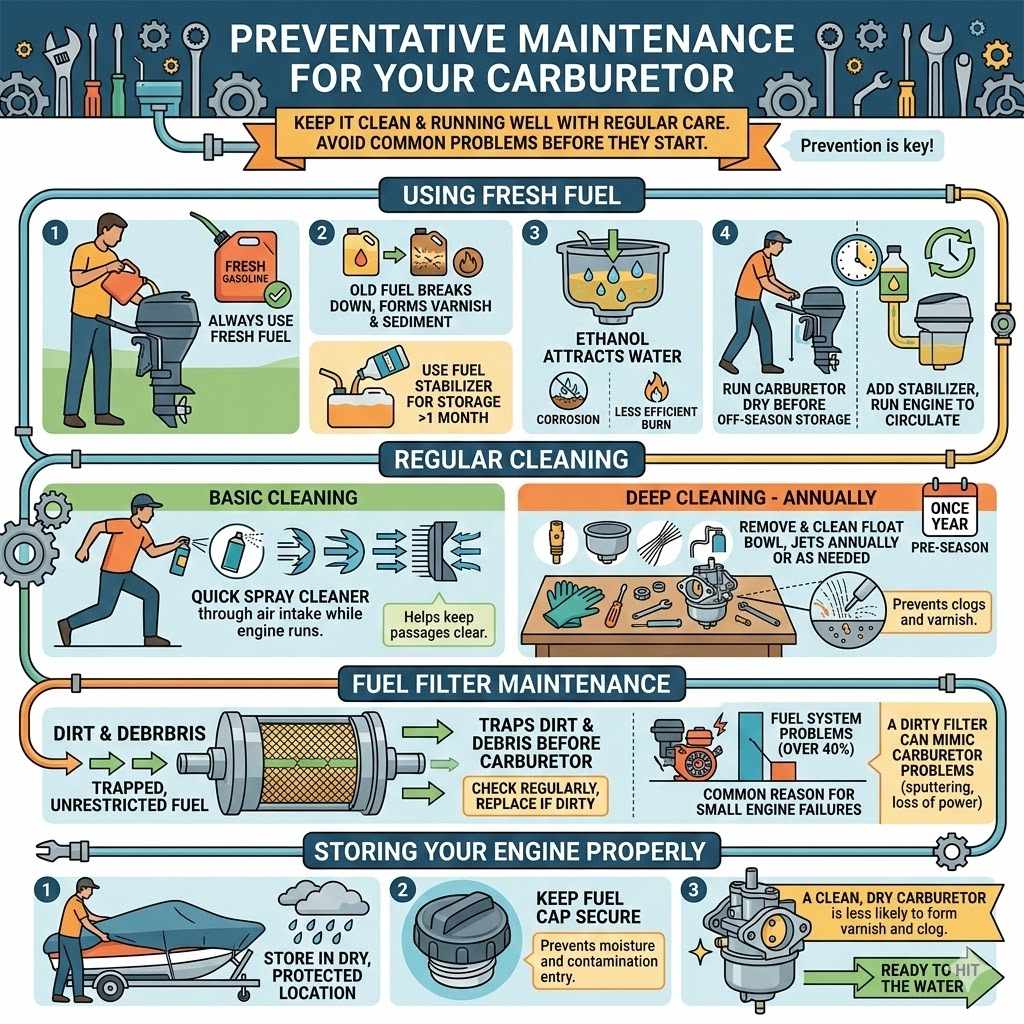
Preventative Maintenance for Your Carburetor
Keeping your carburetor clean and running well involves regular care. A few simple steps can prevent many problems before they start.
Using Fresh Fuel
Always use fresh gasoline in your outboard. Old fuel is the biggest enemy of carburetors. If you store your boat for more than a month, consider using a fuel stabilizer.
This helps keep the fuel from breaking down.
Ethanol in modern gasoline can attract water. Water in fuel can cause corrosion inside the carburetor and fuel system. It can also lead to a less efficient burn.
When storing your engine for the off-season, it’s best to run the engine until it uses up all the fuel in the carburetor. This prevents fuel from sitting and varnishing inside the carb. You can also add a fuel stabilizer and run the engine for a few minutes to circulate it through the system.
Regular Cleaning
Even if your engine is running fine, it’s a good idea to periodically clean your carburetor. This is especially true if you use your boat often or if the fuel quality is questionable.
A quick spray of carburetor cleaner through the air intake while the engine is running can help keep things clear. For a more thorough clean, you can remove and clean the float bowl and jets annually or as needed.
Consider a simple preventative cleaning once a year, perhaps before the start of the boating season. This involves removing the float bowl and spraying cleaner through the main jet and any visible passages. It is much easier to prevent clogs than to fix them.
Fuel Filter Maintenance
A clean fuel filter is essential for a healthy carburetor. The fuel filter traps dirt and debris before it reaches the carburetor. If the filter is clogged, it restricts fuel flow, starving the engine.
Check your fuel filter regularly and replace it if it looks dirty or if you suspect it is clogged. This is a cheap and easy maintenance task that can save you a lot of trouble.
A dirty fuel filter can mimic carburetor problems, leading to sputtering or loss of power. Always check the fuel filter as part of your routine checks.
Statistics show that fuel system issues are among the most common reasons for small engine failures. For example, one study indicated that over 40% of small engine repairs are related to fuel system problems, with carburetors being a frequent offender. Ensuring a clean fuel supply and regular carburetor maintenance can significantly reduce the likelihood of these issues.
Storing Your Engine Properly
Proper storage is key to preventing carburetor problems during off-season. As mentioned, running the engine dry of fuel is a good practice. Alternatively, use a fuel stabilizer and run the engine for a few minutes to ensure it circulates through the carburetor.
Ensure your boat is stored in a dry, protected location. This helps prevent moisture from entering the fuel tank or engine components. Keeping your fuel cap secure also prevents contamination.
A little effort in proper storage can save you a lot of work when you are ready to hit the water again. A clean, dry carburetor is less likely to form varnish and clog.
Frequently Asked Questions
Question: How often should I clean my 7.5 HP Gamefisher carburetor?
Answer: It is a good idea to clean your carburetor at least once a year, or more often if you use your boat frequently or notice performance issues. Running the engine dry of fuel for storage also helps.
Question: What is the most common problem with a Gamefisher carburetor?
Answer: The most common problem is clogs caused by old fuel deposits. This blocks the tiny passages and jets needed for proper fuel flow.
Question: Can I use a general cleaner on my carburetor?
Answer: It is best to use a cleaner specifically designed for carburetors. These cleaners are formulated to break down fuel varnish and gum without damaging carburetor parts.
Question: My engine starts but dies immediately. What could be wrong?
Answer: This usually indicates a problem with the idle circuit in your carburetor being clogged. You will likely need to clean out the idle jet and passage.
Question: How do I know if I need to rebuild my carburetor instead of just cleaning it?
Answer: If cleaning does not fix the problem, or if you find damaged parts like cracked seals or a worn needle and seat, a rebuild is necessary. Using a repair kit with new parts is recommended.
Summary
Your 7.5 HP Gamefisher carburetor needs a little care to run right. This guide showed you its parts, common problems, and how to fix them. You learned to clean, adjust, and maintain it.
Following these steps will keep your engine running smoothly and reliably on the water.