How to Replace Your Honda Civic Battery
Some car jobs can seem a little tricky, especially if you haven’t done them before. Knowing How to
How to Replace Honda Civic 2017 Car Battery Safely
This section covers the essential steps and safety precautions you need to know before you even think about touching your car battery. It’s all about making sure you stay safe and don’t damage anything. We’ll explain why safety is so important when working with car batteries, as they store a lot of power.
You’ll learn about the tools you’ll need and how to prepare your workspace.
Gathering Your Tools and Supplies
Before you start, having the right tools makes the job much easier. You’ll need a few basic items that most people have in their garage or can get at any auto parts store. This ensures you’re ready to go when it’s time to get to work.
- Socket Wrench Set: You’ll need a few specific socket sizes, usually around 10mm and 12mm, to loosen the battery terminals and the hold-down bracket. A ratchet handle will make this much faster than using a wrench.
- Battery Terminal Cleaner Brush: This wire brush is designed to clean corrosion off the battery terminals and cable clamps. Keeping these connections clean is key to good electrical flow.
- Gloves: Protect your hands from dirt, grease, and battery acid. Nitrile or rubber gloves are a good choice.
- Safety Glasses: Always wear eye protection to shield your eyes from any sparks or accidental splashes of battery acid.
- New Car Battery: Make sure you have the correct
- Anti-Corrosion Spray or Grease: This helps prevent future corrosion on the battery terminals and cable clamps.
Having all these items ready beforehand means you won’t have to stop midway through the process to find something. This saves time and prevents frustration. It’s like having a good recipe where all your ingredients are prepped and ready to go.
Understanding Battery Safety Precautions
Car batteries store a significant amount of electrical energy. They also contain sulfuric acid, which is corrosive. Because of this, it’s vital to follow safety guidelines to prevent injury or damage to your vehicle.
Understanding these risks helps you work with more confidence and care.
- Disconnect the Negative Terminal First: Always disconnect the black cable (negative terminal, usually marked with a minus sign) before the red cable (positive terminal, marked with a plus sign). This prevents accidental short circuits.
- Never Smoke or Have Open Flames Nearby: Batteries can release flammable hydrogen gas. Sparks or flames can cause a dangerous explosion.
- Work in a Well-Ventilated Area: This helps to dissipate any fumes that the battery might release.
- Avoid Dropping Tools on the Battery: This can cause sparks or damage the battery casing.
- Handle Batteries Carefully: Batteries are heavy. Lift with your legs, not your back, to avoid strain.
These precautions might seem like a lot, but they are simple habits that make a big difference. They are designed to keep you safe while you perform this common car maintenance task. Think of them as standard operating procedures for handling potentially hazardous materials.
Step-by-Step Guide How to Replace Honda Civic 2017 Car Battery
Now that you’re prepared and understand the safety measures, let’s get into the actual process of replacing your Honda Civic’s battery. This section breaks down each action into clear, manageable steps. We’ll guide you through removing the old battery and installing the new one, ensuring everything is connected correctly.
Locating the Car Battery
In most 2017 Honda Civic models, the car battery is located under the hood. You’ll typically find it on one side of the engine bay, often towards the front or a side. It’s usually a rectangular box with two terminals on top.
You’ll need to open your car’s hood to access it.
To open the hood, you’ll usually find a lever inside the car, typically near the driver’s side dashboard or floor. Pulling this lever releases the hood latch. You might then need to use a secondary safety latch located under the front edge of the hood to fully open it.
Once the hood is open, you’ll see the engine compartment. The battery is a prominent, often black, rectangular component within this space.
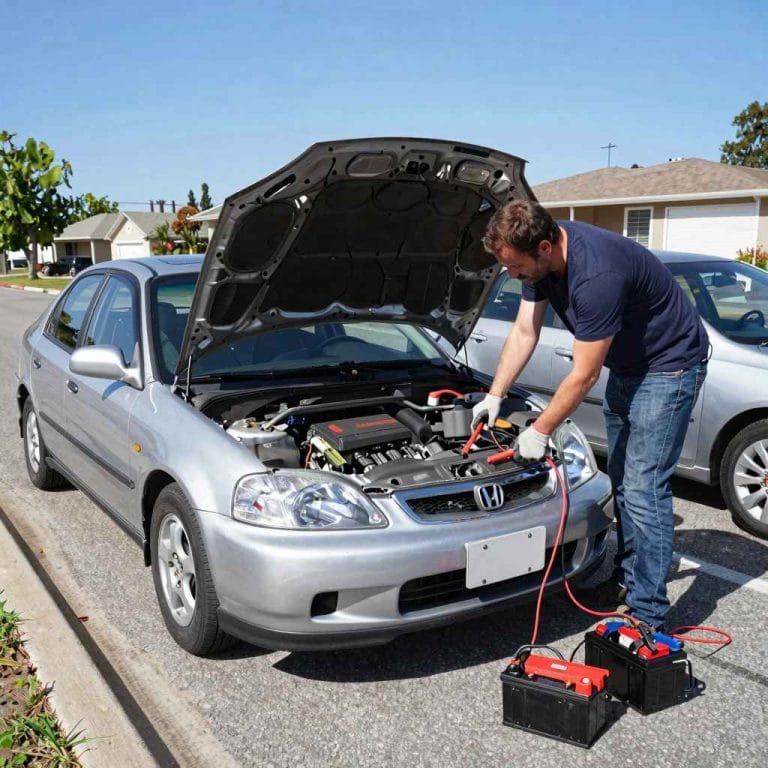
Disconnecting the Old Battery
This is a critical step for safety. You need to ensure no power is flowing before you start removing the battery. Following the correct order prevents electrical shorts.
This part requires a bit of careful attention to detail.
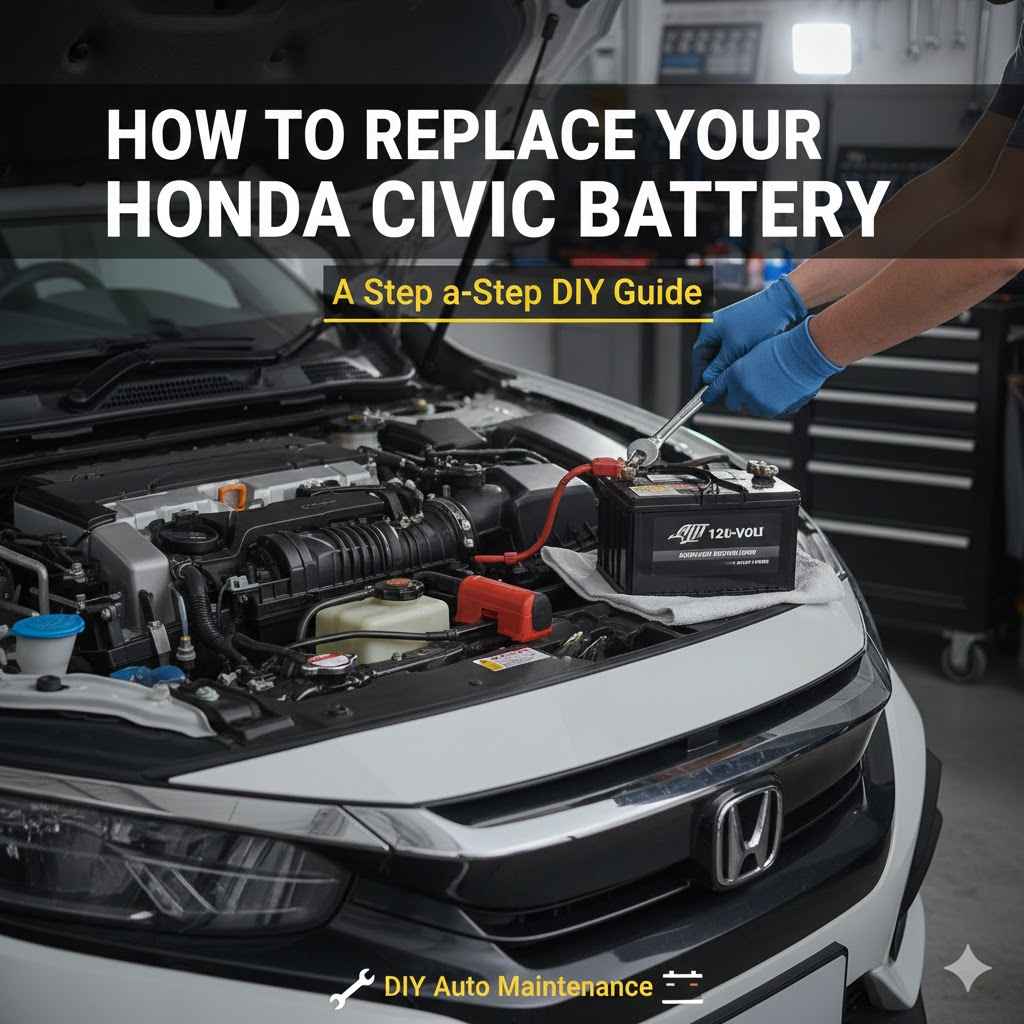
- Identify the Terminals: Look for the two metal posts on top of the battery. One will have a black cable connected to it (the negative terminal), and the other will have a red cable (the positive terminal).
- Loosen the Negative Terminal Clamp: Using your socket wrench, turn the nut on the clamp holding the black cable to the negative terminal counter-clockwise. You only need to loosen it enough to be able to wiggle the cable off the terminal.
- Remove the Negative Cable: Once loosened, gently twist and pull the black cable upwards and away from the battery terminal. Set this cable aside, making sure it cannot accidentally touch the battery terminal again.
- Loosen the Positive Terminal Clamp: Now, do the same for the red cable on the positive terminal. Loosen the nut counter-clockwise with your socket wrench until the clamp is loose.
- Remove the Positive Cable: Carefully lift the red cable off the positive terminal. Again, ensure it doesn’t touch any metal parts of the car or the battery itself.
It’s a good idea to tuck the removed cables away so they don’t swing back and make contact with the battery. This might involve securing them with a zip tie or simply positioning them carefully out of the way.
Removing the Battery Hold-Down Bracket
Most batteries are secured in place by a metal bracket to prevent them from moving around. You need to remove this bracket to get the battery out. The method for securing the bracket can vary slightly, but it usually involves a bolt or nuts.
- Locate the Hold-Down Bracket: Look for a metal piece that clamps the battery base to the car’s tray. This bracket is typically at the bottom of the battery, sometimes with a bolt or rod going through it.
- Unbolt or Unscrew the Bracket: You’ll likely need a socket wrench or a specific size wrench to remove the bolt or nuts that secure this bracket. Turn them counter-clockwise until they are free.
- Remove the Bracket Components: Carefully lift out any parts of the bracket that come loose. Keep these parts with your tools; you’ll need them to resecure the new battery.
Sometimes, the bolt for the hold-down bracket can be a bit long and may be difficult to reach or turn. If it’s corroded, a bit of penetrating oil can help loosen it. Ensure you have a firm grip on your wrench to avoid slipping.
Taking Out the Old Battery
With the terminals disconnected and the hold-down bracket removed, the old battery is now free to be taken out. This step requires some physical effort as car batteries are quite heavy.
Grip the battery firmly by its sides or any built-in handles if available. Lift it straight up and out of the battery tray. Be mindful of its weight and try to keep your back straight.
If you have trouble lifting it, ask for assistance. Once removed, place the old battery on a stable surface, away from traffic and out of reach of children or pets. It’s important to dispose of old batteries properly, as they contain hazardous materials.
Cleaning the Battery Tray and Terminals
Before installing the new battery, it’s a good idea to clean the area where the old one sat and the cable clamps. This ensures a clean connection for the new battery, which helps with optimal performance and longevity.
- Clean the Battery Tray: Use a rag or paper towels to wipe out any debris, dirt, or residue from the battery tray. If there’s significant corrosion, you can use a brush and some water or a mild cleaning solution.
- Clean the Cable Clamps: Take your battery terminal cleaner brush and scrub the inside of both the red and black cable clamps. Remove any signs of corrosion, which looks like a white or bluish powdery substance.
- Inspect the Battery Cables: Check the condition of the cables and terminals themselves. If they appear frayed or damaged, it might be a sign that they need replacement.
A clean connection is crucial. Corrosion acts as an insulator, preventing the flow of electricity. Spending a few extra minutes cleaning now can prevent starting issues down the road and ensure your new battery works at its best.
Installing the New Battery
Now it’s time to put the new battery in place. This is essentially the reverse of removing the old one, but with fresh components and a clean workspace.
Carefully lower the new battery into the battery tray, making sure it sits squarely and securely. Reinstall the hold-down bracket and tighten its bolt or nuts to secure the battery. It should be snug but not so tight that you risk cracking the battery case.
Ensure the battery cannot move or shift.
Connecting the New Battery
This step is as important as disconnecting the old one, but in reverse order. Proper connection ensures the battery functions correctly and safely.
- Connect the Positive Terminal First: Take the red cable and place its clamp onto the positive terminal of the new battery. Tighten the nut with your socket wrench until it’s secure.
- Connect the Negative Terminal Second: Now, take the black cable and place its clamp onto the negative terminal. Tighten its nut securely.
- Apply Anti-Corrosion Protection: You can now apply a thin layer of anti-corrosion spray or grease to the terminals and cable clamps. This will help prevent future buildup.
Once both terminals are connected and secured, give them a gentle tug to ensure they are tight. The cables should not be able to move independently of the terminals. This connection is what allows your car’s electrical system to draw power from the battery.
Testing the New Battery
After everything is connected, it’s time to see if your work paid off. This is the moment of truth to confirm the battery replacement was successful.
Get into your Honda Civic and try to start the engine. The engine should crank over smoothly and start up. If it starts normally, congratulations!
Your new battery is working correctly. If the engine doesn’t start or sounds weak, double-check all your connections and ensure the hold-down bracket is secure. Sometimes, you might need to reset your car’s radio or clock after a battery change.
Troubleshooting Common Issues
Even with careful work, sometimes things don’t go exactly as planned. This section helps you identify and fix common problems you might encounter during or after replacing your battery. Knowing these solutions can save you a lot of worry.
Car Won’t Start After Battery Replacement
This is a frustrating problem, but often has a simple fix. The most common reason is a loose connection.
- Check Terminal Connections: Ensure both the positive and negative terminals are clean and the clamps are tightened securely. They should not wiggle when you try to move them.
- Verify Cable Polarity: Double-check that the red cable is connected to the positive terminal and the black cable to the negative terminal. Reversing them can cause serious electrical damage.
- Check the Hold-Down Bracket: Make sure the battery is firmly secured and not shifting. A loose battery can cause intermittent electrical problems.
- Inspect Fuses: Some cars have a main fuse that protects the electrical system. If it blew during installation, your car won’t start. Consult your owner’s manual for fuse box locations and identify the battery or ignition fuse.
If these steps don’t resolve the issue, there might be a problem with the new battery itself, or another electrical component in your car. In such cases, it might be best to have a mechanic take a look.
Radio or Clock Needs Resetting
Many modern cars have systems that can lose their settings when the battery is disconnected. This is normal and usually easy to fix.
Your car’s owner’s manual will have specific instructions on how to reset your radio presets and clock. Typically, you’ll turn the ignition to the accessory position (where the radio and accessories work but the engine isn’t running) and use the radio’s buttons to re-enter the code or set the time. The radio code is often printed on a sticker inside the glove box or on a separate card that came with your car.
Corrosion on New Terminals
Even with anti-corrosion spray, some minor corrosion can sometimes appear over time, especially in humid environments. This is usually not a major problem unless it becomes extensive.
If you notice a small amount of white or bluish powder forming on the terminals, it’s a sign of slight corrosion. You can usually clean this off with a wire brush and a mixture of baking soda and water. Simply remove the cable, scrub the terminal and clamp, wipe clean, and reattach.
Applying a fresh coat of anti-corrosion spray can help prevent it from returning quickly.
When to Seek Professional Help
While changing a car battery is a manageable DIY task, there are times when it’s best to let the professionals handle it. Knowing your limits is part of good car maintenance. Sometimes, the cost of a professional service is worth the peace of mind and guarantee.
- Unusual Battery Compartment Layout: If your battery is located in a difficult-to-reach spot, like under the passenger seat or behind the engine, it might be worth having a mechanic do it.
- Signs of Other Damage: If you notice any frayed wires, corroded cables that look beyond simple cleaning, or damage to the battery tray or surrounding components, it’s wise to consult a professional.
- Lack of Proper Tools or Confidence: If you don’t have the necessary tools or feel uncomfortable with any part of the process, don’t hesitate to ask for help from a qualified mechanic.
- Persistent Starting Issues: If your car still doesn’t start after replacing the battery and checking all connections, there could be a more complex underlying electrical issue that requires expert diagnosis.
Professional mechanics have specialized tools and extensive experience. They can quickly diagnose and fix problems that might be beyond a DIYer’s ability. Plus, they can often perform a load test on the new battery to ensure it’s performing optimally.
Frequently Asked Questions
Question: How often should I replace my Honda Civic battery?
Answer: Most car batteries last between 3 to 5 years. However, this can vary depending on your driving habits, climate, and the quality of the battery. It’s a good idea to have your battery tested annually after it reaches three years old.
Question: Can I use a different type of battery than the one specified for my Honda Civic?
Answer: It’s generally best to use the battery type recommended in your owner’s manual. Using a battery with different specifications (like cold-cranking amps or reserve capacity) could affect your car’s performance or damage electrical components.
Question: What happens if I connect the battery cables incorrectly?
Answer: Connecting the battery cables in reverse (positive to negative and vice-versa) can cause immediate and severe damage to your car’s electrical system, including the battery, alternator, and computer modules. It can also be dangerous, leading to sparks or even battery explosion.
Question: Do I need to disconnect my car’s alarm system when replacing the battery?
Answer: For most factory-installed alarm systems, disconnecting the battery will not permanently disable them. They are designed to reset and function normally once power is restored. However, aftermarket alarm systems might require specific procedures, so check your alarm system’s manual.
Question: Is it okay to jump-start a car with a dead battery using a new battery?
Answer: No, you should not use a new battery to jump-start another car. Jump-starting uses jumper cables to connect a charged battery to a dead battery to provide enough power to start the engine of the car with the dead battery. Using a new, fully charged battery in place of jumper cables could potentially damage both vehicles’ electrical systems due to the sudden surge of power.
Summary
Replacing your Honda Civic 2017 car battery is a task you can confidently tackle. By gathering the right tools, following safety steps carefully, and working through each connection, you can successfully swap out your old battery. Remember to clean the connections for optimal performance.
If you run into trouble or feel unsure, seeking professional help is always a smart choice. Enjoy your newly powered vehicle!