
Having trouble with your car’s music? It’s common to experience issues with the AUX port in your Honda Civic. It can be frustrating when you can’t listen to your favorite tunes. Don’t worry, figuring out How to Fix the AUX Port in a Honda Civic doesn’t have to be hard. This guide will walk you through a simple, step-by-step process. You’ll soon be enjoying your music again. Let’s get started!
Troubleshooting Your Honda Civic’s Audio Input
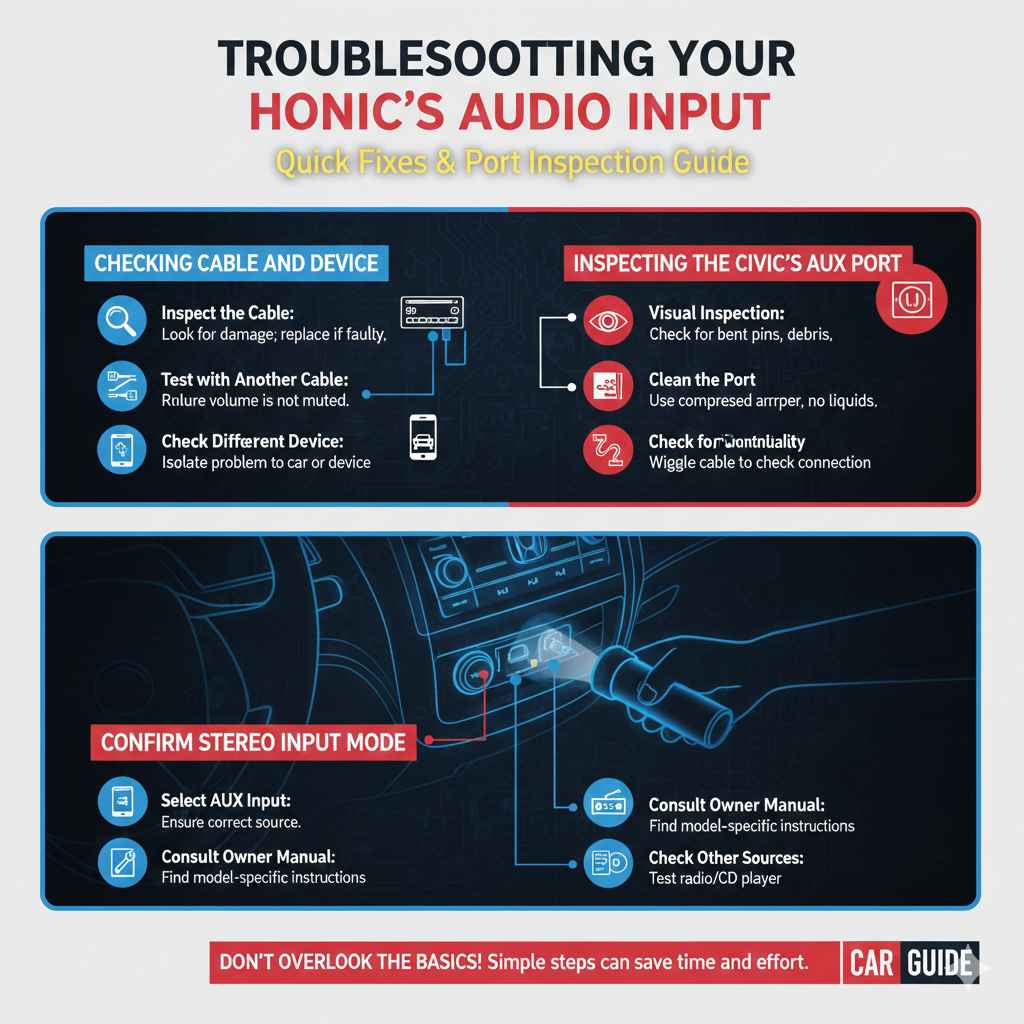
Before you start any repairs, it is important to first figure out what’s wrong. Is the AUX port completely dead, or does it only cut out sometimes? Does the sound sound muffled, or are there any crackling noises? These clues will help narrow down the problem. Checking the easy fixes first can save you time and effort. This includes making sure your device’s volume is up and that the AUX cable is firmly connected at both ends.
Also, verify that the audio source on your Civic’s stereo is correctly set to AUX input. If these simple steps don’t resolve the issue, you can explore the more detailed solutions in this article.
Checking the AUX Cable and Device Connection
The first step in any troubleshooting is to check the basics. A loose connection is the most common cause of AUX port problems. Start by gently unplugging and then re-plugging the AUX cable into both your device and the car. Make sure that the cable is a good quality cable. Many cheaper cables may break internally. Ensure the cable fits snugly. Also, check the audio device. Be sure that the volume is turned up on the music source and that the device is fully functional, using another audio output. These simple tests can often resolve problems quickly. Sometimes the simplest solutions are the most effective.
- Inspect the Cable: Look for any visible damage like bends, cuts, or fraying. If you see damage, the cable is the problem and needs to be replaced.
- Test with Another Cable: Try a different AUX cable. A faulty cable can easily cause audio problems.
- Check the Device Volume: Make sure the audio device’s volume is turned up, and it is not muted. Many users make this simple mistake.
- Try a Different Device: Connect a different device to the AUX port to see if the problem is with the car’s port or the original device.
Inspecting the Civic’s AUX Port
Once you’ve ruled out the cable and the connected device, it’s time to examine the AUX port in your Civic. Look for physical damage inside the port. Bent pins or debris can block the signal. A flashlight can help you see inside the port. Use compressed air to remove any dust or small particles that could be interfering with the connection. Be gentle when cleaning. Inserting the AUX cable into the port can sometimes reveal an issue with the connection points. Thorough inspection is key to determining the actual problem, before moving on to more complex procedures.
- Visual Inspection: Use a flashlight to check for bent pins or debris inside the port.
- Clean the Port: Use compressed air to blow out any dust or small particles. Avoid using liquid cleaners.
- Check for Corrosion: Look for any signs of rust or corrosion inside the port, which may require more extensive cleaning or replacement.
- Test the Port’s Functionality: Try wiggling the AUX cable in the port to see if the sound cuts in and out, indicating a loose connection.
Confirming Stereo Input Mode
Many people overlook the stereo settings. Make sure your Civic’s stereo is set to the correct input mode, usually marked as “AUX” or “Line In.” This is very important. Consult your owner’s manual if you are uncertain how to navigate the stereo’s settings. Incorrectly setting the stereo’s input can cause the sound to be muted or to come through the wrong speakers. Knowing and checking the source selection can immediately resolve many audio problems. This saves time and unnecessary repairs, making the listening experience trouble free.
- Select AUX Input: Ensure that the stereo is set to the AUX input mode. This will be the only way the AUX port can transmit sound.
- Consult the Owner’s Manual: Refer to your Honda Civic’s owner’s manual to find out how to change the input settings on your specific stereo model.
- Check for Stereo Issues: Try other audio sources like the radio or CD player to determine if the problem is isolated to the AUX input.
- Factory Reset: If available, try resetting the stereo to its factory settings. This can sometimes fix software-related issues.
Taking Apart Your Honda Civic’s Console
If simple troubleshooting steps don’t solve the problem, you may need to access the AUX port directly. This often involves removing some parts of your Civic’s console. This can seem daunting, but with the right tools and steps, it is manageable. Before you start, disconnect the car battery’s negative terminal to prevent electrical shorts. Gather the necessary tools: a screwdriver set, a panel removal tool, and perhaps a trim tool. Carefully remove the console parts to access the back of the stereo unit, where the AUX port is usually found. Make sure you work in a clean, well-lit area to avoid losing small parts.
Gathering Tools and Preparing the Work Area
Preparation is key. Ensure you have the right tools, including screwdrivers (Phillips and flathead), a panel removal tool, and a trim tool. These tools will prevent damage to your Civic’s interior. A trim removal tool helps safely release plastic panels. A well-lit and clean work area is crucial. Place a soft cloth or towel to protect surfaces from scratches, such as your car’s console. Organizing your tools and parts will save time. This preparation makes the repair task easier. A little preparation goes a long way. This ensures that the disassembly and reassembly go as smoothly as possible.
- Phillips Head Screwdriver: Required for removing screws that secure the console components.
- Flathead Screwdriver: Useful for prying clips or gently removing trim pieces.
- Panel Removal Tool: Prevents damage to trim when removing panels.
- Trim Removal Tool: Used to carefully release plastic trim without causing scratches.
- Soft Cloth or Towel: Protects surfaces from scratches during the process.
Removing the Console Trim and Stereo
The process of removing the console trim and stereo varies slightly between different Honda Civic model years. Generally, you’ll start by carefully removing the trim around the stereo unit. Use a panel removal tool to gently pry the trim pieces from the console. Locate and remove the screws holding the stereo in place. Once the screws are removed, carefully pull the stereo out of the dashboard. Be cautious of any wiring harnesses connected to the stereo. Disconnect these before fully removing the unit. Always keep track of the screws and clips. Consider labeling any connectors. This allows a smooth reassembly later. This allows access to the back of the AUX port.
- Locate the Trim: Find the trim pieces surrounding the stereo unit.
- Pry the Trim: Use the panel removal tool to carefully pry the trim from the console.
- Remove Screws: Once the trim is removed, locate and remove the screws holding the stereo.
- Disconnect Wiring: Carefully disconnect any wiring harnesses connected to the back of the stereo.
Accessing the Back of the AUX Port
Once you’ve removed the stereo, you should be able to access the back of the AUX port. The AUX port may be directly attached to the stereo’s circuit board or connected via a small wiring harness. At this point, you can inspect the connections to the AUX port. Look for any loose wires or damaged connectors. Check the solder joints on the circuit board if the port is directly mounted. If the port is connected via a wiring harness, gently unplug and replug the connector. Make sure it fits securely. If the problem is still not resolved, you may need to remove and replace the port. Careful inspection is key to identifying the fault. This is the last step before any potential repairs.
- Inspect Connections: Check the wiring or connectors attached to the AUX port for damage.
- Unplug and Replug: If the port connects via a harness, unplug and re-plug the connector to ensure a good connection.
- Check Solder Joints: Inspect the solder joints on the circuit board for any cracks or cold solder joints (if applicable).
- Check the Port: Test the port for damage by wiggling the cable.
Direct Repairs to the Honda Civic’s AUX Port
Once you’ve identified the issue, you can start with the actual repairs. This might include re-soldering connections, replacing a faulty AUX port, or addressing wiring problems. If you’re comfortable with soldering, you can re-solder any loose connections on the circuit board. If the port is damaged, you will need to
Soldering and Connector Repairs
Soldering is a delicate procedure that requires some experience. Before beginning, make sure you have a soldering iron, solder, and flux. Apply flux to the solder joints. Then, heat the joint and apply solder to create a strong connection. Be careful not to overheat the circuit board or the components. Always disconnect the car battery. If the connections are damaged, you can use crimp connectors to repair them. Cut off the old wiring, strip the wires, are no exposed wires.
- Soldering Iron: Used to melt solder and create electrical connections.
- Solder: Metal alloy used to join electrical components.
- Flux: Cleans the soldering surface and helps solder flow smoothly.
- Crimping Tool: Used to secure connectors onto wires.
- Heat Shrink Tubing: Provides insulation and protection for connections.
Replacing the AUX Port
If the AUX port is damaged beyond repair, you will need to:
- Purchase Replacement: Buy a compatible AUX port from an auto parts store.
- Remove Old Port: Desolder or disconnect the old port from the stereo.
- Install New Port: Solder or connect the new port to the circuit board.
- Test the Port: Connect a device to the new AUX port to confirm functionality.
Addressing Wiring Issues and Testing
Wiring problems can cause AUX port issues. Inspect the wires connected to the AUX port and the stereo unit. Check for cuts, breaks, or damaged insulation. Use a multimeter to test for continuity. Replace any damaged wires. If you are comfortable, you can replace the entire wiring harness. This is more time-consuming but can ensure a reliable connection. After completing any repairs, test the AUX port. Turn on the stereo and connect your audio device. Play audio to check if the sound is restored. If the audio is still not working, recheck the connections. You may need to troubleshoot further. If the problem persists, you may need professional help.
- Inspect Wires: Look for breaks or damage in the wiring connected to the AUX port.
- Test Continuity: Use a multimeter to test for continuity in the wires.
- Replace Damaged Wires: Replace any wires that have breaks or damage.
- Test the Port: After all repairs, test the AUX port to verify the sound is restored.
Reassembling Your Honda Civic’s Console and Stereo
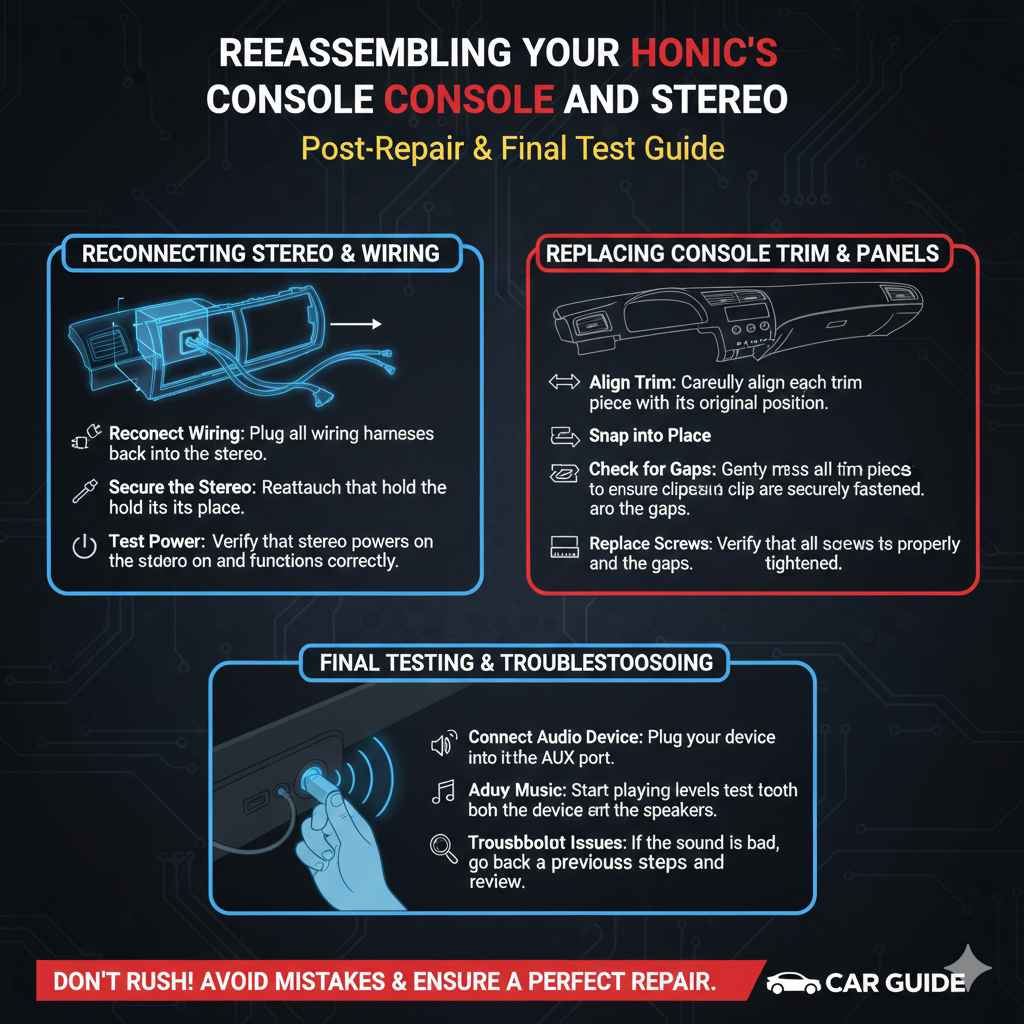
After you have successfully fixed the AUX port, it’s time to put everything back together. Reassembly involves reversing the steps you took to disassemble the console and stereo. Start by reconnecting any wiring harnesses to the stereo unit. Carefully place the stereo back into the dashboard, aligning it with its original position. Reattach the screws that hold the stereo in place.
Next, replace the console trim pieces. Ensure that all clips and fasteners are properly aligned. Once the console and stereo are fully reassembled, reconnect the car battery’s negative terminal. This allows you to power up your Civic’s electronics. Be sure to test the AUX port to ensure that it’s working correctly.
Reconnecting the Stereo and Wiring
Begin by carefully reconnecting any wiring harnesses that you disconnected during disassembly. Ensure that each connector is firmly seated to prevent loose connections. Once the wiring is reconnected, carefully slide the stereo unit back into its position in the dashboard. Make sure that it is properly aligned. Reattach the screws that hold the stereo in place. Ensure that they are fully tightened. Once the stereo is secured, you can test the power to make sure it functions before putting the rest of the console back together. Reconnecting the stereo and all wiring is critical to a functioning audio system.
- Reconnect Wiring: Plug all wiring harnesses back into the stereo.
- Align Stereo: Carefully slide the stereo unit back into its position.
- Secure the Stereo: Reattach the screws that hold the stereo in place.
- Test Power: Verify that the stereo powers on and functions correctly.
Replacing Console Trim and Panels
Once you’ve made sure the stereo is working, replace the console trim pieces and panels. Carefully align each trim piece and gently press them back into place. Listen for the clicks, indicating that all clips and fasteners have been properly secured. Ensure that no wires are pinched or obstructed by the trim. Make sure all panels are flush and that there are no gaps. Double-check all the screws. If any trim pieces are damaged, consider replacing them. Careful reassembly prevents rattles. Proper reassembly also maintains the interior’s original appearance. A well-assembled interior enhances the overall aesthetic and driving experience.
- Align Trim: Carefully align each trim piece with its original position.
- Snap into Place: Gently press the trim pieces to ensure clips are securely fastened.
- Check for Gaps: Make sure all panels are flush and that there are no gaps.
- Replace Screws: Verify that all screws are properly tightened.
Final Testing and Troubleshooting
After reassembly, test the AUX port and the stereo. Connect your audio device to the AUX input and play music. Adjust the volume on both the device and the stereo. Make sure the sound comes through the speakers. If the sound is clear and loud, then congratulations, you’ve successfully fixed the AUX port. If the sound is distorted or absent, you may need to go back and check the connections. Test other audio sources such as the radio.
This will help you identify the problem. If you run into continued problems, go back through each step. Take your time, and do not rush. If you are having problems, professional help may be your best course of action.
- Connect Audio Device: Plug your device into the AUX port.
- Play Music: Start playing music and test the sound from the speakers.
- Adjust Volume: Adjust volume levels on both the device and the stereo.
- Troubleshoot Issues: If the sound is bad, go back to previous steps and review.
Frequently Asked Questions
Question: Why is my AUX port not working?
Answer: Common reasons include a faulty AUX cable, a loose connection, damage to the AUX port, or incorrect stereo input settings.
Question: Can I fix the AUX port in my Honda Civic myself?
Answer: Yes, with the right tools and steps, you can often fix the AUX port. This article provides detailed instructions.
Question: What tools do I need to fix the AUX port?
Answer: You’ll need screwdrivers, a panel removal tool, a trim tool, and potentially a soldering iron and multimeter.
Question: How do I remove the stereo from my Honda Civic?
Answer: You’ll need to remove the console trim, unscrew the stereo, and disconnect the wiring harnesses.
Question: What do I do if I can’t fix the AUX port myself?
Answer: If you’re not comfortable with the repairs, seek help from a qualified car audio professional.
Final Thoughts
You now have a clear guide on how to address problems with your Civic’s AUX port. From the simplest checks to more involved repairs, you’ve learned the steps. Whether it was the cable, port, or wiring, you have the knowledge to troubleshoot and fix these issues. Remember that patience is important. If you aren’t comfortable with electrical work, it’s best to ask a professional. Once you’ve completed the repair, you can enjoy your favorite music. Now, you can once again enjoy a working audio system in your Honda Civic.