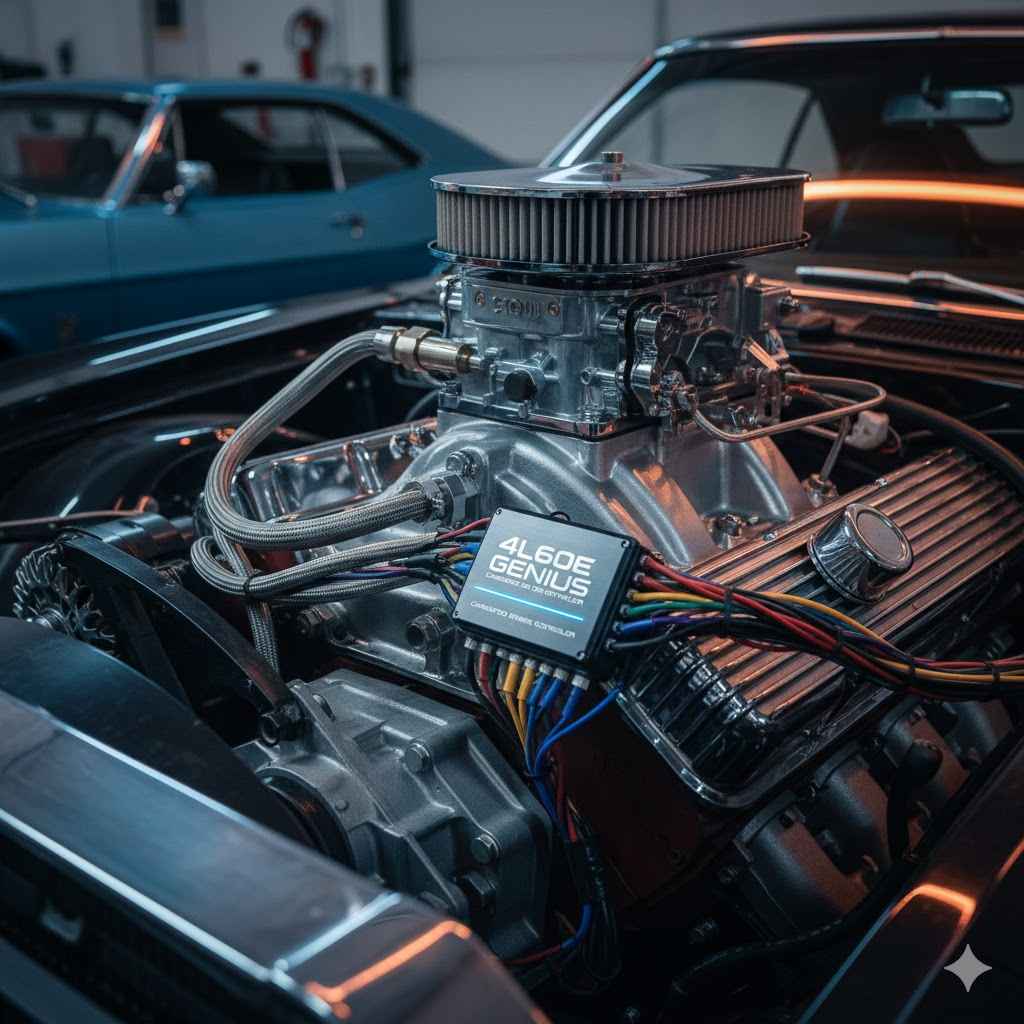
To use a 4L60E transmission with a carbureted engine, you need a standalone electronic controller. This controller acts as the transmission’s brain, managing shift points and line pressure. It works by connecting a throttle position sensor (TPS) to your carburetor, allowing the old-school engine and modern transmission to communicate perfectly for smooth, reliable performance.
Hey there, I’m Dustin Hall. If you’ve ever dreamed of putting a modern, overdrive transmission like the 4L60E behind your classic carbureted engine, you’ve probably hit a common roadblock. The engine is old-school mechanical, but the transmission is a new-school electronic wonder. It can feel like trying to get two different languages to make sense!
But don’t worry, there’s a genius solution that makes it surprisingly simple. It’s called a standalone transmission controller, and it’s the magic black box that bridges the gap. In this guide, I’ll walk you through everything you need to know, step-by-step. We’ll turn that confusing wiring project into a rewarding weekend upgrade you can be proud of.
Understanding the 4L60E and Carburetor Challenge
So, why can’t you just bolt a 4L60E transmission to your carbureted V8 and hit the road? It comes down to one big difference: how they think.
Your carbureted engine is a mechanical masterpiece. It uses vacuum and springs to mix fuel and air. It doesn’t have a computer or complex sensors. On the other hand, the “E” in 4L60E stands for “Electronic.” This transmission was designed to work with a factory Engine Control Unit (ECU). It relies on electronic signals to know when to shift, how hard to shift, and when to lock up the torque converter for better fuel economy on the highway.
Without an ECU, the 4L60E is completely lost. It won’t shift out of first or second gear, the shifts will be harsh, and you’ll miss out on all the benefits of that wonderful overdrive gear. This is where the standalone transmission controller comes in—it becomes the new brain for your transmission.

What Does a 4L60E Transmission Controller Do?
Think of the transmission controller as a translator and a manager all in one. It takes simple information—like how fast you’re going and how hard you’re pressing the gas pedal—and uses it to make smart decisions for the transmission. Here are its three main jobs:
- Controls Shift Points: The controller decides the exact moment the transmission shifts from first to second, second to third, and so on. You can program it to shift at lower RPMs for relaxed cruising or hold gears longer for aggressive, high-performance driving.
- Manages Line Pressure: Line pressure is like the transmission’s grip strength. The controller increases pressure for firm, crisp shifts when you’re accelerating hard. When you’re just cruising around town, it lowers the pressure for buttery-smooth shifts you’ll barely feel.
- Engages the Torque Converter Clutch (TCC): On the highway, the controller can “lock up” the torque converter. This creates a direct, 1-to-1 connection between the engine and transmission, just like a manual transmission. This reduces RPMs, quiets the engine, and significantly improves your gas mileage.
Without a controller, none of this is possible. It’s the key piece of the puzzle that makes this modern-classic combination work so beautifully.
Choosing the Right 4L60E Controller for Your Carbureted Engine
Several great companies make standalone controllers, and choosing one can feel overwhelming. The good news is that most modern kits are very user-friendly. Here are the key features to look for and a comparison to help you decide.
Key Features to Consider:
- Ease of Setup: Look for a controller with a simple setup wizard. Many high-quality kits ask you a few basic questions (like your tire size and rear axle gear ratio) and then create a great starting tune for you.
- Handheld Programmer vs. Laptop Tuning: Most modern controllers come with a small handheld screen. This allows you to install the system and fine-tune everything from the driver’s seat without needing a laptop. This is a huge plus for ease of use.
- Throttle Position Sensor (TPS) Kit: Since your carburetor doesn’t have a TPS, you’ll need to add one. Some controller kits include a universal TPS kit designed to mount onto popular carburetors like Holley, Edelbrock, or Quadrajet. If not, you’ll need to buy one separately.
- Self-Tuning Capabilities: Some advanced controllers have “self-learning” features. They monitor your driving habits and can make small adjustments automatically to improve shift quality over time.
Popular Transmission Controller Options
To give you an idea of what’s out there, here’s a simple breakdown of what you might find. Always check the manufacturer’s website for the most up-to-date features.
| Controller Brand/Model | Primary Tuning Method | TPS Included? | Beginner-Friendliness |
|---|---|---|---|
| TCI Automotive EZ-TCU | Handheld Programmer | No, requires separate kit | Excellent |
| Holley Terminator X / X MAX | Handheld or Laptop | Often sold separately | Very Good (More advanced features) |
| FiTech Go Shift | Handheld Programmer | Yes, typically included | Excellent |
| MSD Atomic T-Com | Handheld Programmer | No, requires separate kit | Very Good |
For most beginners, a kit with a handheld programmer and a clear, simple interface is the best choice. It removes the guesswork and gets you on the road faster.
How to Install a 4L60E Transmission Controller: A Step-by-Step Guide
Alright, let’s get our hands dirty! Installing a controller is mostly about careful wiring and routing. Take your time, read the instructions that come with your specific kit, and you’ll be fine. This is a perfect weekend project.
Step 1: Gather Your Tools and Parts
Having everything ready before you start makes the job go much smoother. You’ll likely need:
- The transmission controller kit (controller box, wiring harness, handheld programmer)
- A carburetor-specific Throttle Position Sensor (TPS) kit
- Basic hand tools (socket set, wrenches, screwdrivers)
- Wiring tools (wire strippers, crimpers, heat gun)
- Electrical supplies (zip ties, heat shrink tubing, electrical tape)
- A digital multimeter for checking connections
- Safety gear (safety glasses, gloves)
- Jack and jack stands to safely lift the vehicle
Step 2: Safety First!
Before you do anything else, prioritize your safety. Park your car on a level surface and engage the parking brake. Disconnect the negative terminal of your battery to prevent any electrical shorts. If you need to get under the car, use jack stands—never rely on a jack alone. For more vehicle safety tips, you can always reference resources like the National Highway Traffic Safety Administration (NHTSA).
Step 3: Mount the Controller Box
The controller box, or TCU (Transmission Control Unit), is the brain of the system. It needs to be mounted in a safe place inside the vehicle’s cabin. The most common location is under the passenger-side dashboard or inside the glove box. Choose a spot that is protected from heat, moisture, and vibration. Secure it firmly with the supplied brackets or heavy-duty zip ties.
Step 4: The All-Important Throttle Position Sensor (TPS)
This is the most critical step for a carbureted setup. The TPS tells the controller how far you’re pushing the gas pedal. Without this signal, the controller has no idea what your engine is doing.
- Mount the Sensor: Most TPS kits come with a bracket that attaches to the carburetor body. The sensor itself has a rotating arm that needs to connect to the throttle linkage—the part of the carburetor that moves when you press the gas pedal.
- Ensure Full Range of Motion: Carefully attach the sensor’s arm to the linkage. As you move the throttle from idle to wide-open, the TPS arm should move smoothly with it through its full range. There should be no binding or slipping. This is crucial for accurate readings.
- Wire it Up: The TPS will have three wires: a 5-volt reference signal (from the controller), a ground (from the controller), and a signal wire (which goes back to the controller). Follow your kit’s wiring diagram exactly. Using solder and heat shrink tubing will create the most reliable connections.
Take your time with this step. A properly installed and calibrated TPS is the secret to perfect shifts.
Step 5: Route and Connect the Main Wiring Harness
Your controller kit will come with a large wiring harness. One end plugs into the controller box you just mounted. The other end needs to go to the transmission.
Find a suitable hole in your car’s firewall to pass the harness through to the engine bay. A factory grommet is the ideal spot. If you have to drill a new hole, be sure to use a rubber grommet to protect the wires from chaffing on the sharp metal edge.
Route the harness away from hot exhaust manifolds, sharp edges, and moving parts like steering or suspension components. Use plenty of zip ties to keep it secure. Once routed, plug the large, round connector into the corresponding port on the side of your 4L60E transmission. It should click firmly into place.
Step 6: Make Your Power Connections
The controller needs clean, reliable power to function correctly. The harness will typically have four key wires:
- Main 12V+ Power: This wire should be connected directly to the positive terminal of the battery. It should be a fused connection—your kit will specify the correct fuse size.
- Switched 12V+ Ignition: This wire needs power only when the key is in the “On” or “Run” position. A good source is an empty slot in your fuse box labeled “IGN” or “ACC.” Use a circuit tester to find a reliable source.
- Main Ground: This is extremely important. Connect this wire to a clean, paint-free spot on the vehicle’s chassis or engine block. A poor ground is the number one cause of electronic issues.
- Brake Switch Signal: This wire connects to the positive side of your brake light switch. It tells the controller when you’re applying the brakes so it can unlock the torque converter.
Step 7: Initial Setup with the Handheld Programmer
With everything wired up, it’s time for the fun part! Reconnect your battery, plug the handheld programmer into the wiring harness, and turn the key to the “On” position (don’t start the engine yet).
The screen should light up and guide you through a basic setup wizard.
- Calibrate the TPS: The first thing it will ask you to do is calibrate the throttle position sensor. You’ll simply press the gas pedal to the floor and release it so the controller can learn the idle (0%) and wide-open (100%) positions.
- Enter Vehicle Info: Next, you’ll enter basic information like your rear axle gear ratio (e.g., 3.73), the number of engine cylinders, and the approximate diameter of your rear tires.
- Load the Base Tune: Based on your answers, the controller will create a safe, reliable starting tune. You can now start the engine!
At this point, you are ready for a test drive. Drive gently at first and pay attention to how the transmission shifts. The base tune is often very good, but you can fine-tune it later for a custom feel.
Fine-Tuning Your 4L60E for the Perfect Feel
One of the best parts of having a transmission controller is the ability to customize its behavior. Using your handheld programmer, you can adjust several parameters to match your driving style.
- Shift Points: You can adjust the MPH or RPM at which the transmission shifts at both light and heavy throttle. Want it to shift sooner for better fuel economy? No problem. Want it to hold each gear longer for better acceleration? You can do that, too.
- Shift Firmness: This setting controls the line pressure. You can increase it for firmer, more noticeable shifts or decrease it for smoother, almost seamless shifts. Most programmers let you adjust this based on throttle percentage.
- Torque Converter Lockup: You can set the exact speed at which the torque converter locks in 4th gear. Setting it around 45-50 MPH is usually a good starting point for highway cruising.
Make small, one-at-a-time adjustments and then go for a drive to feel the difference. It’s a rewarding process that lets you dial in your car’s personality perfectly.
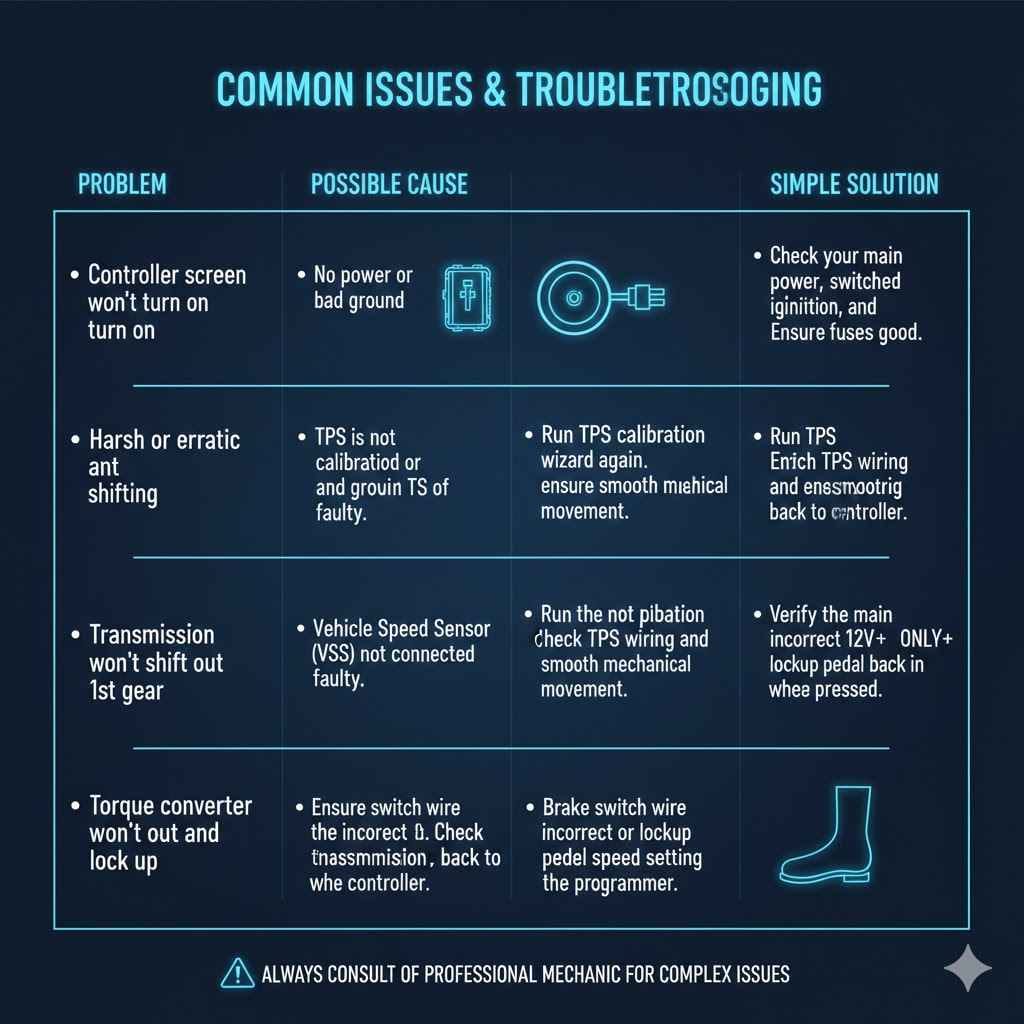
Common Issues and Troubleshooting
Even with a careful installation, you might run into a hiccup. Here are some common problems and their likely solutions.
| Problem | Possible Cause | Simple Solution |
|---|---|---|
| Controller screen won’t turn on | No power or bad ground | Check your main power, switched ignition, and ground wires. Ensure fuses are good. |
| Harsh or erratic shifting | TPS is not calibrated or is faulty | Run the TPS calibration wizard again. Check TPS wiring and ensure it has smooth mechanical movement. |
| Transmission won’t shift out of 1st gear | Vehicle Speed Sensor (VSS) not connected or faulty | Ensure the VSS is plugged in at the transmission. Check the wiring back to the controller. |
| Torque converter won’t lock up | Brake switch wire is incorrect or lockup speed is set too high | Verify the brake switch wire has 12V+ ONLY when the brake pedal is pressed. Lower the lockup speed setting in the programmer. |
Frequently Asked Questions (FAQ)
1. Can I use a 4L60E transmission without a controller?
No, you cannot. The 4L60E is fully electronic and requires a computer (either a factory ECU or a standalone controller) to operate its internal solenoids for shifting and line pressure control.
2. What is a TPS, and why is it so important for a carbureted engine?
TPS stands for Throttle Position Sensor. It’s an electronic sensor that tells the transmission controller how far you are pressing the gas pedal. For a carbureted engine, which has no native electronic sensors, adding a TPS is the only way for the modern transmission to know the driver’s intent.
3. Is installing a transmission controller a difficult job for a beginner?
If you have basic wiring skills and can follow instructions, it is a very manageable project. Most kits are designed for DIY installation. The key is to be patient and make clean, secure electrical connections. It’s a great weekend project for an enthusiast.
4. How much does a 4L60E controller kit usually cost?
Prices can vary, but you can typically expect to spend between $600 and $1,200 for a complete, high-quality kit that includes the controller, wiring harness, and a handheld programmer.
5. Do I need a laptop to tune the transmission controller?
Not anymore! Most modern controller kits, like those from TCI and FiTech, use a simple handheld touchscreen for all setup and tuning, making them extremely user-friendly without needing a laptop.
6. Will this conversion improve my car’s performance and fuel economy?
Absolutely. The 4L60E has a 0.70:1 overdrive gear, which will dramatically lower your engine’s RPMs on the highway, leading to better fuel economy and a quieter ride. The ability to precisely control shift points also allows you to optimize performance for your specific engine and driving style.
7. What is the difference between a 4L60 and a 4L60E?
The original 4L60 (produced until 1992) was hydraulically controlled, much like an older TH700R4, and did not require a computer. The 4L60E (1993 and later) is electronically controlled. This guide is specifically for the “E” version.
You’ve Got This: Enjoy the Ride!
Pairing a strong, reliable 4L60E with your classic carbureted engine is one of the best upgrades you can make. It gives you the best of both worlds: the timeless soul of a carburetor with the modern efficiency and performance of an overdrive automatic.
While the wiring might seem intimidating at first, a standalone transmission controller makes the process straightforward and accessible for any DIY enthusiast. By following the steps, taking your time, and making good connections, you can absolutely handle this job. The reward is a car that’s more fun to drive, more efficient on the highway, and perfectly dialed in to your personal taste. So go ahead, get in the garage, and make it happen. You’ll be glad you did.