If you can’t find a pedal pulse (the slight vibration or movement you feel when pressing the brake pedal), it usually means there’s a problem with your brake fluid level, air in the lines, or a failing master cylinder. First, check the fluid level. If it’s low, add the correct DOT fluid and bleed the brakes. If the pedal still feels spongy or dead, professional help might be needed to inspect the main components.
Welcome to your guide for tackling tricky brake issues! Have you ever pressed the brake pedal and felt… nothing? That smooth, reassuring ‘pulse’ or slight resistance—the signal that your brakes are working—is suddenly gone. This can be alarming for any driver. A missing pedal pulse often signals that air has crept into your brake lines or that the heart of your braking system, the master cylinder, is struggling. Don’t worry. We can break this down into simple, safe steps. You don’t need a fancy mechanic’s license to figure out the most common causes and what to do next. Let’s get your confidence—and your brakes—back where they belong!
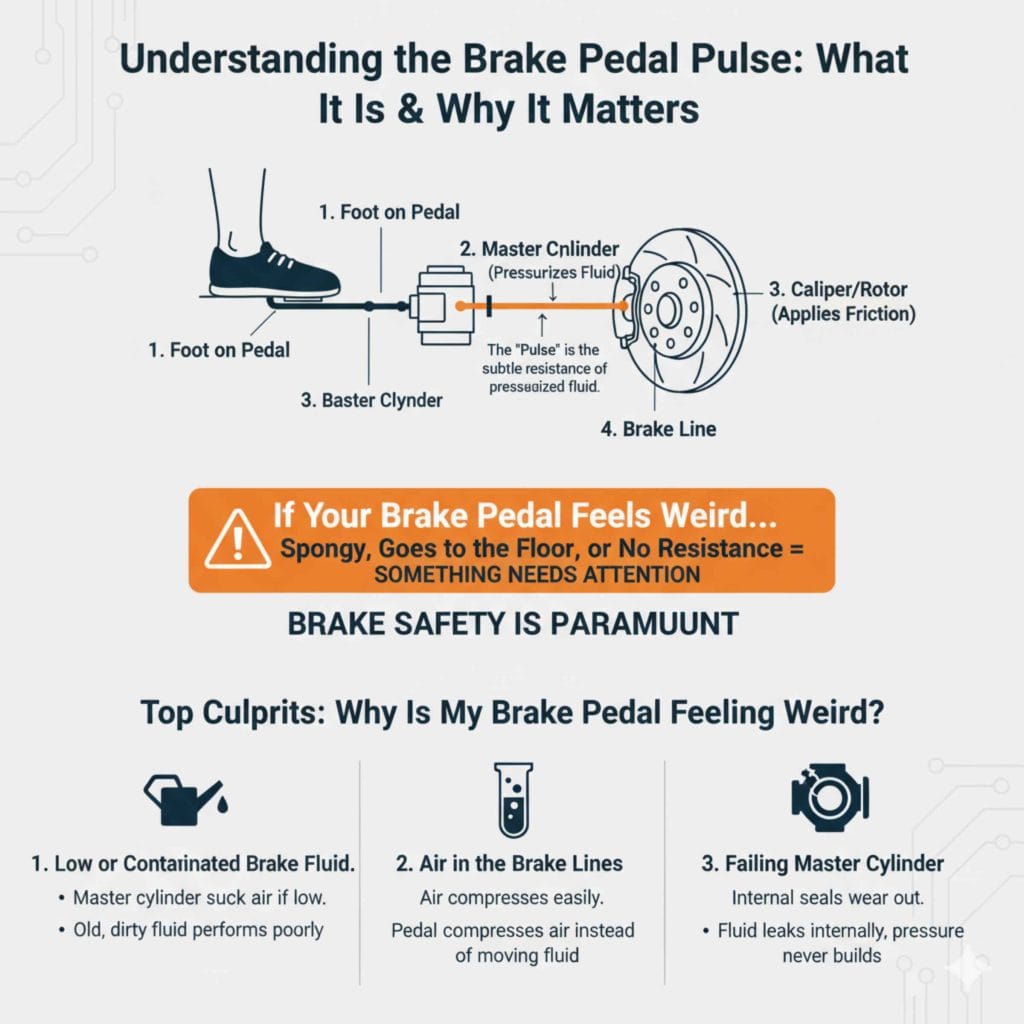
Understanding the Brake Pedal Pulse: What It Is and Why It Matters
When you push the brake pedal in a typical hydraulic brake system, you are not using friction directly; you are moving fluid. Your foot pushes a piston in the master cylinder, which pressurizes the brake fluid. This pressurized fluid travels through the lines to the calipers or wheel cylinders, forcing the brake pads against the rotors (or shoes against the drums), which slows your car down. That slight feel you look for when checking the pedal is the subtle resistance of that pressurized fluid doing its job.
If you press the pedal and it feels spongy, goes straight to the floor, or feels completely dead (no resistance at all), that missing pulse is your car’s way of telling you something important needs attention. Because brake safety is paramount, ignoring this symptom is never an option.
Why Is My Brake Pedal Feeling Weird? The Top Culprits
Most issues resulting in a lost pedal pulse fall into three main categories. Knowing these helps you troubleshoot safely:
- Low or Contaminated Brake Fluid: Fluid is the lifeblood of your brakes. If it’s too low, the master cylinder can suck in air. Old, dirty fluid also performs poorly.
- Air in the Brake Lines: Air compresses easily, while fluid does not. If air gets into the system, pressing the pedal compresses the air bubble instead of moving the fluid, leading to a soft or non-existent feel.
- Failing Master Cylinder: This is critical. The master cylinder is like the heart of your braking system. If its internal seals wear out, fluid leaks internally when you press the pedal, meaning pressure never builds up correctly.
Step 1: The Non-Negotiable Safety Check (Before You Touch Anything)
Before we grab any tools, safety must come first. Braking systems are crucial for safety, and if you suspect a major failure, you must avoid driving the vehicle. If your pedal goes completely to the floor when you press it, do not drive the car. Call for a tow if you need to move it.
When to Immediately Stop Driving
If any of these conditions apply, your immediate action is to stop using the car and seek professional assistance:
- Pedal Drops to the Floor: If you press the pedal and it offers zero resistance and hits the floorboard, you have almost no hydraulic pressure.
- Braking is Unpredictable: If the pedal is sometimes soft and sometimes firm, the system is unreliable.
- Warning Lights: If your Brake System warning light (often a circle with an exclamation mark (!) inside) is illuminated on the dashboard, stop immediately.
Step 2: Checking the Brake Fluid Reservoir (The Easiest Fix)
The easiest and safest thing to check is the brake fluid level. This location is usually under the hood, near the firewall (the big metal wall separating the engine from the cabin). The reservoir is often a plastic container with a black or white lid.
What to Look For
Identify the markings on the side of the reservoir. You should see ‘MIN’ or ‘LOW’ and ‘MAX’ or ‘FULL’. If the fluid level is below the MIN line, you have found a primary reason for a weak pedal pulse—air may have entered the system.
Tools You Might Need for this Step:
- Shop Rags or Paper Towels (Brake fluid can damage paint!)
- The Correct Brake Fluid (Check your owner’s manual or the cap for DOT 3, DOT 4, or DOT 5.1 specifications).
How to Top Off the Fluid
- Ensure the Car is Level: Park on flat ground.
- Open the Cap: Twist the cap counter-clockwise to open the reservoir. Many caps have a yellow or red warning label underneath.
- Inspect the Fluid Color: New brake fluid is usually clear or light yellow. Dark brown or black fluid indicates it is old and should be flushed soon, but for now, we are focusing on the level.
- Add Carefully: Slowly pour the new, correct DOT fluid into the reservoir until it reaches the MAX line. Do not overfill.
- Secure the Cap: Put the cap back on tightly.
Important Note on Fluid Type: Never, ever mix different types of brake fluid (like mixing DOT 3 with DOT 5 silicone fluid). If you are unsure what fluid is currently in there, stick to the type specified on the master cylinder cap or in your vehicle manual. Mixing incompatible fluids can cause seals to swell and fail.
Step 3: Testing for Air in the Lines (The Spongy Pedal Test)
If adding fluid didn’t bring back your pedal pulse, the next most likely culprit is air trapped in the hydraulic lines. Air compresses, making the pedal feel spongy or loose.
The Simple Pump Test
This simple test can help confirm if air is present:
- Sit in the driver’s seat with the engine OFF.
- Pump the brake pedal slowly and steadily about 5 to 10 times.
- On the final pump, hold firm, constant pressure on the pedal.
What to watch for:
- Good Sign: If the pedal firms up quickly and holds pressure steadily a few inches off the floor, the hydraulics are likely okay, and the issue might be a minor stuck component or a worn pedal bushing (less serious).
- Bad Sign: If the pedal continues to sink slowly toward the floor while you hold pressure, you absolutely have a hydraulic issue, likely air in the lines or a failing internal seal in the master cylinder.
Step 4: Bleeding the Brakes (Removing the Air)
If the pump test confirms air is present, you need to bleed the brakes. Brake bleeding is the process of forcing fresh, air-free fluid through the system by opening a bleeder screw at each wheel, allowing the old fluid and any trapped air to escape. This is a two-person job for the easiest method, although single-person DIY kits exist.
Tools Needed for Bleeding:
| Tool | Purpose |
|---|---|
| New, Correct Brake Fluid | To push air out and refill the reservoir. |
| Box-end Wrench | To open and close the bleeder screws (size specific to your car). |
| Clear Tubing | To fit over the bleeder screw to watch the old fluid/air escape. |
| Catch Container | An old plastic bottle or jar to collect dirty fluid. |
| A Helper | Someone to work the brake pedal inside the car. |
The Basic Two-Person Bleeding Procedure
Expert mechanics often start with the wheel farthest from the master cylinder (usually the rear passenger side) and work their way closer. Always consult your vehicle’s repair manual for the exact, safest sequence for your specific car model.
- Preparation: Place shop rags around the bleeder fittings to catch spills. Ensure the master cylinder reservoir is full and keep it topped up throughout the process.
- Attach Tubing: Place one end of the clear tubing onto the bleeder screw of the first wheel and put the other end into your catch container.
- The Pump: Have your helper slowly pump the brake pedal three or four times, then hold it down firmly.
- Release the Air: While they hold the pedal, loosen the bleeder screw about a quarter to a half turn. You will see fluid and perhaps some bubbles rush out through the tube.
- Close Tight: Once the flow stops, quickly tighten the bleeder screw before your helper releases the pedal.
- Repeat: Have your helper release the pedal. Repeat steps 3 through 5 until the fluid coming out is clean and completely free of bubbles.
- Move On: Go to the next wheel in the correct sequence. Remember to check and top off the master cylinder reservoir frequently! Running it dry will reintroduce air and make you start over.
After bleeding all four wheels, check the pedal feel again. If the pulse is back and firm, you successfully removed the air! If the pedal still sinks slowly, this strongly indicates an internal failure inside the master cylinder.
Step 5: Diagnosing a Failing Master Cylinder (Losing Pressure Internally)
The master cylinder is a precision component. If it fails, you lose hydraulic pressure even if the lines are full of clean fluid. This often manifests as a pedal that slowly sinks to the floor—it feels okay initially, but cannot maintain pressure.
How the Master Cylinder Fails
Inside the cylinder are rubber cups (pistons) that seal against the cylinder walls to push fluid. Over time, these seals can wear out. When you press the pedal, instead of pushing fluid to the wheels, the fluid leaks past the worn seal back into the reservoir area behind the piston. This is called “internal bypassing.”
Can I Fix a Master Cylinder Myself?
For beginners, replacing a master cylinder is often a task best left to experienced DIYers or professionals. It requires careful bench-bleeding (bleeding the cylinder before installation), precise line connections, and careful adherence to torque specifications. If you suspect this is the issue, it’s time to consult a trusted resource or a mechanic. You can find excellent guides from resources like the National Highway Traffic Safety Administration (NHTSA) regarding vehicle maintenance, but actual replacement involves disconnecting pressurized brake lines, which requires expertise.
If the pedal drops rapidly to the floor, it could also indicate a catastrophic failure, such as a brake line rupture, but a soft, sinking pedal after bleeding usually points to the master cylinder itself.
When the Pulse is Weak, but Not Gone: Other Considerations
Sometimes the issue isn’t total failure but reduced performance. If you have decent braking but lack that crisp, noticeable pulse, consider these secondary areas:
1. Brake Booster Issues (Power Assist)
Your brake booster uses engine vacuum (or sometimes hydraulic pressure) to help you push the pedal easily. If the booster fails, the pedal will feel very hard to push, and you will have to push much harder than normal to get stopping power. While this doesn’t usually cause a “lost pulse,” it creates a completely different, heavy pedal feel that can be confused with a hydraulic problem.
Quick Booster Check:
- With the engine OFF, pump the brake pedal several times until it feels hard.
- Hold it down firmly.
- Start the engine.
- When the engine starts, the pedal should move down slightly (the booster engages). If it doesn’t move down at all, the booster may have failed.
2. Contaminated Fluid (Brake Fluid Boiling)
Brake fluid is hygroscopic, meaning it absorbs moisture from the air over time. Water lowers the fluid’s boiling point. If you brake hard repeatedly (like going down a long hill), the excessive heat can boil this water content, creating steam bubbles in the lines. Steam, like air, compresses, causing the pedal to go soft or disappear temporarily until the system cools down.
The Fix: If your fluid is dark or you regularly drive in mountainous terrain, you need a complete brake fluid flush and replacement with fresh fluid conforming to your state’s safety standards.
Troubleshooting Summary Chart: What Does Your Pedal Do?
Use this chart to quickly narrow down the cause of your missing pedal pulse:
| Pedal Feel Description | Most Likely Cause | Your Next Step |
|---|---|---|
| Goes straight to the floor (dead). | Major leak, sever brake line failure, or completely failed master cylinder. | Do not drive. Inspect lines for visible leaks. Call a tow. |
| Slowly sinks to the floor when held down. | Internal master cylinder failure or air leak that cannot be bled out. | Bleed the system. If that fails, replace the master cylinder. |
| Spongy or mushy, then firms up after pumping. | Air trapped in the brake lines or in the ABS unit. | Perform a full brake bleed starting at the farthest wheel. |
| Very hard pedal, takes a lot of effort to stop. | Brake booster failure (vacuum issue). | Check vacuum lines leading to the booster; test as described above. |
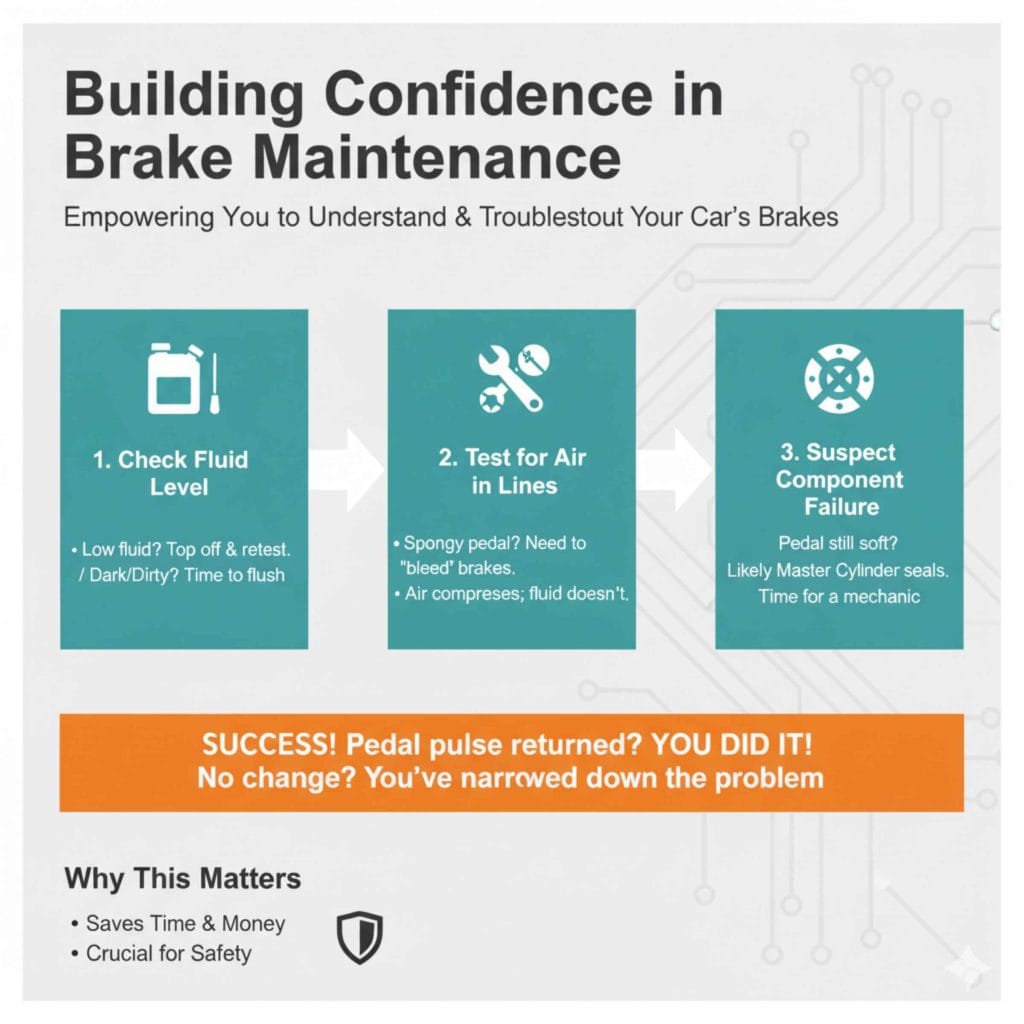
Building Confidence in Brake Maintenance
Dealing with brake issues can be intimidating because the stakes are so high. Remember that your car gives you clear signals. A missing pulse is a sign that the hydraulic system needs attention, but often the fix—topping fluid or bleeding air—is well within the reach of a careful beginner.
By following these steps methodically—checking the level first, then testing for air, and only then suspecting component failure—you save time and money. If your pedal pulse returns after bleeding, congratulate yourself! You’ve successfully maintained a vital safety system. If it doesn’t return, you’ve successfully narrowed down the problem to a specific part (likely the master cylinder), allowing you to approach a mechanic with clear information, saving you diagnostic time.
Frequently Asked Questions (FAQ) – Pedal Pulse and Braking Feel
Q1: How often should I check my brake fluid?
A: Check it once a month when you check your oil, or any time you notice a change in pedal feel. Always check immediately after performing major service near the wheels, like rotating your tires.
Q2: Can I use WD-40 or something else if I don’t have brake fluid?
A: Absolutely not. Never use anything other than the specific DOT fluid recommended for your vehicle. Other oils or solvents will destroy the rubber seals in your master cylinder and calipers, leading to immediate and dangerous brake failure.
Q3: If my pedal pulse returns after bleeding, do I need to flush the fluid too?
A: Yes, if the fluid was very dark before bleeding, you should plan a full brake fluid flush soon. Even if the pedal feels firm now, old, moisture-laden fluid will cause problems when things get hot.
Q4: Why does my pedal pulse feel normal when the engine is off, but soft when it’s running?
A: This is a classic sign of a failed brake booster. When the engine is off, you use reserve vacuum memory to apply the brakes. When running, if the booster diaphragm is leaking, it won’t assist your foot, leading to a very hard pedal feel (the opposite of a missing pulse, but related to system function).
Q5: How long should it take a mechanic to bleed the brakes after I add fluid?
A: A standard, typical brake bleed usually takes a professional mechanic about 45 minutes to an hour, depending on the number of wheels and accessibility. If they have to deal with rusted bleeder screws, it can take longer.
Q6: My pedal pulse is back, but it’s slightly lower than normal. What’s wrong?
A: A slightly lower pedal usually means there’s still a very small amount of air in the system, or the master cylinder seals are beginning to wear slightly. Try another half-hearted bleed session, paying extra attention to the bleeder screws nearest the master cylinder connections.
Conclusion: Take a Missing Pedal Pulse Seriously But Handle It Methodically
If you can’t find a brake pedal pulse, your vehicle is clearly telling you that hydraulic pressure isn’t being built or maintained correctly. While that can sound frightening, the reality is reassuring: most causes follow a logical, traceable path—low fluid, air in the lines, or internal master cylinder failure.
By approaching the problem step by step—starting with safety, checking the brake fluid level, testing for air, and bleeding the system—you can often restore a firm, confident pedal without major repairs. When bleeding doesn’t solve the issue and the pedal continues to sink, the diagnosis becomes clearer: the master cylinder is no longer sealing internally and must be replaced.