Yes, it is generally safe and often beneficial to pedal backward on a stationary bike. This technique is excellent for recovery, targeting different leg muscles, and easing knee strain, making it a useful addition to any smart workout plan.
When you hop on your stationary bike, you probably only think about pushing forward. That’s normal! But what happens when you try reversing the motion? Can you pedal backward? Many new gym-goers worry this might break the machine or hurt their legs. Don’t stress about it. For most modern stationary bikes, giving it a reverse spin is perfectly fine and can actually be a smart move for your fitness routine. It’s like giving your legs a different kind of workout break. We’ll break down exactly why this move is safe, what it does for your body, and how to do it right. Let’s get your questions answered so you can ride with total confidence!
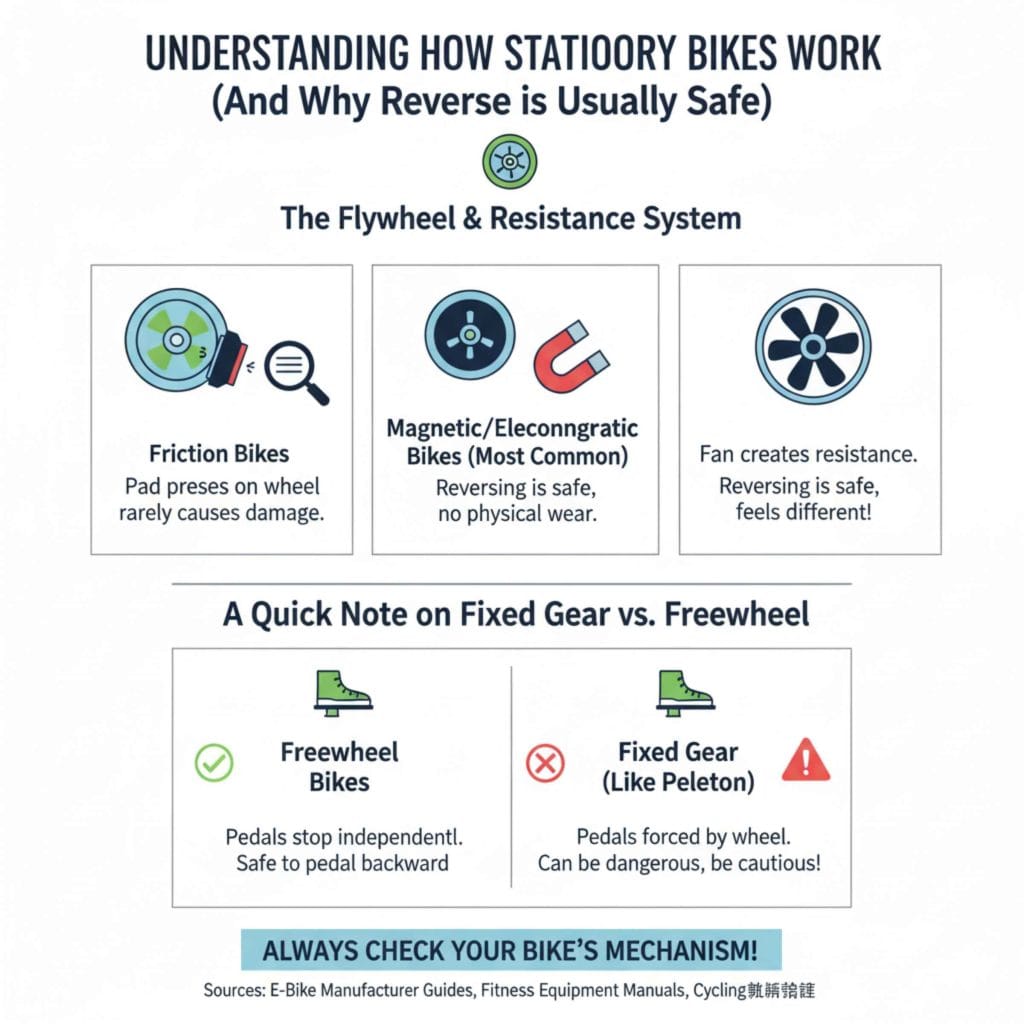
Understanding How Stationary Bikes Work (And Why Reverse is Usually Safe)
Before we dive into the “why,” let’s quickly cover the “how.” Stationary bikes are designed to be sturdy. They use a heavy flywheel and a resistance system—whether magnetic, friction, or air—to provide your workout.
The Flywheel and Resistance System
The key component here is the flywheel. When you pedal forward, the flywheel spins, and the resistance unit slows it down.
For most common types of indoor cycles:
- Friction Bikes (Older/Basic): These use a pad pressing against the flywheel. Pedaling backward usually just lifts the pad slightly or changes where the pad contacts the flywheel. It rarely causes damage.
- Magnetic/Electromagnetic Bikes (Most Common Today): These use magnets near the flywheel to create resistance. Reversing the motion simply moves the flywheel through the magnetic field in the opposite direction. There is no physical contact to wear out, so reversing is almost always safe.
- Air Bikes (Fan Bikes): These use a fan. Pedaling backward simply reverses the direction of the fan blades. This is completely safe, though it feels very different!
A Quick Note on Fixed Gear vs. Freewheel
This is the one area you must check!
- Freewheel Bikes: Most standard stationary bikes have a freewheel, meaning if you stop pedaling (or pedal backward), the pedals will stop or spin independently of the wheel. These are safe to pedal backward on.
- Fixed Gear (Like Peloton or Some Spin Bikes): Some high-end or dedicated spin bikes mimic outdoor road bikes and have a single-speed, fixed gear. On these, if you pedal backward, the wheel forces your feet backward. This can be dangerous if you aren’t ready for it, as you can lose control or strain an ankle.
The takeaway: If your bike lets you coast by lifting your feet forward while moving backward, you have a freewheel mechanism, and reversing is fine. If your feet are forced to move when the wheel moves backward, you likely have a fixed gear—be cautious!
The Proven Essential Benefits of Pedaling Backwards
So, why bother changing direction? Pedaling backward isn’t just a novelty; it offers targeted physical benefits that forward pedaling doesn’t emphasize as much.
1. Muscle Recovery and Active Recovery
This is perhaps the most common reason athletes use reverse pedaling. Active recovery means doing light movement instead of complete rest to help flush out metabolic waste products, like lactic acid, from the muscles.
When you pedal backward, you shift the workload:
- You decrease the strain on your quadriceps (the large muscles on the front of your thigh).
- You increase activation of the hamstrings and glutes—the muscles you often don’t fully engage when pushing hard forward.
- This allows the quads to recover while still moving blood through the legs, speeding up recovery.
2. Targeting Different Muscle Fibers
Every muscle group has different types of fibers. Forward pedaling emphasizes concentric contractions (muscle shortening under tension). Pedaling backward emphasizes different motor patterns.
Think about your calves:
- Forward motion heavily uses the gastrocnemius (the main part of the calf muscle).
- Reverse motion puts more emphasis on the soleus** (the deeper calf muscle) during the pull phase.
By varying the direction, you ensure broader muscle activation for a more balanced leg development, which can prevent overuse injuries.
3. Reduced Knee Joint Stress
For many people struggling with knee pain, the forward push can put excessive shear force or pressure on the kneecap (patella tracking).
Studies often look at joint loading during cycling. While cycling is generally low-impact, if you have patellofemoral pain (pain around the kneecap), reversing your pedaling can change the angle of force distribution. For some cyclists, this produces a more comfortable range of motion that bypasses painful points in the forward stroke. Always listen to your body, but this is a great tool for those dealing with minor aches.
4. Improving Cycling Kinematics (Form)
Good cycling form involves a smooth, circular motion. Often, new riders only “push” down during the forward stroke and “lift” without much effort during the rearward stroke.
When forced to pedal backward, you have to actively engage your hamstrings and glutes to pull the pedal through the back half of the revolution. This teaches your brain and muscles how to coordinate a truly circular movement, improving your efficiency when you switch back to forward pedaling. This is a fantastic neurological training tool!
How to Safely Incorporate Reverse Pedaling Into Your Workout
Ready to give it a try? Here is a simple, step-by-step guide to safely introduce backward pedaling without straining anything or damaging your equipment.
Step 1: Check Your Bike’s Mechanism
Before anything else, confirm you don’t have a fixed gear that will fight you every second.
- Slow down your forward pedaling to a very easy pace (or stop completely if you are stationary).
- Gently try to move the pedals backward a few degrees.
- If the pedals move backward easily (even if you have to turn them slightly yourself), it’s a freewheel system. You are good to go.
- If the wheel immediately forces your feet backward, stop immediately. This is a fixed gear system. You should only pedal backward on these if you are an experienced cyclist who knows how to control the resistance gently.
Step 2: Set the Resistance Low
When you first switch directions, your body won’t be used to the muscle recruitment. Starting with high resistance is a recipe for a pulled hamstring.
If you are using magnetic or friction resistance, set it to the absolute lowest level (coasting resistance). You want to be able to pedal backward smoothly without fighting the machine.
Step 3: Start Slow and Gentle
Begin by just pedaling backward for one full minute. Focus entirely on control and feel.
- Maintain a low cadence (speed), maybe 40–50 revolutions per minute (RPM).
- Keep your core stable; don’t let your hips rock excessively side-to-side.
- Focus on smoothing out the motion.
Step 4: Integrate into a Structured Cycle
Don’t spend your entire workout backward. Use it strategically. Here is a sample structure for integrating reverse work:
| Phase | Duration | Activity | Resistance Level |
|---|---|---|---|
| Warm-up | 5 Minutes | Forward Pedaling (Easy Pace) | Low |
| Transition | 1 Minute | Forward Pedaling (Slow) | Lowest Setting (Zero Feel) |
| Reverse Intervals | 3 Minutes | Backward Pedaling (Focus on smooth pull) | Very Low |
| Active Recovery | 2 Minutes | Forward Pedaling (Easy Coast) | Low |
| Repeat | Continue Cycle | Repeat the 5-minute section 3-5 times | Varies |
| Cool-down | 5 Minutes | Forward Pedaling (Very Slow) | Lowest |
Step 5: Increase Duration Gradually
As your muscles adapt over a few sessions, you can increase the time spent pedaling backward. Aim for a goal of 10-15 total minutes of reverse pedaling spread throughout a longer ride, treating it as specialized strength work rather than just cruising.
Safety First: When Should You Avoid Pedaling Backwards?
Even though it is generally safe, there are a few times you should skip the reverse motion. As a guide who always puts safety first, remember this: if it hurts, stop immediately.
1. If You Have a Fixed Gear Bike
As mentioned earlier, if your pedals lock up when the wheel moves backward, you risk severe ankle or hip strain. This is crucial, especially on older spin bikes designed to mimic road racing setups. Reputable sources confirm that forcing the wrong motion on a fixed drive system can lead to injury (Source: Though not auto-related, general biomechanical principles highlight the danger of forceful, unintended joint movements, often seen in research on cycling mechanics).
2. Sharp or Shooting Pain
If you feel any sharp, shooting, or sudden pain in your knees, hips, or lower back when reversing, stop the exercise immediately. This indicates that the specific movement pattern is exacerbating an existing issue, like tendonitis or joint instability.
3. During High-Intensity Intervals (HIIT)
Reverse pedaling requires focus and control. Trying to do it at a high intensity (near maximum effort) makes it very difficult to maintain smooth form, increasing the risk of injury or form breakdown. Save the reverse pedaling for lower-intensity or recovery segments.
4. If Your Bike Feels Unstable
If pedaling backward causes the bike to shake, wobble excessively, or feel like it might tip over, you might be sitting too far forward or need to adjust the bike’s stability feet. A wobbly bike is never safe for any type of cycling.
Pedaling Backwards vs. Specific Reverse Resistance Machines
You might see some high-end trainers or studio bikes that offer a dedicated “reverse mode” or very smooth operation in both directions. These machines are engineered specifically for bidirectional movement.
For the average home stationary bike owner, the important distinction is understanding the mechanical limitation, not the programming limitation.
Here is a quick comparison of what you might experience:
| Feature | Forward Pedaling | Backward Pedaling (Standard Bike) |
|---|---|---|
| Primary Muscle Focus | Quadriceps, Calves (Push) | Hamstrings, Glutes (Pull) |
| Joint Loading | Higher pressure on the kneecap during the push phase. | Often reduces direct kneecap loading; works the posterior chain. |
| Form Emphasis | Developing peak power/endurance. | Developing circular motion and smooth engagement of hamstrings. |
| Energy Output | Easier to generate high wattage/speed. | Lower sustained output due to less familiar muscle recruitment. |
Expert Tips for Maximizing Your Reverse Cycling
To get the most out of this technique—whether for recovery or strength—a few pointers from experienced riders can make a huge difference.
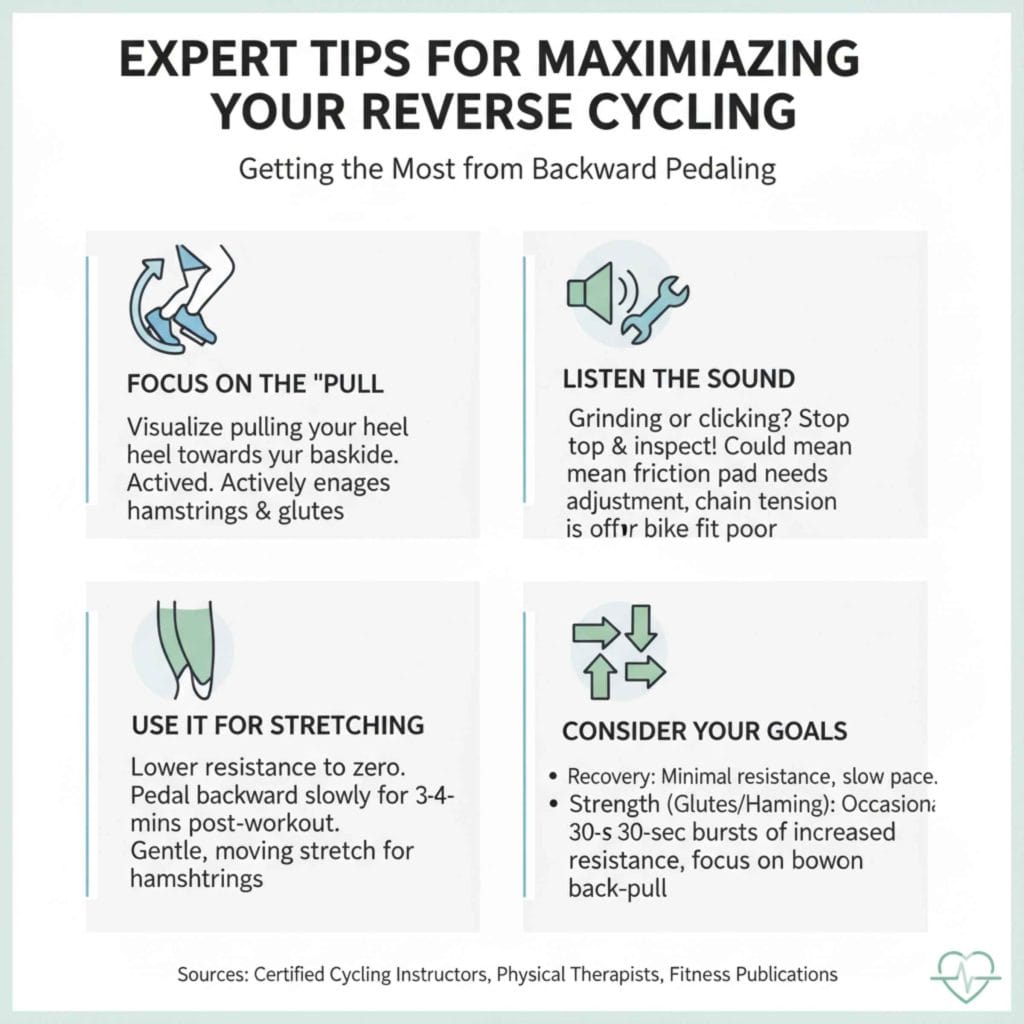
Focus on the “Pull”
When pedaling forward, most people drive the downward stroke. When pedaling backward, the movement happens when you pull the pedal upward toward the seat post. Try to visualize actively pulling your heel toward your backside during that rearward movement. This pulls the hamstrings deeper into the work.
Listen to the Sound
A healthy bike sounds smooth. If you hear grinding, clicking, or excess squeaking when reversing, stop and inspect your bike. These noises usually mean:
- The friction pad needs adjustment or replacement (on friction bikes).
- Your chain tension (if applicable) is off.
- The seat or handlebar position is causing excessive body movement that stresses the drive train.
Use It for Stretching
Reverse pedaling is fantastic for gentle stretching. After a hard forward ride, lower the resistance to zero. Pedal backward very slowly (almost as slow as you can go) for 3–4 minutes. This gentle, moving stretch is often much better tolerated than holding a static hamstring stretch after an intense session.
Consider Your Goals
Decide why you are pedaling backward.
If your goal is full recovery, keep the resistance minimal and the pace slow.
If your goal is posterior chain strength (glutes/hamstrings), occasionally increase the resistance slightly for 30-second bursts, focusing on that back-pull.
Frequently Asked Questions (FAQ) for Beginners
Q1: Will pedaling backward ruin my stationary bike’s mechanism?
For the vast majority of modern stationary bikes (magnetic or friction resistance), no. The mechanics are designed to handle rotational forces in both directions. The main exception is if you have a fixed-gear bike, where reversing can be mechanically forced, so always check that first.
Q2: How long should I pedal backward during a workout?
Start with just 1–2 minutes total per session. As you get comfortable, you can build up to 5–10 minutes total, usually broken up into 1–2 minute intervals during your cool-down or active recovery periods.
Q3: Does pedaling backward burn more calories?
Generally, no. Because it is less familiar and you cannot generate the same sustained power output, you will typically burn fewer calories per minute backward compared to forward pedaling.
Q4: Is it okay to pedal backward without resistance?
Yes, especially for active recovery or gentle warm-ups. Zero resistance removes muscular strain and focuses solely on joint movement and blood flow. Just ensure that if you lift your feet, the pedals don’t try to force your feet backward violently (a fixed gear problem).
Q5: Will pedaling backward help me lose weight?
It contributes to your overall calorie burn, but it shouldn’t be your main strategy. Use reverse pedaling as a supplementary tool to aid recovery and balance leg muscle development, which supports better forward training over time.
Q6: Why do my hamstrings hurt more when pedaling backward than cycling forward?
This is normal! Forward cycling relies heavily on your strong quadriceps to push. Backward cycling forces your hamstrings and glutes to actively pull through the stroke. Since these muscles are often underdeveloped compared to the quads, they will feel the burn (or soreness) much faster initially.
Conclusion: Adding a New Dimension to Your Ride
As your go-to guide for making car care and fitness practical, I want you to feel completely confident using all the tools you have. Pedaling backward on your stationary bike is far from a gimmick; it’s a proven technique for enhancing recovery, strengthening the often-neglected posterior chain muscles, and promoting healthier joint mechanics.
Remember the key checkpoints: confirm you don’t have a fixed gear, start with low resistance, and focus on a smooth, controlled pull. By safely incorporating reverse intervals into your routine, you are training your legs more completely and intelligently. You’re not just cycling forward anymore; you are cycling smarter. Keep experimenting gently, listen to what your body tells you, and watch this simple change add a powerful new dimension to your indoor workouts!