
Make a Simple Car That Moves: A Step-by-Step Guide for Beginners
Building a car that actually moves might sound like a task for seasoned mechanics or engineers, but you can create a simple, functional model with basic materials and clear instructions. This guide breaks down the process into easy steps, perfect for anyone curious about how vehicles work. We’ll focus on the core principles of motion and construction, empowering you to bring your creation to life.
Have you ever looked at a car and wondered how all those parts work together to make it zoom down the road? It’s a question many of us have, especially when faced with a project or just sheer curiosity. The good news is, understanding the basics doesn’t require a degree or a garage full of tools. We can explore the fundamental concepts of a moving vehicle by building a simple model. This guide is designed to be super clear, so even if you’ve never tinkered with anything mechanical before, you’ll feel confident. We’ll walk you through each step, showing you exactly what to do to make your own simple car move. Get ready to discover the excitement of creation!
—
Understanding the Basics: What Makes a Car Move?
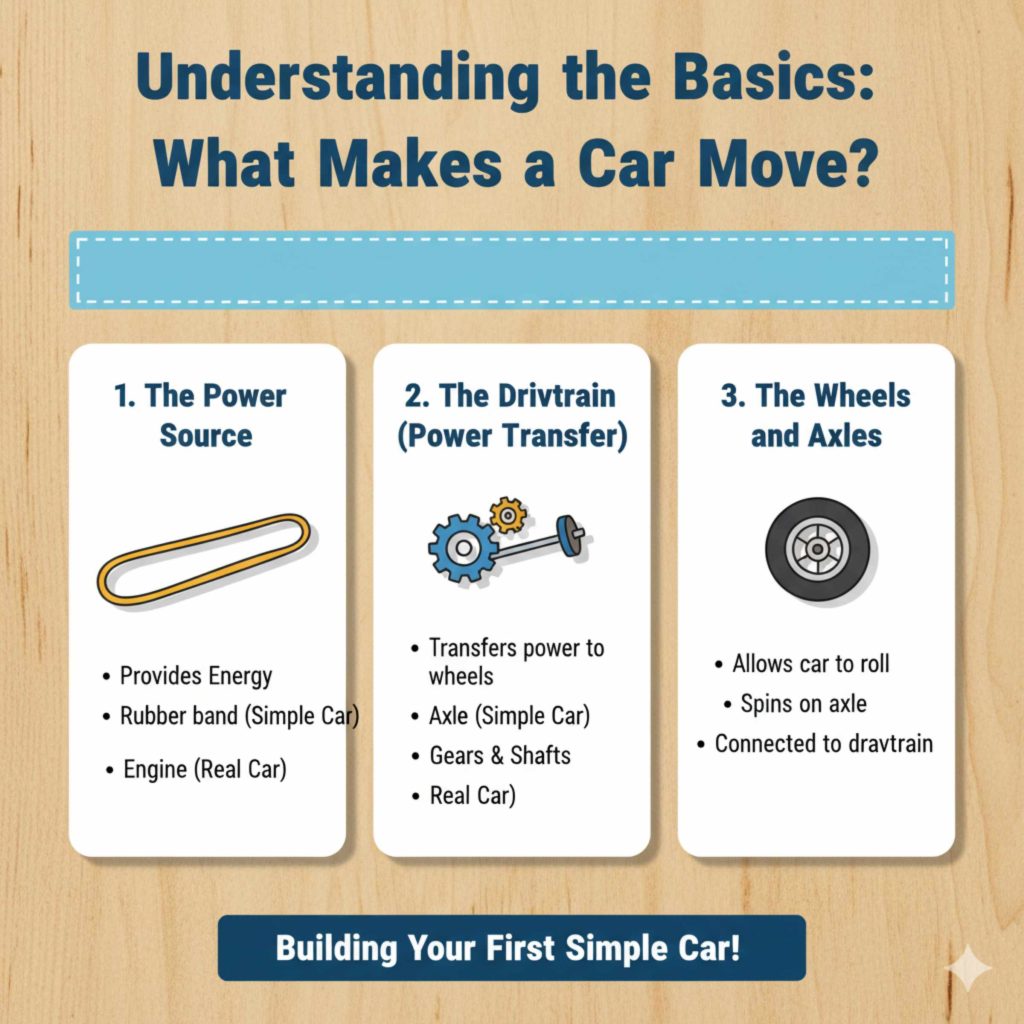
At its heart, a car moves because of a few key things: something needs to provide power, something needs to transfer that power to the wheels, and the wheels need to spin. For our simple car, we’ll need to replicate these core functions in a basic way.
The Power Source
In a real car, this is the engine. For our model, we can use a simple rubber band. When you twist a rubber band, you store energy in it. When you let go, it unwinds, releasing that energy. This stored energy is what will make our car move.
The Drivetrain (Power Transfer)
This is how the engine’s power gets to the wheels. In a real car, it’s a complex system of gears and shafts. In our model, we’ll use an axle that connects the wheels directly to the rubber band’s power.
The Wheels and Axles
These are crucial for movement. Wheels allow the car to roll smoothly, and the axle is the rod that the wheels spin on. For our simple car, they’ll be the direct link to the ground, powered by our rubber band.
Gathering Your Supplies: What You’ll Need
Don’t worry, you won’t need a trip to a specialized auto parts store! Most of these items can be found around your home, at a craft store, or a local supermarket.
Materials List
Cardboard: A sturdy piece, like from a shipping box, will be great for the car’s body.
Plastic Bottles: Two empty, clean plastic bottles (like water bottles) will serve as excellent chassis components and potentially wheel housings.
Wooden Dowels or Skewers: These will act as your axles. You’ll need two, long enough to go through your car’s body and stick out enough to attach wheels.
Cardboard Wheels: You can cut these from more cardboard. Aim for consistency in size. Four wheels are needed.
Straws: A few drinking straws to act as bearings for your axles, allowing them to spin smoothly.
Rubber Bands: These are your power source! A few standard rubber bands will work.
Strong Tape: Duct tape or packing tape will be your best friend for holding everything together.
Glue: Strong craft glue or hot glue (with adult supervision if needed) for a more permanent hold.
Scissors or Craft Knife: For cutting cardboard.
Ruler: For measuring.
Marker or Pen: For marking.
Optional: Washers or Beads: Small ones can help the wheels spin more freely on the axles.
—
Step-by-Step Construction: Building Your Moving Car
Let’s get building! Follow these steps carefully, and you’ll have a rolling creation in no time.
Step 1: Preparing the Car Body
1. Design the Chassis: Take your sturdy cardboard. You can cut out a rectangular base, about 6 inches by 3 inches. This will be the main platform of your car.
2. Reinforce: For extra strength, you can tape a second layer of cardboard to the bottom of your base.
3. Add Supports: Cut two strips of cardboard about 1 inch wide and 3 inches long. These will be the sides. Tape or glue them to the edges of your base. You can also add a front and back piece to create a more enclosed structure.
Step 2: Creating the Axle Mounts
1. Cut Straw Pieces: Cut four pieces of straw, each about 2 inches long.
2. Attach Straws: Tape or glue two straw pieces across the underside of your car’s body, near the front and back. Make sure they are parallel to each other and at least 1 inch from the edges. These will hold your axles.
Step 3: Preparing the Axles and Wheels
1. Cut Axles: If your dowels or skewers are too long, trim them so they extend about 1 inch beyond each side of your car body once they are threaded through the straw mounts.
2. Attach Wheels to Axles: This is a crucial step. You need to secure the wheels to the axles so that when the axle turns, the wheels turn with it.
Method 1 (Glue): Put a generous amount of glue on the end of the dowel/skewer. Press a cardboard wheel firmly onto the glued end. Hold it until the glue starts to set. Repeat for all four wheels on both ends of your two axles. Ensure the wheels are centered on the axles.
Method 2 (Through-Hole): If your cardboard wheels are thick enough, you can carefully poke a hole through the center of each wheel. Then, thread the axle through the hole. Secure with glue or by wrapping tape tightly around the axle where it meets the wheel.
3. Add Optional Washers/Beads: Before attaching the wheels, you can slide a washer or bead onto the axle, then up against the straw mount. This creates a small gap between the wheel and the body, reducing friction.
Step 4: Assembling the Drivetrain
1. Insert Axles: Carefully slide each axle through its corresponding straw mount. It should spin freely within the straw.
2. Check Alignment: Ensure the axles are parallel and the wheels are pointing straight. If they are not, your car will likely pull to one side or not roll smoothly.
Step 5: Installing the Power Mechanism
1. Create a Hook: You need something to attach the rubber band to on the front axle.
Method 1 (Notch): Carefully cut a small notch into the center of the front axle.
Method 2 (Hook Screw/Wire): If you have a small screw with a hook or can bend a sturdy paperclip into a hook, you can carefully screw or tape this securely into the center of the front axle.
2. Attach Rubber Band: Loop one end of the rubber band onto the hook or notch you’ve created on the front axle.
3. Connect to Body: Loop the other end of the rubber band around the back of your car’s body. You can use a small piece of tape or a notch cut into the back cardboard piece to keep the rubber band from slipping off the back. Ensure the rubber band is taut, but not so tight that it stops the axle from turning.
Step 6: Testing and Refining
1. The Wind-Up: Gently turn the front wheels backwards. You should feel the rubber band start to twist and tighten. Keep winding until it’s quite tight, but be careful not to over-wind and break the rubber band or your axle.
2. Release: Place your car on a smooth, flat surface. Let go of the wheels. The rubber band should unwind, spinning the front axle and thus the front wheels, propelling your car forward!
3. Troubleshooting:
Car doesn’t move: Check if the rubber band is wound enough, if it’s slipping off the hook, or if the wheels are too stiff within the straw mounts.
Car moves slowly: Ensure the wheels are spinning freely. Are they rubbing against the body? Is the rubber band too loose?
Car veers off: Check the alignment of your axles and wheels. Make sure they are straight and parallel.
—
Anatomy of Your Simple Moving Car
To better visualize what we’ve built, let’s break down the components and their roles.
Component Breakdown Table
| Component | Material Used | Function |
| :————– | :———————— | :—————————————— |
| Car Body | Cardboard, Plastic Bottles| Provides structure and support for parts. |
| Wheels | Cardboard | Allow the car to roll on the ground. |
| Axles | Wooden Dowels/Skewers | Rods that wheels spin on; transfer motion. |
| Axle Mounts | Drinking Straws | Reduce friction, allowing axles to spin. |
| Power Source| Rubber Bands | Stores and releases energy to move the car. |
| Drivetrain | Axle & Rubber Band Hook | Transfers power from the rubber band to wheels.|
—
Why This Works: The Science Behind the Movement
You’ve just created a working model that demonstrates key principles of physics, like potential and kinetic energy, and rotational motion.
Potential and Kinetic Energy
When you twist the rubber band, you are storing potential energy. This is energy that is waiting to be released. As the rubber band unwinds, this potential energy is converted into kinetic energy, which is the energy of motion. This kinetic energy is what makes the axle, and subsequently the wheels, spin.
Friction Reduction
The straws acting as bearings are a simple way to reduce friction. Friction is the force that opposes motion when two surfaces rub against each other. By allowing the axles to spin within the straws, we minimize the friction between the axle and the car body, making the movement more efficient. A smooth surface beneath your car will also reduce friction with the wheels, helping it travel further.
Torque and Rotation
The unwinding rubber band creates torque on the front axle. Torque is a rotational force. This torque causes the axle to rotate. Because the wheels are attached to the axle, they also rotate. This rotation, against the surface of the ground, generates the force that pushes the car forward. Here’s a great resource from NASA about the basics of forces: NASA: Forces and Motion is a fantastic primer.
—
Variations and Improvements: Making Your Car Even Better
Once you’ve got your basic car moving, you can experiment with making it faster, stronger, or just cooler-looking!
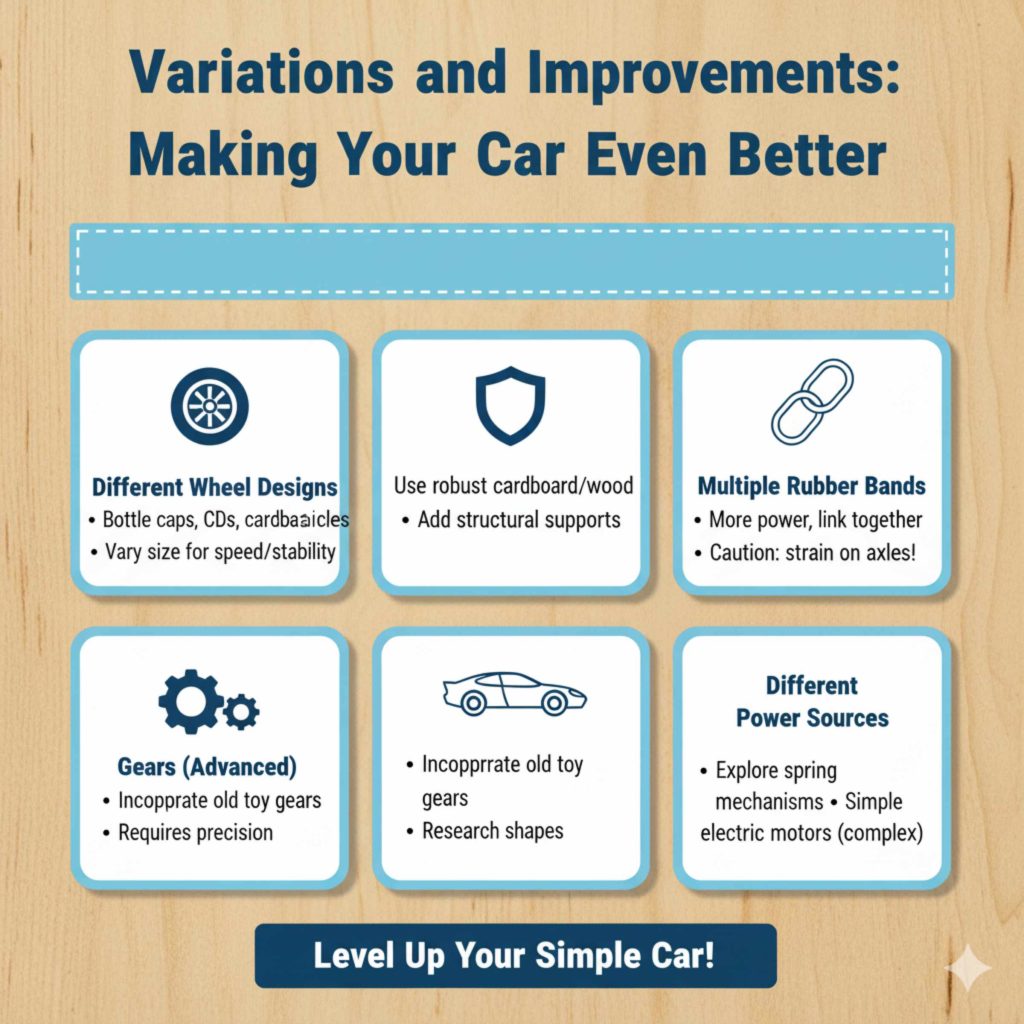
Ideas for Improvement
Different Wheel Designs: Try making wheels from bottle caps, old CDs, or even smaller cardboard circles. Experiment with different sizes to see how it affects speed and stability.
Stronger Chassis: Use more robust cardboard or even lightweight wood if you have it. Consider adding more structural supports.
Multiple Rubber Bands: For more power, you can try using more rubber bands linked together. Be careful not to strain your axles or body too much.
Gears (Advanced): If you’re feeling ambitious, you could try to incorporate some simple gears from old toys to transfer power differently. This will require more precision.
Aerodynamics: Decorate your car with a sleek design to make it look faster! You can even research basic aerodynamic shapes to see if you can improve its performance.
* Different Power Sources: While rubber bands are simple, you could explore other spring-based mechanisms or even simple electric motors if you have access to them and are ready for a more complex build.
—
Frequently Asked Questions (FAQs)
Q1: Will this car be fast?
A1: This simple car is designed to demonstrate the basic principles of movement. It won’t be as fast as a real car, but it will move! Speed depends a lot on how well you build it and the materials you use.
Q2: What if my car doesn’t roll smoothly?
A2: Check if your axles are straight and parallel. Make sure the wheels are securely attached and not wobbly. Also, ensure they spin freely within the straw mounts and aren’t rubbing against the car’s body. Sometimes, adding a small washer or bead between the wheel and the body helps a lot.
Q3: How can I make my car go backward?
A3: This design is primarily for forward motion using the rubber band. To make it go backward, you would typically wind the rubber band, causing it to move forward. For reverse, you’d need a more complex mechanism, like a different type of motor or a gear system that can change the direction of rotation, which is beyond this simple model.
Q4: Is it okay if the rubber band breaks?
A4: Yes, rubber bands can break, especially if they are old or overstretched. Gather a few spares. If it breaks during winding, you might have over-wound it. If it breaks during motion, it might be a sign of too much tension for the rubber band’s strength.
Q5: Can I use different materials for the wheels?
A5: Absolutely! While cardboard is easy to work with, you can experiment with bottle caps, plastic lids, binder clips, or even Lego wheels if you have them. The key is that the material is round, can be securely attached to the axle, and can roll with minimal resistance.
Q6: Where can I learn more about building simple machines?
A6: Many educational websites and science museums offer great resources. For instance, science project sites often list basic machine examples and experiments. For more in-depth information on physics principles, you can explore reputable educational sites like those from universities or scientific organizations. For example, the Exploratorium’s “Snacks” program offers many simple, hands-on science activities.
—
Conclusion: Your First Mobile Creation
Congratulations! You’ve successfully built a simple car that can move, powered by your own hands and a bit of clever engineering. You’ve not only created a fun toy but also gained a hands-on understanding of fundamental mechanical principles like energy transfer, torque, and friction. Think about how your creation mirrors the complex systems in real automobiles, just on a much smaller and simpler scale.
This project is a fantastic starting point for anyone interested in how things work. Don’t stop with this one model; use it as a launchpad for more experimentation. Try out different designs, materials, and power sources. The world of automotive engineering, and indeed, all of engineering, is built on curiosity and the desire to make things move. Keep tinkering, keep learning, and you might be surprised at what you can build next!