Figuring out if your car needs new brake fluid can seem tricky when you’re just starting out with car care. You might worry about missing something important that could affect your safety. But don’t worry, it’s easier than you think!
We’ll walk you through it step by step to make sure you know exactly what to look for. Let’s get your brakes in top shape.
Why Brake Fluid Checks Matter For Your Car
Brake fluid is a vital part of your car’s braking system. It’s the liquid that pushes the brake pads against the rotors, making your car stop. Over time, this fluid can get old, dirty, or absorb moisture.
This can make your brakes less effective, which is a big safety concern. Knowing How to Know If Your Car Needs Brake Fluid helps you keep your car stopping reliably.
What Brake Fluid Does
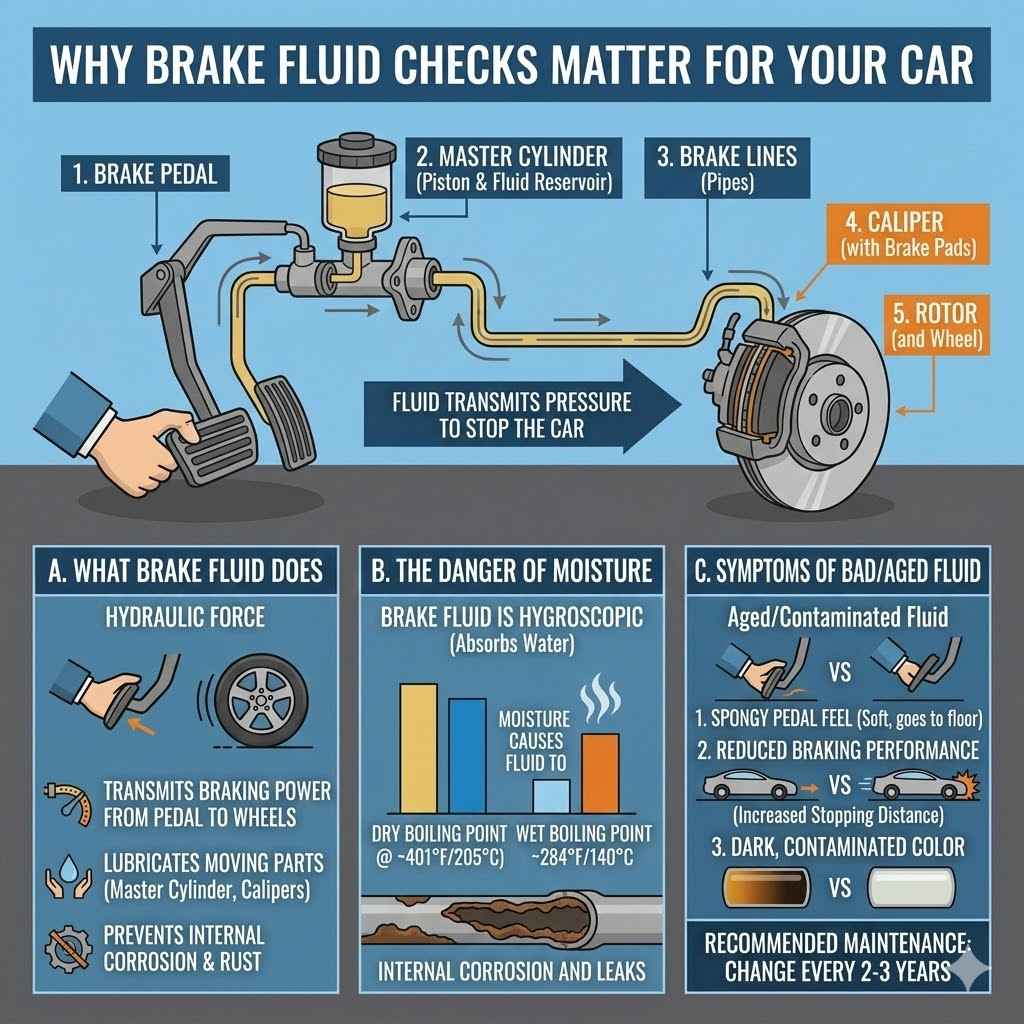
Brake fluid works using hydraulic pressure. When you press the brake pedal, you push a piston in the master cylinder. This forces the brake fluid through the brake lines.
The fluid then goes to the brake calipers or wheel cylinders. These parts push the brake pads or shoes against the rotors or drums, slowing your car down. It’s a chain reaction that relies on the fluid being clean and at the right level.
The properties of brake fluid are important. It needs to have a high boiling point. This is because braking generates a lot of heat.
If the fluid boils, it can create air bubbles. Air is compressible, unlike fluid. So, if you have air in your brake lines, your brake pedal can feel spongy.
It can even go all the way to the floor without much braking action. This is a very dangerous situation.
Brake fluid also needs to lubricate moving parts within the brake system. It helps prevent corrosion and rust. Over time, as the fluid ages, it can start to break down.
It can also absorb moisture from the air. This moisture lowers the boiling point of the fluid. It also speeds up corrosion inside the brake system.
This is why regular checks and changes are so important for your car’s safety.
The Role of Moisture in Brake Fluid
Brake fluid is hygroscopic, meaning it absorbs moisture from the atmosphere. This is a natural process. Even with sealed brake systems, tiny amounts of water can get in over time.
Think of it like a sponge soaking up water. A little bit of moisture can seem harmless at first. But it can significantly impact the performance and safety of your brakes.
When water mixes with brake fluid, it lowers the fluid’s boiling point. For example, DOT 3 brake fluid has a dry boiling point of 401 degrees Fahrenheit (205 degrees Celsius). However, its wet boiling point, after absorbing just 3.7% water, drops to 284 degrees Fahrenheit (140 degrees Celsius).
This is a huge difference. This lower boiling point means the fluid can boil more easily when you brake hard or repeatedly. Boiling creates vapor bubbles that can lead to a spongy brake pedal.
Moisture also causes corrosion. Metal parts within the brake system, like brake lines, calipers, and the master cylinder, can rust. This rust can flake off and contaminate the fluid.
It can also cause leaks. Eventually, corrosion can lead to component failure. Replacing corroded brake parts is much more expensive than simply changing the brake fluid.
So, keeping moisture out is key to a long-lasting brake system.
Common Symptoms of Moisture Contamination
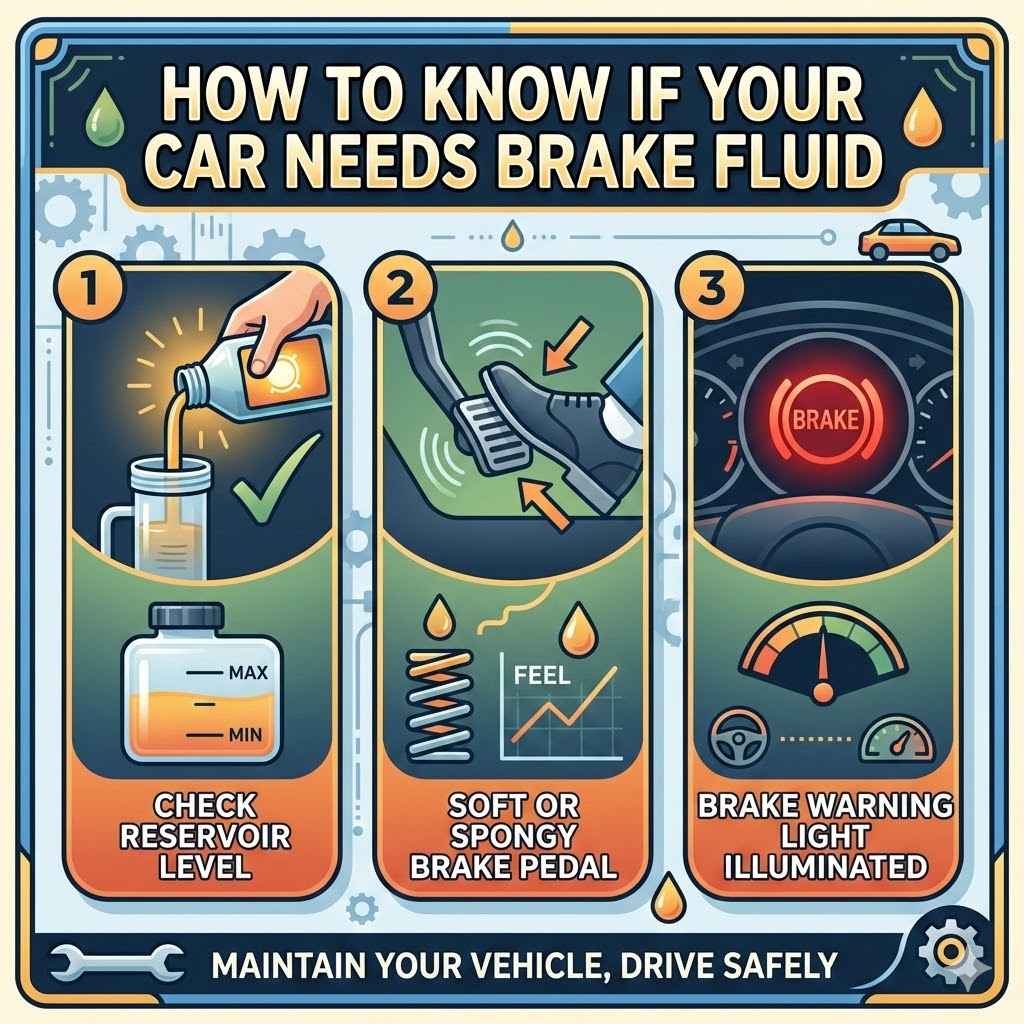
- Spongy brake pedal: When you press the brake pedal, it feels soft and goes down further than usual. This is a direct sign that something is wrong with the hydraulic system, often due to boiled fluid.
- Reduced braking performance: You might notice that it takes longer to stop your car. The brakes just don’t feel as strong as they used to, especially during heavy braking.
- Corrosion in brake lines or components: If you can see rust or discoloration on brake lines or near the master cylinder, it’s a sign of internal corrosion caused by moisture.
These symptoms are not to be ignored. They are clear indicators that your brake fluid is no longer performing as it should. Driving with compromised brakes puts you and others on the road at significant risk.
Therefore, recognizing these signs is a critical step in maintaining your vehicle’s safety.
How Old Brake Fluid Affects Braking
Brake fluid doesn’t last forever. Over time, it breaks down chemically. The additives that keep it performing well degrade.
This means the fluid loses its ability to protect the brake system and maintain optimal performance. Old fluid can become contaminated with small particles from wear and tear within the brake system. These particles can clog small passages and affect how the brakes operate.
When brake fluid gets old, its viscosity can change. This means it might not flow as easily. This can lead to slower response times in your braking system.
The fluid can also become more acidic. This acidity contributes to the corrosion of metal components. Even if the fluid looks clear, its chemical properties can deteriorate significantly over a few years.
A typical recommendation is to change brake fluid every two to three years. This is regardless of mileage. This timeframe is based on the chemical degradation of the fluid and its tendency to absorb moisture.
Ignoring this maintenance can lead to serious problems. These problems include damage to expensive brake components. They can also lead to a dangerous failure of the braking system itself.
Signs of Aged Brake Fluid
- Darkened fluid color: New brake fluid is typically clear or slightly amber. As it ages and gets contaminated, it turns darker, sometimes appearing brownish or even black.
- Gritty feeling in the brake pedal: Older fluid might contain small particles. You might feel a gritty sensation when you press the brake pedal, indicating internal contamination.
- Increased braking distance: Your car takes longer to stop. This is a consequence of the fluid’s reduced efficiency and potential for boiling or air pockets.
These visual and tactile cues are your car’s way of telling you it needs attention. Paying attention to them can save you from more significant repairs and ensure your safety on the road.
Checking Your Car’s Brake Fluid Level and Condition
A key part of knowing How to Know If Your Car Needs Brake Fluid is knowing how to check it. This is a straightforward process that most car owners can do themselves. It involves a few simple steps and helps you catch potential issues early.
Taking a few minutes to perform this check can save you a lot of trouble down the road.
Locating the Brake Fluid Reservoir
The brake fluid reservoir is usually a semi-transparent plastic container. It’s located under the hood of your car. You’ll typically find it near the driver’s side firewall.
It often has a warning label on it. It might say “Brake Fluid” or show a symbol of a brake. The lid is usually black or dark-colored and might have a brake symbol on it.
Sometimes, the reservoir is built directly into the master cylinder. The master cylinder is a metal component that the brake pedal linkage connects to. If you can’t find a separate plastic tank, look for this larger metal part.
It will have lines running out of it to the brake lines. The reservoir cap will be on top of this unit.
When you locate it, observe its condition. Is it clean? Is there any visible debris around the cap?
A clean reservoir indicates that someone has taken care of the braking system. If it’s covered in dirt or grime, it’s a good idea to clean the area around the cap before opening it. This prevents dirt from falling into the fluid.
Steps to Identify the Reservoir
- Open your car’s hood.
- Locate the master cylinder, a metal component typically on the firewall near the driver’s side.
- Look for a plastic reservoir attached to the top or side of the master cylinder.
- Check for warning labels or symbols indicating it’s for brake fluid.
Once you’ve found the reservoir, you’re ready for the next steps in checking your brake fluid.
Visual Inspection of the Fluid
The easiest way to check your brake fluid is to look at it. Most reservoirs are made of clear or translucent plastic. This allows you to see the fluid level and its color without opening the cap.
There are usually “MIN” and “MAX” lines on the side of the reservoir. The fluid level should be between these two marks.
If the fluid level is below the “MIN” line, it could mean two things. First, your brake pads are worn down. As pads wear, the caliper pistons extend further out.
This requires more fluid to be drawn from the reservoir. Second, it could indicate a leak in the brake system. If the level is very low or you see puddles under your car, that’s a serious sign of a leak.
Observe the color of the fluid. New brake fluid is clear or light amber. If the fluid looks dark brown, black, or has visible particles floating in it, it’s time for a change.
Dark fluid means it’s old and contaminated. This contamination reduces its effectiveness and can damage your brake system. Think of it like dirty oil; it’s not doing its job properly.
What to Look For During Visual Inspection
- Fluid level: Ensure it is between the MIN and MAX marks on the reservoir. A low level often means worn brake pads or a leak.
- Fluid color: Check if it’s clear or light amber. Dark brown or black fluid indicates it needs to be replaced.
- Clarity: Look for any visible particles, debris, or cloudiness in the fluid. This signifies contamination.
This simple visual check is a great first step. It gives you a quick idea of your brake fluid’s health. If the fluid looks good and is at the correct level, you might not need to do anything immediately.
But if you notice any issues, it’s time to investigate further.
Checking the Fluid Level with a Dipstick
While most reservoirs have markings, sometimes you need a more precise measurement, or the markings are worn. In these cases, a brake fluid dipstick can be useful. However, not all cars are designed to be checked this way, and it’s crucial to use the correct type of dipstick.
Many modern cars do not require or accommodate this type of check.
If your car does have a dipstick provision, it’s usually a simple insert and pull. Ensure the dipstick is clean and designed specifically for brake fluid. Using the wrong tool or a dirty dipstick can contaminate the fluid.
Always refer to your car’s owner’s manual for specific instructions on checking brake fluid levels with a dipstick. It will tell you if it’s recommended and how to do it correctly.
The general idea is to insert the dipstick carefully into the reservoir opening. Do not force it. Pull it out and observe the fluid level marked on the dipstick.
Compare this to the markings on the reservoir. If the dipstick reading is significantly different from the reservoir markings, it could indicate an issue. It might be a worn brake pad needing replacement, or it could signal a leak.
When to Use a Brake Fluid Dipstick
- When reservoir markings are unclear or worn.
- If you suspect a very small leak or low fluid level that isn’t obvious visually.
- To get a more precise measurement, especially if you’re learning car maintenance.
Remember, safety first. If you are unsure about using a dipstick or any part of this process, it’s always best to consult a qualified mechanic. They have the tools and expertise to diagnose any issues accurately.
Common Problems Indicating Need For New Brake Fluid
When it comes to How to Know If Your Car Needs Brake Fluid, paying attention to how your car feels and sounds is crucial. There are several tell-tale signs that your brake fluid is no longer in good condition and needs to be replaced. Ignoring these signs can lead to serious safety issues and costly repairs.
Spongy or Soft Brake Pedal
This is one of the most common and dangerous symptoms of contaminated or degraded brake fluid. When you press the brake pedal, it feels soft and mushy, and it goes down further than usual before engaging the brakes. This sensation is often described as feeling “spongy.”
This happens because old brake fluid can absorb moisture. When you brake, the heat generated can cause this moisture to boil, creating air bubbles within the fluid. Air is compressible, unlike brake fluid.
So, when you press the pedal, you’re compressing air instead of directly applying hydraulic pressure to the brakes. This loss of direct pressure makes the pedal feel soft and reduces braking effectiveness.
In some cases, a spongy pedal can also indicate air in the brake lines. Air can enter the system if the fluid level is too low and the master cylinder draws air, or if there’s a leak. Regardless of the cause, a spongy brake pedal is a serious warning sign that requires immediate attention.
You need to have your brake system inspected and the fluid flushed and replaced.
Reasons for a Spongy Brake Pedal
- Moisture contamination: Water in the fluid lowers its boiling point, leading to vapor formation under heat.
- Air in the brake lines: If the master cylinder runs low or there’s a leak, air can enter the system.
- Worn brake hoses: Old or damaged brake hoses can expand under pressure, creating a spongy feel.
- Faulty master cylinder: If the seals in the master cylinder are worn, it can allow fluid to bypass, leading to a soft pedal.
It’s vital to address a spongy brake pedal immediately. Driving with such a symptom compromises your ability to stop your car effectively, putting yourself and others at risk.
Brake Warning Light Illuminates
Most modern cars have a brake warning light on the dashboard. This light can illuminate for several reasons, and one of them is a low brake fluid level. If the fluid level in the reservoir drops below a certain point, a sensor will trigger the warning light.
The brake warning light often looks like an exclamation mark inside a circle or the letters “BRAKE.” It might also be accompanied by the Anti-lock Braking System (ABS) warning light. If the brake fluid is low, it could be due to worn brake pads, meaning the caliper pistons are extended further out. This is normal as pads wear down.
However, a sudden or significant drop in fluid level is a serious concern.
A low fluid level can also indicate a leak in the brake system. Leaks are dangerous because they mean your braking system isn’t functioning correctly. If the brake warning light comes on, you should check your brake fluid level immediately.
If the level is low and there’s no obvious leak, it might be time to replace the fluid due to worn pads or other internal system issues.
Understanding the Brake Warning Light
- Low brake fluid level: This is the most common cause related to brake fluid. It signifies either worn brake pads or a leak in the system.
- Parking brake engaged: Sometimes the light illuminates if the parking brake is still on. Ensure it’s fully disengaged.
- ABS system fault: If the ABS light also illuminates, there might be an issue with the anti-lock braking system itself, which often works in conjunction with the brake fluid.
Do not ignore the brake warning light. It’s a critical safety indicator. A quick check of the fluid level can help you determine the cause and whether you need immediate service.
Grinding or Squealing Noises When Braking
While grinding or squealing noises when braking are often associated with worn brake pads, they can also be a symptom of old, contaminated brake fluid. Worn brake pads have wear indicators that produce a high-pitched squeal when the pad material is almost gone. A grinding noise usually means the metal backing plate of the brake pad is scraping against the rotor, which is a more severe issue.
However, if the brake fluid is old and full of contaminants, these particles can get into the brake caliper and between the brake pads and rotors. This can cause a grinding or scraping sound even if the pads themselves have some life left. The particles act like sandpaper, creating friction and noise.
This can also accelerate wear on the rotors and pads.
Furthermore, if moisture has caused internal corrosion in the brake system, the rough surfaces created by rust can also lead to unusual noises. If you hear grinding or squealing, it’s essential to have your brakes inspected. It’s not just about the noise; it’s about the underlying cause and its impact on your braking performance and safety.
Causes of Braking Noises
- Worn brake pads: The primary cause, indicated by squealing or grinding as metal contacts metal.
- Contaminated brake fluid: Dirt and debris in the fluid can cause friction and noise.
- Corrosion in the brake system: Rust on components can create rough surfaces that cause sounds.
- Glazed brake pads or rotors: Overheating can cause a hard, shiny surface on pads and rotors, leading to squealing.
Any unusual noise during braking should be investigated. It’s better to catch a minor issue early than to wait for a major component failure or a safety hazard.
Fluid Leakage
A visible leak of brake fluid is a critical emergency. Brake fluid is typically amber or clear and has a slightly oily feel. It also has a distinct odor that some people describe as being similar to castor oil.
If you notice puddles of this fluid under your car, especially near the wheels or the front of the engine bay, it indicates a leak.
Leaks can occur in various parts of the brake system. This includes the brake lines (which can corrode and rust), brake hoses (which can crack or burst), caliper seals, or wheel cylinder seals. A leak means that the hydraulic pressure needed to stop your car is escaping, and your brakes will become progressively less effective.
If you suspect a leak, do not drive your car. Have it towed to a mechanic immediately. Driving with a brake fluid leak is extremely dangerous.
It means your braking system is compromised and could fail entirely. The amount of fluid lost might seem small, but even a small leak can lead to a significant loss of braking power over time.
Identifying Brake Fluid Leaks
- Puddles under the car: Check for fluid on the ground, particularly under the wheels or the engine area.
- Wet spots on brake components: Inspect brake lines, hoses, calipers, and wheel cylinders for signs of moisture or fluid residue.
- Low fluid level with no other apparent cause: If the reservoir fluid level drops significantly without obvious reasons like worn pads, a leak is likely.
A fluid leak is a direct threat to your safety. It requires immediate professional attention to prevent accidents.
How to Replace Your Car’s Brake Fluid
Knowing How to Know If Your Car Needs Brake Fluid is just the first step. The next is knowing how to address it. Replacing your brake fluid, also known as flushing the brake system, is a maintenance task that can be done at home.
It involves removing the old fluid and replacing it with new fluid. This process ensures your brakes work effectively and safely.
Gathering the Necessary Tools and Supplies
Before you begin, make sure you have everything you need. This will make the process smoother and prevent interruptions. Having the right tools ensures you can complete the job safely and correctly.
You will need:
- New brake fluid: Check your car’s owner’s manual for the correct type (e.g., DOT 3, DOT 4, DOT 5.1). Using the wrong type can damage your brake system.
- A brake fluid bleeder kit: This kit typically includes a clear plastic hose and a collection bottle. Some kits have a one-way valve to prevent air from entering the system.
- Wrench set: To open and close bleed screws on the brake calipers.
- Gloves: Brake fluid can irritate skin.
- Safety glasses: To protect your eyes from splashes.
- Rags or shop towels: For cleaning up spills.
- A helper: It’s much easier and safer to do this with someone to pump the brake pedal.
It’s also a good idea to have a jack and jack stands if you need to lift your car for better access to the bleed screws. Always use jack stands for safety; never rely solely on a jack.
Essential Tools and Supplies List
- Correct type of new brake fluid (DOT 3, DOT 4, etc.)
- Brake fluid bleeder kit (hose and collection bottle)
- Wrenches for bleed screws
- Protective gloves
- Safety glasses
- Shop rags
- Jack and jack stands (if needed)
- A patient helper
Having these items ready will help you complete the brake fluid flush efficiently.
The Brake Fluid Flushing Process
The process of flushing brake fluid involves bleeding the brakes. This is done one wheel at a time. It’s important to follow a specific order to ensure all the old fluid is removed and no air is left in the system.
The general order is to start with the wheel furthest from the master cylinder and work your way closer.
For most cars, this order is: right rear, left rear, right front, left front. This ensures that the new fluid pushes the old fluid and any air out effectively. If you have a car with ABS, the procedure might be slightly different, so consult your owner’s manual or a service manual.
Here’s a general step-by-step guide:
Prepare the car: Ensure the parking brake is engaged (unless working on the rear brakes where it might interfere with access to bleed screws) and the car is on a level surface. If needed, lift and secure the car with jack stands.
Locate the bleed screw: On each brake caliper (or wheel cylinder), you’ll find a small bleed screw. Clean any dirt from around it.
Attach the bleeder kit: Connect one end of the clear hose from your bleeder kit to the bleed screw. Place the other end of the hose into the collection bottle, ensuring the end of the hose stays submerged in some old brake fluid at the bottom of the bottle. This prevents air from being sucked back in.
Open the bleed screw: Using the correct size wrench, slightly loosen the bleed screw (about a quarter to a half turn). Do not remove it completely.
Pump the brake pedal: Have your helper slowly and steadily pump the brake pedal several times. Then, have them hold the pedal down. As they hold the pedal down, you should see fluid flow through the clear hose into the collection bottle.The fluid color will change from dark to clear as the new fluid replaces the old.
Close the bleed screw: While your helper is holding the brake pedal down, tighten the bleed screw. This is crucial to prevent air from entering the system.
Release the brake pedal: Once the bleed screw is tightened, your helper can release the brake pedal.
Repeat: Continue this process for each wheel, moving in the correct sequence (RR, LR, RF, LF). Periodically check the brake fluid reservoir under the hood. Keep it filled with new fluid; do not let it run dry.If it runs dry, you’ll introduce air into the system, and you’ll have to start over.
Final check: Once all wheels are done, top off the brake fluid reservoir to the MAX line. Tighten the reservoir cap securely. Test the brakes in a safe area by gently applying them at low speeds.The pedal should feel firm.
This process takes patience and attention to detail. If you’re not comfortable doing it yourself, a professional mechanic can perform a brake fluid flush efficiently and safely.
When to Seek Professional Help
While replacing brake fluid is a manageable DIY task for some, there are situations where it’s best to leave it to the professionals. If you’re not confident in your mechanical abilities, or if you encounter any issues, it’s always safer to seek expert assistance. This ensures the job is done correctly and your brakes are safe.
You should consider professional help if:
- You’re unsure about the correct type of brake fluid for your vehicle. Using the wrong fluid can cause significant damage to seals and other components.
- You don’t have the necessary tools, like a proper bleeder kit or jack stands, or you’re not comfortable using them.
- Your car has an advanced ABS system, and you’re not familiar with its specific bleeding procedure. Some ABS systems require specialized diagnostic tools to cycle the ABS pump to bleed properly.
- You suspect a leak in the brake lines or other components. Diagnosing and repairing leaks requires specific expertise and tools.
- After flushing the fluid, your brake pedal still feels spongy or you have other braking performance issues. This indicates a more complex problem that needs professional diagnosis.
A mechanic has the experience, specialized equipment, and knowledge to handle any brake system issue. They can also perform a thorough inspection of your entire brake system, checking for worn pads, rotors, and any signs of damage or impending failure. Prioritizing safety is paramount when it comes to your brakes.
How to Know If Your Car Needs Brake Fluid Related Statistics
Understanding the importance of regular maintenance, like checking and replacing brake fluid, can be reinforced by looking at some statistics. These figures highlight the real-world impact of brake system health and the consequences of neglect. They underscore why knowing How to Know If Your Car Needs Brake Fluid and acting on it is so critical for safety.
Brake System Failures and Accidents
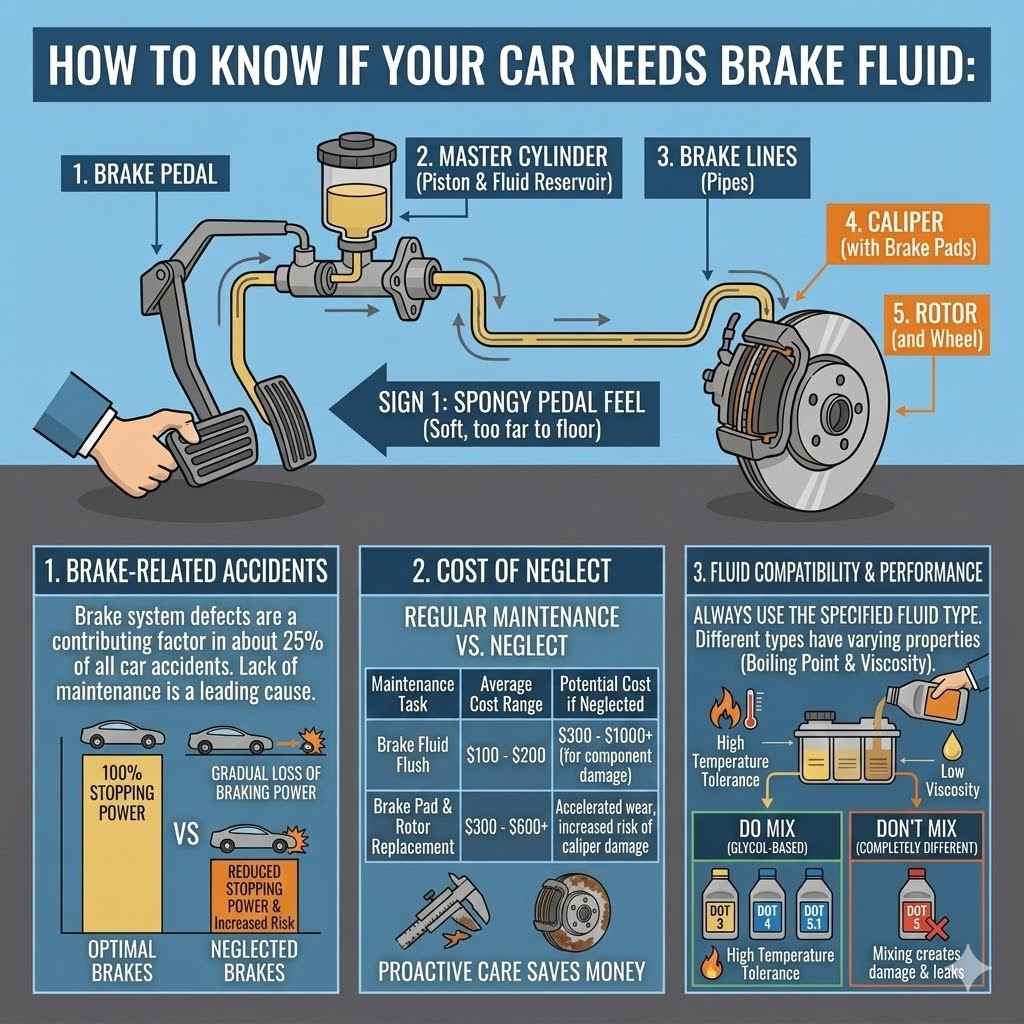
While brake failure isn’t the most common cause of accidents, when it does happen, the results can be catastrophic. According to the National Highway Traffic Safety Administration (NHTSA), brake system defects are a contributing factor in about 25% of all car accidents. This includes issues with brake fluid, pads, rotors, and other components.
A significant portion of these defects stem from a lack of maintenance. Worn brake pads, low or contaminated brake fluid, and leaks can all lead to a gradual or sudden loss of braking power. When a driver expects their car to stop and it doesn’t, or it takes much longer than anticipated, accidents are likely to occur.
These accidents can range from minor fender-benders to severe collisions resulting in serious injuries or fatalities.
One study indicated that about 5% of vehicle failures reported by police are related to brake issues. While this might seem like a small percentage, it represents a critical failure point that can lead directly to accidents. For instance, if a driver experiences brake fade due to overheated, contaminated fluid on a steep downhill road, they might not be able to stop at an intersection, leading to a serious crash.
Statistics on Brake-Related Accidents
- Approximately 25% of car accidents are influenced by brake system defects.
- Around 5% of vehicle failures reported by law enforcement involve brake problems.
- Brake system maintenance issues are a significant, though often overlooked, contributor to road safety.
These statistics emphasize that your brakes are a primary safety feature. Keeping them in optimal condition by addressing issues like old brake fluid directly contributes to preventing accidents and protecting lives.
Cost of Brake System Repairs
Neglecting regular brake maintenance, such as changing brake fluid, can lead to more extensive and expensive repairs down the line. Brake fluid replacement itself is relatively inexpensive, especially if done as part of routine maintenance. However, if contaminated or old fluid causes damage to other components, the repair costs can escalate significantly.
For example, if moisture in the brake fluid causes corrosion in the brake lines, these lines will eventually need to be replaced. A set of brake lines can cost several hundred dollars in parts and labor. If the corrosion damages the calipers or master cylinder, the cost can be even higher, potentially reaching over a thousand dollars for major components.
Data from automotive repair shops shows that a standard brake fluid flush service typically costs between $100 and $200. This is a small price to pay compared to replacing calipers or brake lines. The average cost of replacing brake pads and rotors, another common brake job, can range from $300 to $600 or more, depending on the vehicle and parts used.
Letting brake fluid degrade can hasten the wear on these parts and lead to their premature replacement, adding to overall maintenance expenses.
| Maintenance Task | Average Cost Range | Potential Cost if Neglected |
|---|---|---|
| Brake Fluid Flush | $100 – $200 | $300 – $1000+ (for component damage) |
| Brake Pad & Rotor Replacement | $300 – $600+ | Accelerated wear, increased risk of caliper damage |
These figures highlight the financial wisdom of adhering to a consistent maintenance schedule. Proactive care not only ensures safety but also saves money in the long run by preventing costly component failures.
Impact of Fluid Type on Performance
The type of brake fluid used in your vehicle is not just a recommendation; it’s a specification that affects performance and safety. Different brake fluid types have varying properties, such as boiling points and viscosity, which are crucial for optimal brake system function. Using the wrong type can lead to reduced braking performance and potential damage to the system.
For instance, DOT 3, DOT 4, and DOT 5.1 brake fluids are glycol-based. They have different dry and wet boiling points. DOT 4 has a higher boiling point than DOT 3.
This means it can withstand higher temperatures before boiling, offering better performance in demanding situations like heavy braking or driving in hot climates. DOT 5.1 offers even higher boiling points.
DOT 5 fluid, on the other hand, is silicone-based and not compatible with glycol-based systems. Mixing DOT 5 with DOT 3, 4, or 5.1 can cause serious damage to seals and other rubber components in the brake system. This incompatibility can lead to leaks and brake failure.
Therefore, always using the fluid type specified in your owner’s manual is essential for maintaining the integrity and performance of your braking system.
Brake Fluid Type Compatibility
- DOT 3, DOT 4, DOT 5.1 (Glycol-based): These are generally compatible with each other in that they can be mixed, but it’s always best to use the specified type for optimal performance. DOT 5.1 offers the highest boiling points among these.
- DOT 5 (Silicone-based): This fluid is not compatible with glycol-based fluids. It has different properties and should only be used in vehicles specifically designed for it. Mixing DOT 5 with other types will cause significant damage.
Understanding these distinctions reinforces the importance of using the correct fluid. It’s a simple yet critical aspect of brake system maintenance that directly impacts performance and safety.
Frequently Asked Questions
Question: How often should I check my brake fluid?
Answer: It’s a good practice to check your brake fluid level and condition visually at least once a month, and especially before any long road trips. You should aim to have it professionally flushed and replaced every two to three years, or as recommended by your car’s manufacturer.
Question: Can I just top off my brake fluid if it’s low?
Answer: Topping off is a temporary fix if the level is slightly low and your brake pads are worn. However, if the level is consistently dropping or the fluid is dark, you should investigate the cause, as it could indicate a leak or that the fluid needs changing. Adding new fluid to old, contaminated fluid doesn’t restore its performance.
Question: What happens if I ignore low brake fluid?
Answer: Low brake fluid can lead to reduced braking effectiveness, a spongy brake pedal, and eventually, a complete loss of braking power. It can also be a sign of a leak in the brake system, which is a serious safety hazard that needs immediate attention.
Question: Is it okay to use a different type of brake fluid than what’s recommended?
Answer: No, it is not okay. Using the wrong type of brake fluid, especially mixing DOT 5 (silicone-based) with DOT 3, 4, or 5.1 (glycol-based), can cause severe damage to your brake system’s seals and components, leading to leaks and brake failure.
Question: How do I dispose of old brake fluid?
Answer: Brake fluid is considered hazardous waste. You should never pour it down the drain or into the ground. Collect it in a sealed container and take it to an auto parts store, a service station, or a local hazardous waste disposal facility that accepts used automotive fluids.
Conclusion
Knowing How to Know If Your Car Needs Brake Fluid is about listening to your car and performing simple checks. Watch for a spongy pedal, warning lights, noises, or leaks. Regularly inspecting your brake fluid’s level and color is key.
If it’s dark or low, it’s time for a change. Keeping your brake fluid fresh ensures your car stops safely.