Most car manufacturers recommend bleeding your brakes every two to three years or every 24,000 to 36,000 miles, whichever comes first. However, you should always bleed them immediately if your brake pedal feels spongy, soft, or sinks to the floor, as this indicates air has entered the brake lines.
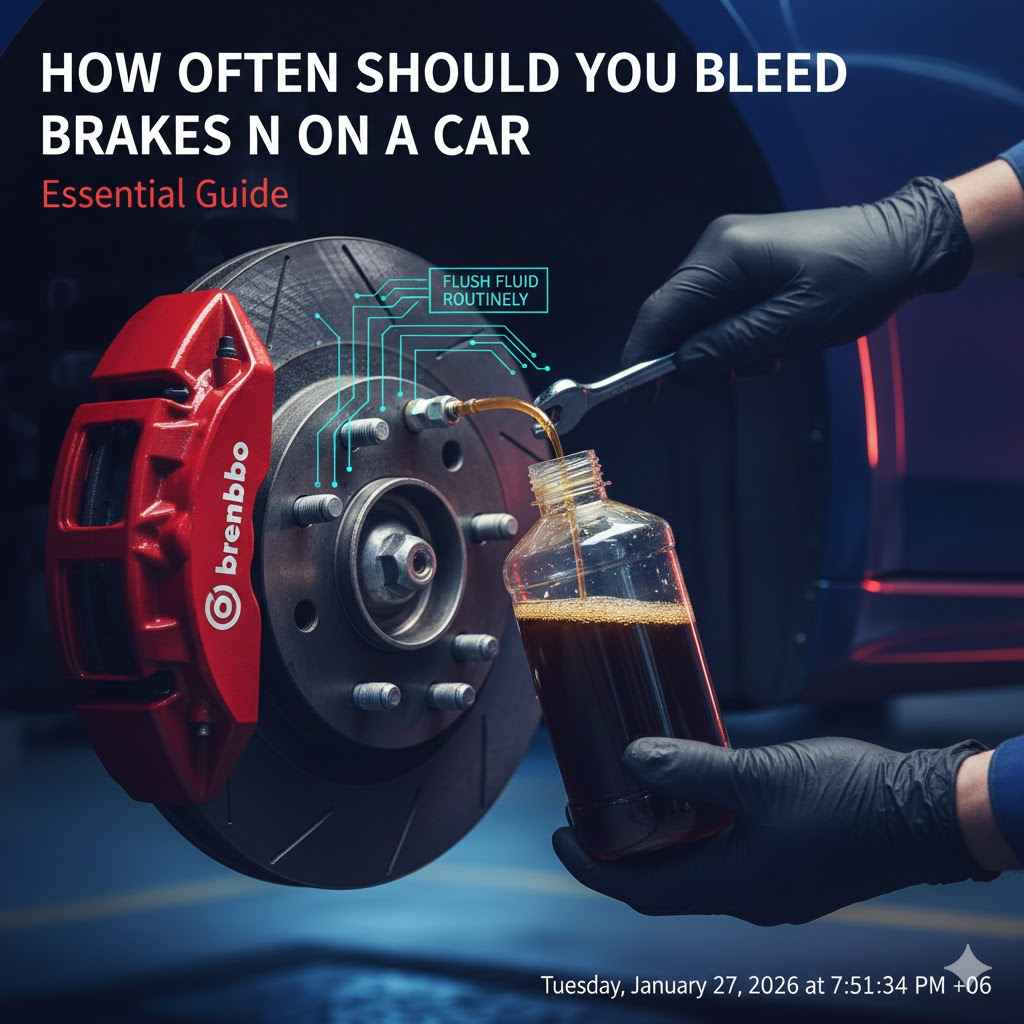
Your car’s brakes are your most important safety feature. When you press the brake pedal, you trust it to work every single time. But what happens when it feels… different? Maybe it’s a little soft, or you have to press it further down than usual. This is a common worry, but thankfully, the fix is often simple: bleeding your brakes.
Don’t let the term “bleeding” scare you! It sounds complicated, but it’s just the process of removing tiny air bubbles from your brake lines. Air is the enemy of a firm brake pedal. This guide will walk you through everything you need to know, step by step. We’ll cover why it’s important, how to tell when it’s time, and how you can do it yourself. Let’s get you back to confident, safe driving.
What is Brake Bleeding, and Why Does it Matter?
Let’s start with the basics. Your car’s braking system is a hydraulic system. That’s a fancy way of saying it uses a special liquid—brake fluid—to work. When you push the brake pedal, you are pushing this fluid through a series of tubes (brake lines) to the wheels. This fluid pressure then squeezes the brake pads against the rotors, slowing your car down.
Here’s the key: Brake fluid cannot be compressed. This is great because it means all the force from your foot goes directly to stopping the car. Air, on the other hand, is very easy to compress.
Brake bleeding is the process of pushing old, contaminated brake fluid and any trapped air bubbles out of the brake lines and replacing it with fresh, clean fluid. Think of it like getting a bubble out of a sticker you’re trying to apply—you push it out to the edge until it’s gone. It’s the same idea here, but with brake fluid and air.
Why Air in Your Brake Lines is a Big Problem
If air gets into your brake lines, it creates a major safety issue. When you press the pedal, some of your force is wasted squishing the air bubble instead of applying the brakes. This leads to a few dangerous symptoms:
- Spongy or Soft Pedal: The brake pedal feels mushy, like you’re stepping on a sponge instead of a firm surface.
- Increased Stopping Distance: Your car takes longer to stop because the brakes aren’t applying with full force immediately.
- Pedal Sinks to the Floor: In serious cases, the pedal might slowly sink to the floor while you’re holding it down, which is a clear sign that you are losing brake pressure.
Bleeding the brakes removes these air bubbles, restoring the firm pedal feel and ensuring your brakes respond instantly, just like they were designed to.
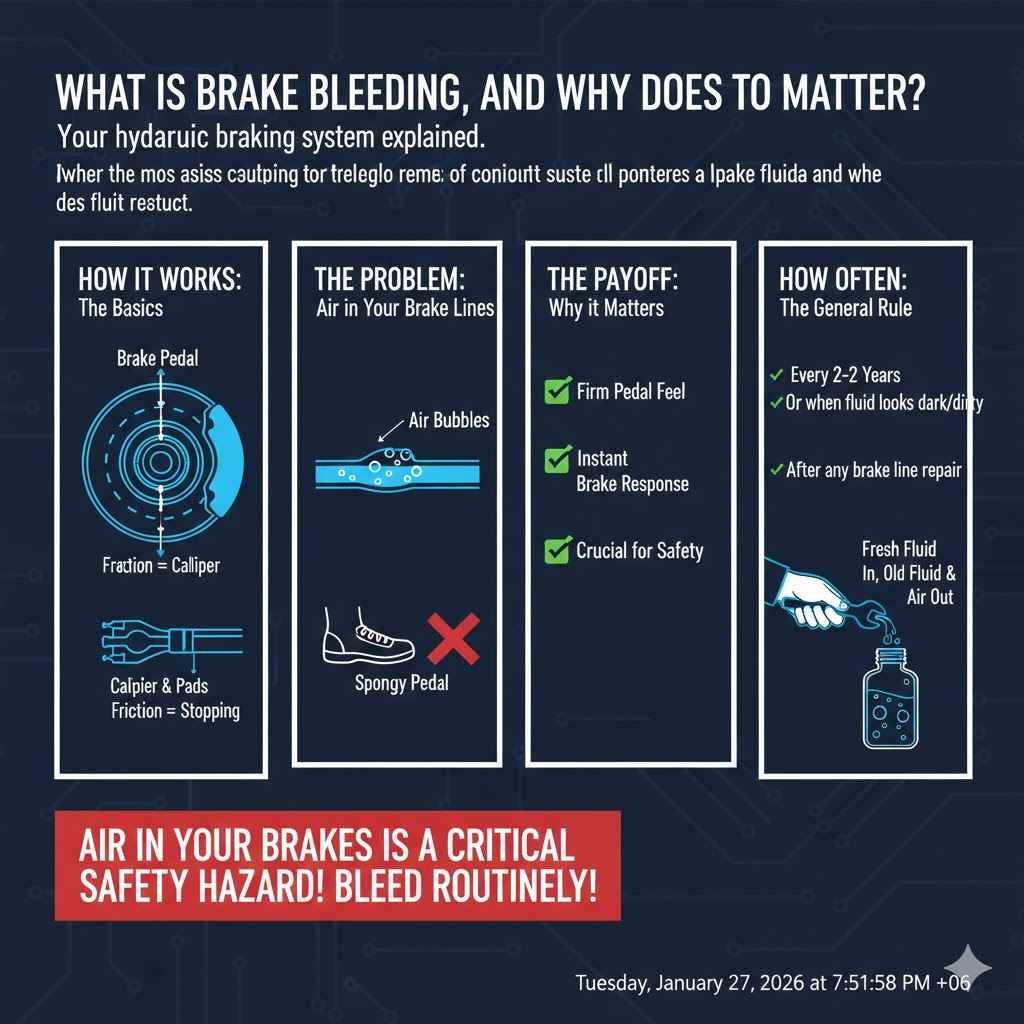
The General Rule: How Often to Bleed Your Brakes
So, we arrive at the big question. The most straightforward answer is to follow your vehicle manufacturer’s recommendation, which you can find in your owner’s manual. However, a good general guideline is a great starting point.
As a rule of thumb, you should bleed your brakes every two to three years.
Why this timeframe? Over time, brake fluid absorbs moisture from the air. This water can lower the fluid’s boiling point, which is dangerous during heavy braking (like going down a long hill). The heat can cause the water in the fluid to boil, creating steam bubbles. This has the same effect as having air in the lines, leading to brake failure.
Furthermore, old fluid can become contaminated with rust and debris from inside the brake system, which can damage sensitive components like the ABS module. A regular brake bleed is not just about removing air; it’s about replacing old, tired fluid with fresh fluid to keep the entire system healthy.
Factors That Influence Brake Bleeding Frequency
The “two to three years” rule is a great baseline, but several factors might mean you need to do it more or less often. Think of it as a personalized maintenance plan for your car.
| Factor | Impact on Brake Bleeding Frequency | Recommendation |
|---|---|---|
| Driving Habits | Aggressive driving with hard, frequent braking generates more heat. This can break down brake fluid faster. Stop-and-go city traffic is also harder on brakes than highway driving. | If you’re an aggressive driver or do a lot of city driving, consider bleeding your brakes closer to the two-year mark. |
| Climate and Humidity | Brake fluid is “hygroscopic,” meaning it absorbs moisture from the air. If you live in a very humid or rainy climate, your fluid will get contaminated with water more quickly. | In humid climates, stick to a strict two-year schedule to prevent water contamination and rust. |
| Vehicle Age and Type | Older vehicles may have less-sealed systems, allowing more moisture in. High-performance cars or heavy-duty trucks often require more frequent maintenance due to higher braking demands. | Check your owner’s manual. High-performance models may recommend annual brake fluid flushes. |
| Brake System Repairs | Any time the brake system is “opened up”—for example, when replacing a brake line, caliper, or master cylinder—air will enter the system. | You must bleed the brakes immediately after any repair that involves disconnecting a brake line. This is not optional. |
Clear Signs Your Brakes Need Bleeding Now
Sometimes, your car will tell you exactly what it needs. Don’t wait for your scheduled maintenance if you notice any of these warning signs. Your safety is the top priority.
1. The Spongy Brake Pedal
This is the most common and classic sign. If your brake pedal feels soft, squishy, or less responsive than usual, there’s a very high chance you have air in your brake lines. The pedal should feel firm and engage near the top of its travel.
2. The Sinking Pedal
You’re stopped at a red light with your foot on the brake. Do you feel the pedal slowly sinking towards the floor? This is a serious symptom. It could mean air in the lines or a potential leak in the master cylinder. Either way, it needs immediate attention.
3. Inconsistent Braking
Do your brakes feel fine one moment and soft the next? Inconsistent performance is a red flag. Air bubbles can move around in the lines, causing unpredictable braking behavior. You need consistent, reliable stopping power every time.
4. Visible Brake Fluid Leaks
If you see puddles of a clear-to-brown, oily liquid under your car near the wheels, you may have a brake fluid leak. A leak allows fluid to escape and air to enter. Check your brake fluid reservoir under the hood. If the level is low, get it inspected immediately. According to the National Highway Traffic Safety Administration (NHTSA), maintaining your brake system is critical for road safety.
5. Dark or Murky Brake Fluid
New brake fluid is typically clear or has a light amber tint. Over time, it gets dark and dirty as it collects moisture and contaminants. Pop your hood and check the brake fluid reservoir. If the fluid looks like used motor oil, it’s long overdue for a change and a bleed.
DIY Brake Bleeding: Tools and Step-by-Step Guide
Feeling confident? Bleeding your own brakes is a very achievable DIY project that can save you a good amount of money. It’s a great way to get more familiar with your car. The key is to be patient, methodical, and safe. You will need a helper for the most common method.
Tools and Supplies You’ll Need
Gather everything before you start to make the process smooth and easy.
- A Helper: For the two-person method, you’ll need a friend to pump the brake pedal.
- New Brake Fluid: Check your owner’s manual for the correct type (e.g., DOT 3, DOT 4). Using the wrong type can damage your system. Buy a fresh, sealed bottle.
- Box-End Wrench or Flare Nut Wrench: This is for opening and closing the bleeder valve. You need one that fits the bleeder screws on your car perfectly to avoid stripping them.
- Clear Plastic Tubing: About 2-3 feet of clear tubing that fits snugly over the bleeder screw. This lets you see the air bubbles coming out.
- A Clean Jar or Bottle: This will be used to catch the old brake fluid. Pour a little clean fluid in the bottom to prevent air from being sucked back in.
- Jack and Jack Stands: You will need to lift the car and remove the wheels to access the brakes. Never work under a car supported only by a jack. Always use jack stands.
- Lug Wrench: To remove the wheel nuts.
- Turkey Baster or Syringe: To remove some of the old fluid from the master cylinder reservoir.
- Rags or Paper Towels: For cleaning up spills. Brake fluid is corrosive and can damage your car’s paint.
Step-by-Step Instructions (Two-Person Method)
This is the most common and reliable method for beginners. Always start with the wheel furthest from the master cylinder and work your way closer. For most cars in the US, the order is:
- Right Rear (Passenger Rear)
- Left Rear (Driver Rear)
- Right Front (Passenger Front)
- Left Front (Driver Front)
Step 1: Prepare Your Car and Workspace
Park your car on a flat, level surface. Engage the parking brake and put the car in “Park” (or in gear for a manual). Use the turkey baster to remove most of the old, dark fluid from the master cylinder reservoir under the hood. Be careful not to let it run dry. Wipe the area clean and fill the reservoir with fresh, new brake fluid. Leave the cap off but rest it on top to prevent dirt from falling in.
Step 2: Lift the Car and Remove the Wheel
Loosen the lug nuts on the first wheel (right rear) while the car is still on the ground. Then, use the jack to lift that corner of the car and securely place a jack stand underneath the frame. Lower the car onto the jack stand. Now, you can fully remove the lug nuts and the wheel.
Step 3: Locate the Bleeder Screw
Look at the back of the brake caliper. You will see a small nozzle with a nut at its base—this is the bleeder screw. It might have a rubber cap on it, which you can just pull off.
Step 4: The Bleeding Process (The Fun Part!)
This is where your helper comes in. It’s all about communication.
- Place your wrench over the bleeder screw, then attach the clear plastic tube to the end of the screw. Put the other end of the tube into your catch jar, making sure the end is submerged in the clean fluid at the bottom.
- Tell your helper to “Pump the brakes.” They should slowly press the brake pedal down several times to build up pressure. They should then tell you “Holding,” meaning they are holding the pedal firmly to the floor.
- While they are holding the pedal down, you will slowly turn the wrench about a quarter to a half turn to open the bleeder screw. You will see old fluid and air bubbles shoot into the tube.
- The brake pedal will sink as the fluid comes out. Before it hits the floor, you must yell “Close!” and tighten the bleeder screw. It only needs to be snug, not overly tight.
- Once the screw is closed, tell your helper, “Release.” They can now let their foot off the brake pedal.
Step 5: Repeat and Refill
Repeat this “pump, hold, open, close, release” cycle several times for that wheel. Keep a close eye on the fluid coming through the tube. At first, you’ll see bubbles and dark fluid. Keep going until you see only clear, new fluid with no bubbles. After every 4-5 cycles, check the master cylinder reservoir and top it up with fresh fluid. NEVER let the master cylinder run dry! If it does, you will introduce a lot of air into the system and have to start all over.
Step 6: Move to the Next Wheel
Once you are done with the first wheel, tighten the bleeder screw snugly (don’t overtighten!), remove the tube and wrench, and replace the rubber cap. Put the wheel back on, tighten the lug nuts by hand, lower the car, and then give the lug nuts a final tightening with the lug wrench. Now, move on to the next wheel in the sequence (left rear) and repeat the entire process.
Step 7: Final Checks
After bleeding all four wheels, top off the master cylinder reservoir to the “MAX” line and securely replace the cap. Get in the car and press the brake pedal. It should feel firm and high. Start the car and test the brakes at a very low speed in a safe area before heading out on the road. Properly dispose of the old brake fluid at an auto parts store or local recycling center.
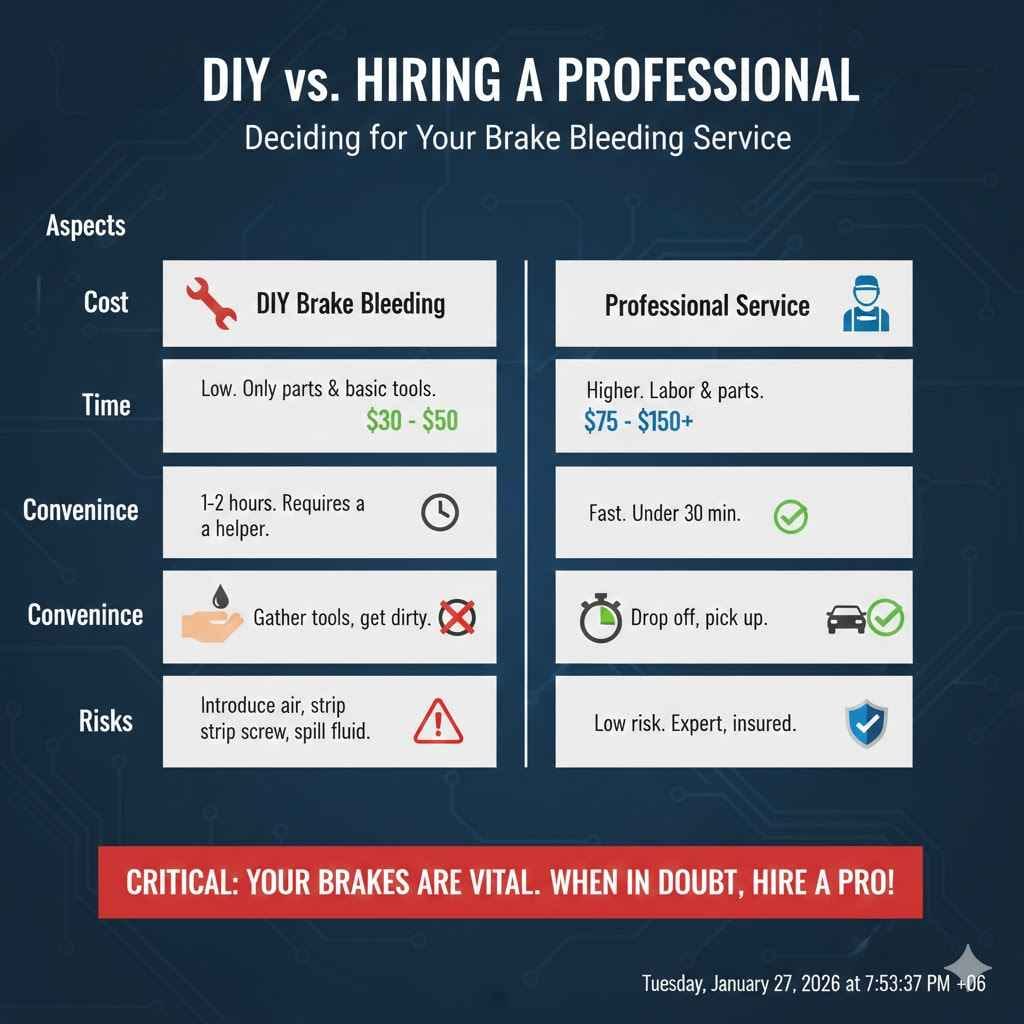
DIY vs. Hiring a Professional
Deciding whether to tackle this yourself or head to a mechanic depends on your comfort level, time, and tools. Here’s a quick comparison to help you decide.
| Aspect | DIY Brake Bleeding | Professional Service |
|---|---|---|
| Cost | Low. You only pay for brake fluid and maybe a few basic tools. Can be under $30. | Higher. You pay for labor and parts. Typically ranges from $75 to $150. |
| Time | Can take 1-2 hours, especially for your first time. Requires patience and a helper. | Fast. A mechanic with a pressure bleeder can often do it in under 30 minutes. |
| Convenience | You need to gather tools, find a helper, and get your hands dirty. | Very convenient. Just drop off your car and pick it up when it’s ready. |
| Skill Level | Beginner to intermediate. You need to be comfortable jacking up your car and following steps carefully. | No skill required on your part. You are trusting an expert. |
| Risks | Risk of introducing more air if done incorrectly, stripping a bleeder screw, or spilling corrosive fluid. | Low risk. Professionals have the right tools (like power bleeders) and experience. They are also insured. |
Frequently Asked Questions (FAQ)
1. What type of brake fluid should I use?
Always check your owner’s manual or the cap of the brake fluid reservoir. The most common types are DOT 3 and DOT 4. They are not always interchangeable. Using the wrong fluid can cause serious damage to your brake system’s seals.
2. Can I bleed brakes by myself?
Yes, it is possible with a one-person brake bleeding kit. These kits often use a vacuum pump or a pressurized bottle to force the fluid through the system without needing someone to pump the pedal. They are a great option if you don’t have a helper available.
3. What happens if I let the master cylinder run out of fluid?
If the master cylinder runs dry, it will suck a large amount of air into the brake lines and potentially into the complex ABS module. This makes the bleeding process much more difficult and longer, as you’ll have to push all that new air out. Always keep it topped up!
4. My car has ABS. Is the bleeding process different?
For most standard brake bleeds, the process is the same for cars with and without Anti-lock Braking Systems (ABS). However, if air gets into the ABS module itself (often happens if the master cylinder runs dry), you may need a special electronic scan tool to cycle the ABS pump and valves to get the air out. In this case, it’s best to see a professional.
5. How do I dispose of old brake fluid?
Old brake fluid is considered hazardous waste. Do not pour it down the drain or on the ground. Most auto parts stores and local hazardous waste collection facilities will accept it for free. Pour the old fluid into the empty new brake fluid bottle for safe transport.
6. Is a brake fluid “flush” the same as “bleeding”?
They are very similar but have a slightly different goal. Bleeding focuses on removing trapped air. A flush focuses on replacing all of the old fluid in the entire system with new fluid. A good bleeding procedure will often result in a full flush anyway, as you push old fluid out until new, clean fluid appears.
7. Why is my brake pedal still spongy after bleeding?
If the pedal is still soft, it could mean there’s still a stubborn air bubble trapped somewhere, you have a leak in a brake line, or there might be an issue with the master cylinder itself. Re-bleed the brakes, making sure your technique is correct. If the problem persists, it’s time to have a professional mechanic inspect the system.
Conclusion: Your Path to Safer, More Confident Driving
Understanding how often you should bleed your brakes is a huge step toward becoming a more proactive and confident car owner. While the general rule of every two to three years is a solid guideline, the most important thing is to listen to your car. A soft, spongy brake pedal is a clear call for action that should never be ignored.
Whether you choose to take on the job yourself or hand it over to a trusted mechanic, you’re now armed with the knowledge to make the best decision for your vehicle and your safety. Performing a brake bleed is more than just maintenance; it’s about ensuring that the most critical safety system on your car is in perfect working order. By keeping your brake fluid fresh and free of air, you’re investing in peace of mind on every drive.