
To know if pedals fit your bike, you only need to check the thread size on your existing pedals or crank arms. Nearly all modern bikes use the standard 9/16″ x 20 TPI thread. If your bike is older or a very small youth model, it might use 1/2″ threads. Measure or look for markings!
Buying new bike pedals is exciting! They can completely change how your bike looks and feels. But then you get that sinking feeling: Will these shiny new pieces actually screw into my bike? It is a very common worry, especially for new riders. You definitely do not want to buy a great set of pedals only to find out they won’t work. Don’t worry! Figuring out if pedals fit is actually one of the easiest checks you can do. We will walk through this step-by-step. You will feel confident making your purchase today.
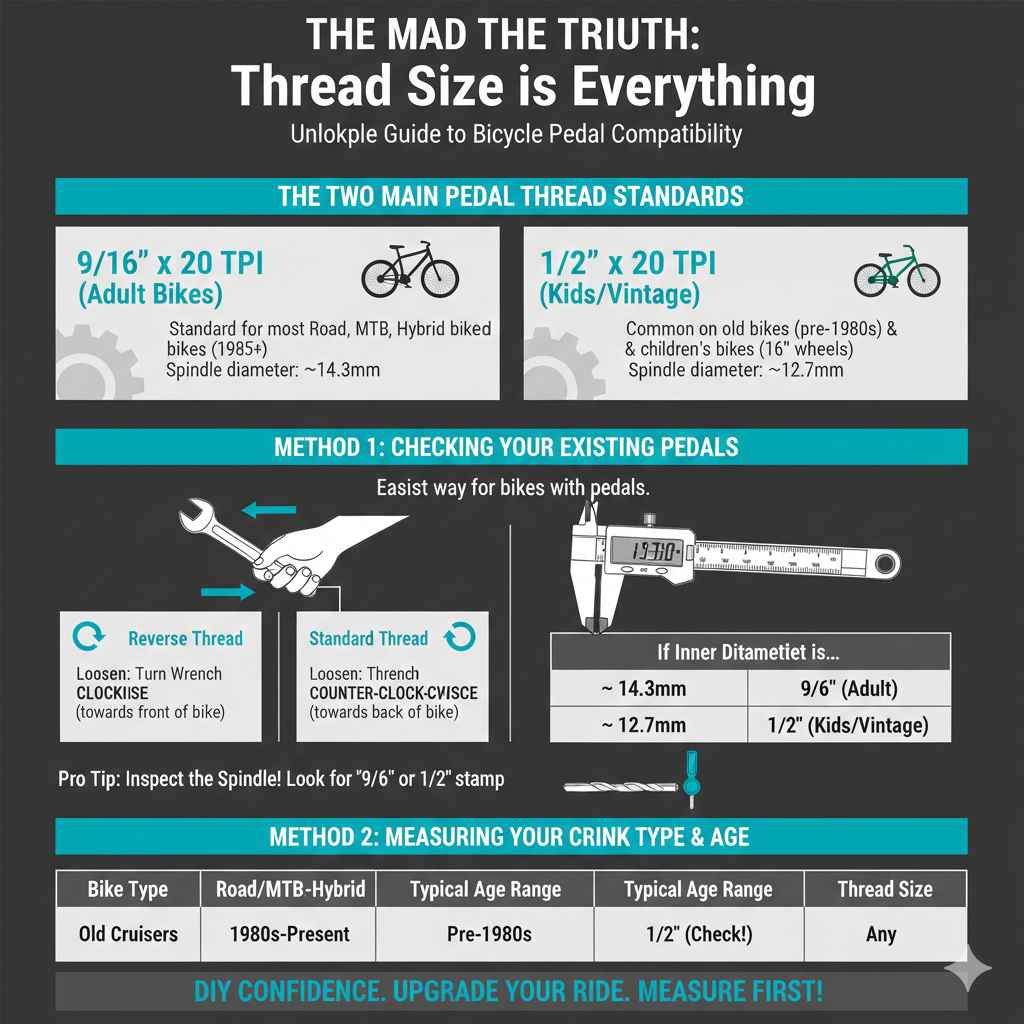
The Simple Truth: Thread Size is Everything
When we talk about pedals fitting a bike, we are almost entirely talking about the threads—the spiraled grooves inside the crank arm that the pedal spindle screws into. This threading needs to match the pedal spindle perfectly, or you risk damaging your bike’s crank arms, which is an expensive fix. Thankfully, the cycling world settled on a very common standard years ago. This makes your life much easier!
Most adult bikes today use only one size. However, a few exceptions exist, mainly older bikes or very small children’s bikes. Knowing this one measurement is the key to unlocking compatibility.
The Two Main Pedal Thread Standards
You only need to worry about two thread sizes for almost every bicycle manufactured today. Knowing which one you have prevents ordering the wrong parts. Think of this as knowing the difference between a standard battery and a specialty battery for your tools.
- 9/16″ x 20 TPI (Threads Per Inch): This is the standard size for nearly all adult bicycles. If you have a mountain bike (MTB), road bike, hybrid, or cruiser made in the last 30 years, it almost certainly uses this size.
- 1/2″ x 20 TPI: This is referred to as the “one-piece” or “BMX” standard size. You usually find this on very old bikes, or on many smaller children’s bikes (bikes with 16-inch wheels or smaller).
If you are buying new pedals for a modern adult bike, you can bet your bottom dollar you need the 9/16″ size. However, you should always confirm this for peace of mind. Let’s look at the tried-and-true methods for checking right now, even without specialized tools.
Method 1: Checking Your Existing Pedals (The Easiest Way)
If your bike already has pedals on it, this is the fastest route to an answer. Sometimes, the size marking is stamped directly onto the pedal spindle or the body itself. You will need to remove the existing pedals first to see this clearly. Remember, bicycle pedals tighten differently on each side, which is a crucial safety detail we need to cover.
Step-by-Step: Removing and Inspecting Old Pedals
Before you start taking things apart, grab the right tool. For removing pedals, you will usually need an 8mm Allen wrench (hex key) or a specific 15mm pedal wrench. A thin 15mm wrench is often better because the body of the pedal can get in the way of a standard socket wrench. Always check the head of your current pedal for the required tool size.
- Identify the Sides: The right side (drive-side, where the chain is) has a standard right-hand thread (tightens clockwise). The left side (non-drive side) has a reverse thread (tightens counter-clockwise). This is vital for removal and installation!
- Prepare for Removal: Turn the pedals so they point forward. For the right side (drive side): Hold the brake and turn the wrench toward the back of the bike (counter-clockwise to loosen). For the left side (non-drive side): Turn the wrench toward the front of the bike (clockwise to loosen). If you can’t remember, think: “Loosen toward the back wheel for both sides when the crank is horizontal.”
- Inspect the Spindle: Once the old pedal is off, look closely at the threaded metal rod (the spindle). Sometimes, manufacturers stamp the size right on it—you might see “9/16” or “1/2”.
- Check Your New Pedals: If you already have the new pedals and are checking compatibility, look on the packaging or the pedal spindle itself. Reputable brands always list the required thread size (e.g., “Fits all 9/16″ cranks”).
If you cannot find a marking, don’t worry! The next method is purely based on visual estimation and measurement.
Method 2: Measuring the Crank Threads (If No Markings Exist)
If you can’t find the size stamped anywhere, tools make this measurement easy. We need to measure the diameter of the hole where the pedal screws in. Remember to always check the crank arm on both sides. Although rare, low-end or very old bikes could theoretically have mismatched threading, though this is unheard of on standard production bikes.
Tools You Might Need
- Calipers (digital or dial are best for accuracy)
- A set of known metric drill bits (if you don’t have calipers)
- Your 8mm or 15mm pedal wrench
Visual and Measurement Guide
Since we are dealing with fractions of an inch, calipers are the most reliable tool. If you do not have them, you can use a known drill bit as a go/no-go gauge.
| Standard Size | Metric Equivalent (Approximate) | How to Test with Drills |
|---|---|---|
| 9/16 inch | ~14.3 mm | A 14mm drill bit will go in, but a 15mm drill bit will not fit or will be very loose. |
| 1/2 inch | ~12.7 mm | A 12mm drill bit will be slightly too small; a 13mm drill bit will be slightly too large. |
If you use calipers, measure the internal diameter (ID) of the thread directly. If the measurement is right around 14.3mm, it is the standard 9/16″. If it is closer to 12.7mm, it is the 1/2″ standard.
Pro Tip for Accuracy: When measuring the threads, try to measure the diameter across the peaks of the threads, not just the valleys, to get the true major diameter reading.
Method 3: Identifying Your Bike Type and Age
For most readers, simply knowing what kind of bike you ride is often enough to confirm the fit before you even touch a wrench. Bike manufacturers stick to these standards for obvious reasons related to cost and ease of maintenance. Understanding where your bike fits in the lineup gives you incredible confidence.
Common Bike Types and Their Pedal Standards
This table breaks down what you are most likely to find based on the style of bike you own. For compatibility checks, consulting reputable industry standards bodies gives strong backing to these assumptions. For example, standards for bicycle components are generally well-documented by organizations focused on bicycle engineering.
| Bike Type | Typical Age Range | Most Likely Thread Size |
|---|---|---|
| Road Bikes (Modern) | 1985 – Present | 9/16″ |
| Mountain Bikes (MTB) | 1980s – Present | 9/16″ |
| Hybrid/Commuter Bikes | 1990s – Present | 9/16″ |
| BMX Bikes (Standard Race/Freestyle) | All Ages | 9/16″ |
| Old Cruiser Bikes (Pre-1980s) | Any | Often 1/2″ (Need to check!) |
| Children’s Bikes (Under 20″ Wheels) | Any | Often 1/2″ (Need to check!) |
When You Must Be Extra Careful
There are special cases where you need to be extra vigilant about the thread size:
- Vintage Bicycles: If your bike is from the 1970s or earlier, thread standards were less unified. Always measure!
- Very Small Children’s Bikes: The tiny crank arms on bikes with 12-inch or 16-inch wheels often use the 1/2″ standard to keep the pedal spindle size proportional to the tiny crank arm.
- Spin Bikes/Indoor Trainers: Indoor exercise bikes often use proprietary or different threading than outdoor bikes. Always check the manual for your specific indoor trainer model before buying replacement pedals.
The Golden Rule: Pedals Always Come in Paired Sets
When you buy a set of replacement bicycle pedals, they are always designed to work together. One spindle will be for the standard right-hand thread (9/16″), and the other will be for the reverse thread (the opposite for the left side). The important takeaway here is that the two crank arms on the same bike must have the same thread size. You do not need to worry about one side being 9/16″ and the other being 1/2″.
If you look at the new pedals you intend to buy, they will almost always state “Fits 9/16″ standard cranks” or “Fits 1/2″ cranks.” Purchase based on that label after you have confirmed your bike’s existing size.
A Quick Note on Installation: Threads Are Not Universal!
This isn’t exactly about fitting, but it’s the second biggest mistake beginners make—and it leads to broken parts. Even if you buy the correct size, installing them incorrectly will cause problems. Remember the reversal:
Right Side (Drive Side): Standard thread. Tightens Clockwise. Loosens Counter-Clockwise.
Left Side (Non-Drive Side): Reverse thread. Tightens Counter-Clockwise. Loosens Clockwise.
When installing new pedals, always apply a very thin coat of grease to the threads of the new pedal spindle. This prevents galling (metal seizing) and makes removal easier next time. Thread the pedal in by hand first for a few turns to ensure it catches correctly before using a wrench. If you feel heavy resistance right away, stop! You are cross-threading it.
For more in-depth safety guidance on component handling, especially when working with threaded bicycle parts, resources from established cycling safety organizations often provide excellent, community-vetted advice on preventing component failure.
FAQ: Beginner Questions About Pedal Fit
Q1: What if my new 9/16″ pedals won’t screw into my bike?
A: If you are certain you bought 9/16″ pedals and they don’t thread in, your bike almost certainly has the older/smaller 1/2″ threading. Stop immediately! Forcing them can damage your crank arms permanently. You need to return the pedals and find a pair specifically labeled for 1/2″ (or 15/16″) cranks, usually found labeled as “BMX” style replacement pedals.
Q2: Do I need a special tool just for checking the size?
A: No. While digital calipers are the most accurate for measurement, you can often visually confirm by looking for stamps on your old pedals or by buying a cheap set of replacement pedals known to fit your bike type (e.g., knowing a $30 set of adult pedals will work). The easiest check is often just looking online for the specs of your bike model year.
Q3: Why do different bikes use different thread sizes?
A: The 9/16″ standard became dominant because it offers a very robust connection for the forces involved in modern cycling (road, mountain biking). The 1/2″ size predates this standardization and is suitable for lower-torque applications like very small children’s bikes where the crank arms themselves are very thin.
Q4: If I have a very early 1980s road bike, what size should I check for?
A: In the early 80s, there was some overlap, but the industry was quickly moving toward 9/16″. However, some European manufacturers sometimes used older standards. Always remove an old pedal and measure the spindle threads or the crank arm threads directly. Do not guess!
Q5: Can I change the threads on my crank arm if they are the wrong size?
A: No, this is not an advisable DIY fix. If your crank arms have 1/2″ threads but you want to use 9/16″ pedals, you cannot safely re-tap (re-cut) the threads larger without risking weakening the crank arm material around the mounting point. In this situation, the safest and most reliable solution is to purchase a new set of compatible crank arms for your existing bottom bracket setup.
Q6: Is there a difference in thread direction between the inside and outside of the crank arm?
A: No. The threads are inside the crank arm. You only need to worry about the direction for installation and removal (right side tightens clockwise, left side tightens counter-clockwise/reverse). The thread standard (9/16″ or 1/2″) must match for both sides of the bike.
Conclusion: Pedal Confidence Achieved
See? That was much simpler than wrestling with engine parts! Determining if pedals will fit your bike boils down almost entirely to one number: 9/16 inch. If your bike is a standard off-the-shelf adult model made since the mid-1980s, you are almost certainly safe buying any standard replacement pedals labeled for 9/16″ cranks. If you have a tiny child’s bike or a true vintage machine, take the extra two minutes to physically check the threads with a simple measurement tool or by inspecting the existing pedals.
Once you confirm that size, you can purchase with absolute confidence, knowing your new pedals will screw in smoothly. Remember the golden rule of installation: grease the threads, and watch out for that reverse thread on the left side! With this knowledge, you are ready to upgrade your ride safely and easily. Happy pedaling!