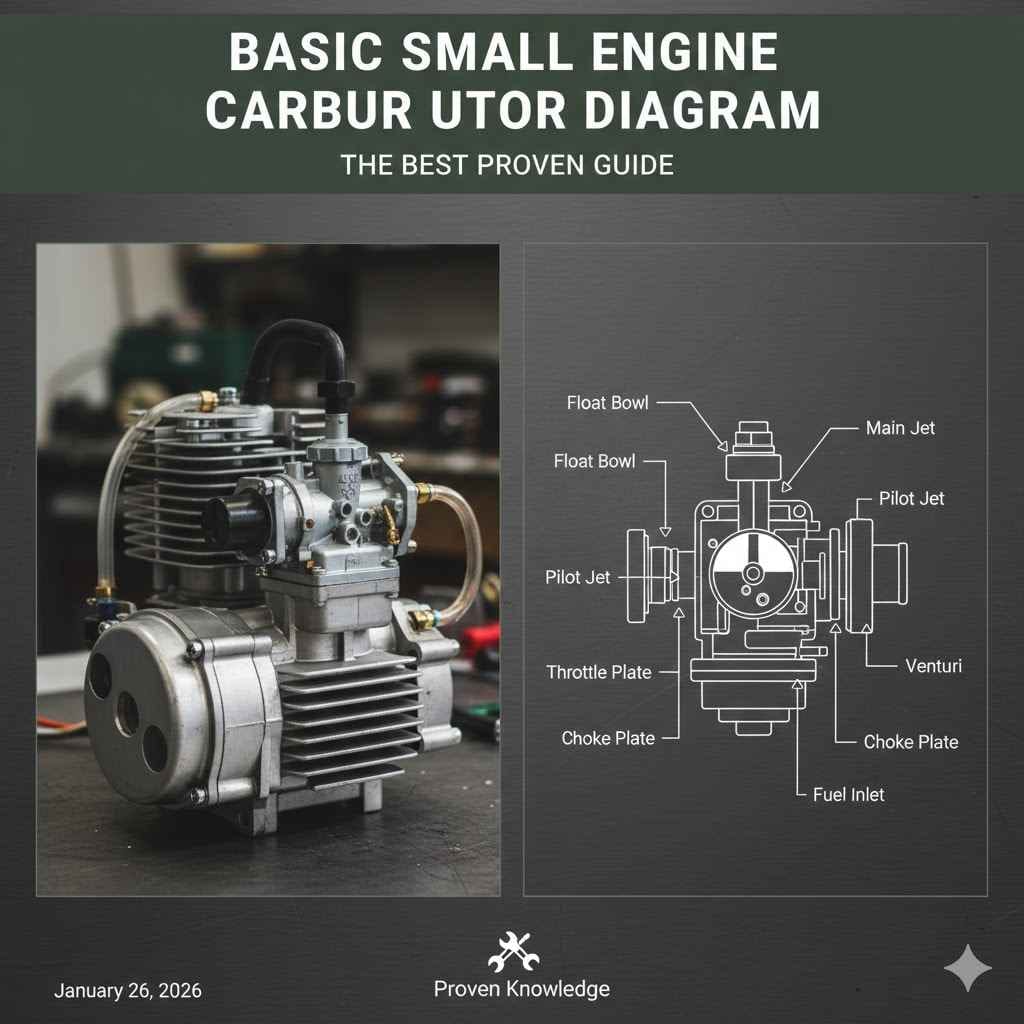
A basic small engine carburetor diagram shows key parts like the fuel bowl, float, jets, and throttle plate. These components work together to mix air and fuel perfectly for your engine. Understanding this diagram is the first step to fixing common problems like a rough-running lawnmower or a generator that won’t start.
Does your lawnmower sputter and stall? Is your snow blower refusing to start right when you need it most? These frustrating problems often point to one small, but mighty, part: the carburetor. It might sound complicated, but don’t worry. You don’t need to be a master mechanic to understand it.
This guide is here to help. We are going to break it all down in a simple, friendly way. I’ll show you exactly what each part does using a clear diagram. By the end, you’ll feel confident enough to tackle basic maintenance and save yourself a trip to the repair shop. Let’s get your small engine running smoothly again!
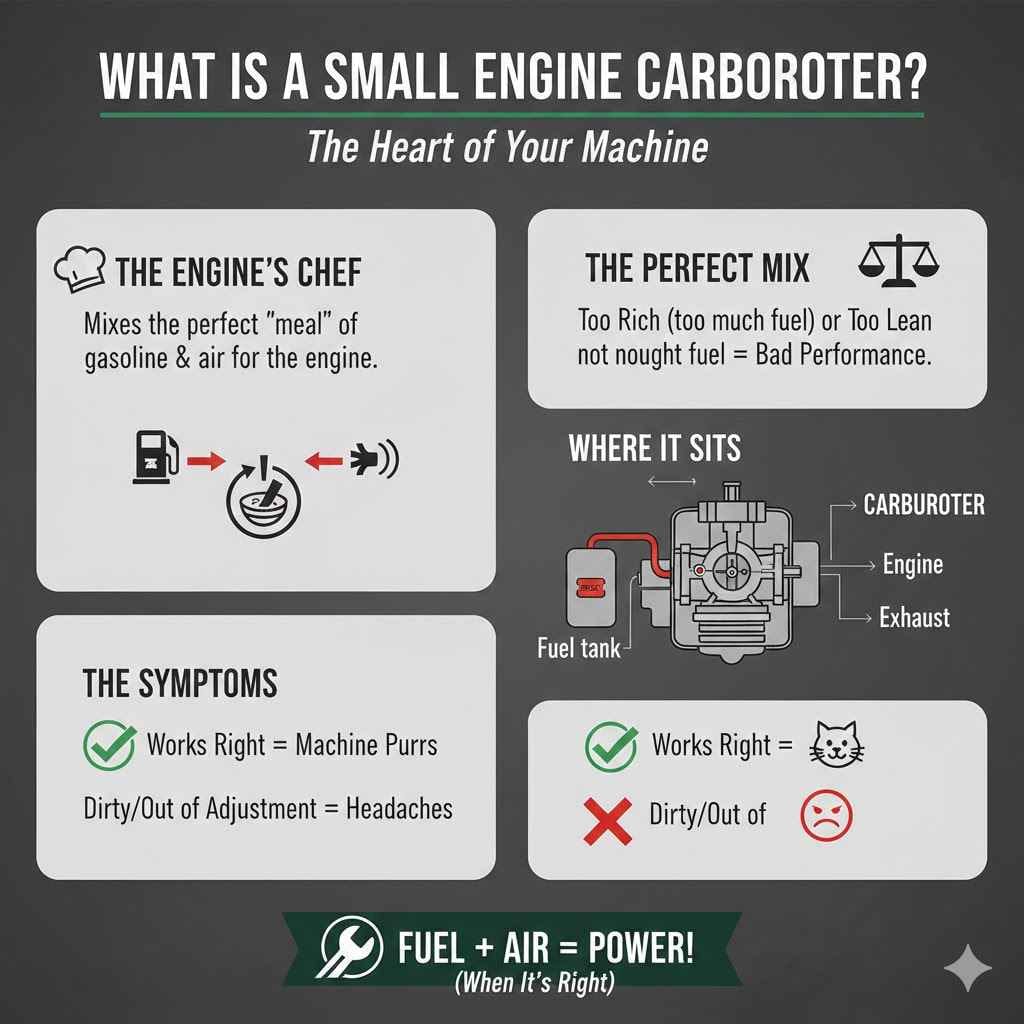
What Is a Small Engine Carburetor? The Heart of Your Machine
Think of a small engine carburetor as the engine’s chef. Its one and only job is to mix the perfect “meal” of gasoline and air for the engine to consume. If the mix is too rich (too much fuel) or too lean (not enough fuel), the engine won’t run properly. It’s that simple.
Every small engine, from your leaf blower to your pressure washer, has one. It sits between the air filter and the engine itself. Air comes in one side, fuel comes in from the tank, and the carburetor carefully combines them before sending the mixture on its way. When it works right, your machine purrs. When it’s dirty or out of adjustment, you get headaches.
Why Understanding the Carburetor Diagram Is a Game-Changer
Looking at a diagram of a carburetor might seem overwhelming at first. But once you learn the main parts, you unlock a new level of DIY confidence. Here’s why it’s so helpful:
- You Can Diagnose Problems: Is the engine getting no fuel? You’ll know to check the fuel inlet or the jets. Is it leaking gas? The float or needle valve is a likely culprit. The diagram is your treasure map to the problem.
- You Save Money: A simple carburetor cleaning can cost over $100 at a repair shop. With a little knowledge, you can often do it yourself for the cost of a can of cleaner.
- You Feel Empowered: There’s nothing more satisfying than fixing something with your own two hands. Understanding your equipment builds confidence and makes you more self-reliant.
Breaking Down the Basic Small Engine Carburetor Diagram
Let’s look at the main characters in our carburetor story. We’ll go piece by piece, so it’s easy to follow. Imagine you’re taking a tour of a tiny fuel-and-air factory.
The Main Body and Fuel Bowl
The main body is the outer casing that holds everything together. It has passages and channels for air and fuel to travel through. Attached to the bottom is the fuel bowl. This is a small reservoir that holds a ready supply of gasoline, kind of like the water tank on a toilet. A single screw or bolt usually holds it in place, and a rubber gasket or O-ring seals it to prevent leaks.
The Choke Plate
Located at the air intake side of the carburetor, the choke plate is a round, flat piece of metal that can pivot to block the airway. When you start a cold engine, you close the choke. This reduces the amount of air, creating a very “rich” fuel mixture that helps the engine fire up easily. Once the engine warms up, you open the choke to let more air in for normal operation.
The Throttle Plate (Butterfly Valve)
The throttle plate looks a lot like the choke plate, but it’s on the engine side of the carburetor. This plate is connected to your machine’s throttle lever or trigger. When you press the gas, the throttle plate opens, allowing more of the air-fuel mixture into the engine, making it run faster. When you let go, it closes, and the engine idles down.
The Float and Needle Valve
Inside the fuel bowl, you’ll find the float. It does exactly what its name suggests—it floats on top of the gasoline. The float is connected to a tiny, pointed pin called the needle valve. As the fuel level in the bowl rises, the float pushes the needle into its seat, stopping more gas from entering. As the engine uses fuel, the float drops, opening the valve to let more gas in. This simple team ensures the bowl never overflows or runs dry.
The Main Jet and Pilot Jet
Jets are tiny, precision-drilled brass nozzles that allow fuel to be pulled from the bowl into the airflow. Think of them as tiny straws. The main jet supplies most of the fuel when the engine is running at high speed. The pilot jet (or idle jet) provides the small amount of fuel needed for the engine to idle smoothly. These jets have very small holes and are the most common parts to get clogged by old fuel.
The Primer Bulb
Many small engines have a soft, plastic primer bulb. When you press it, you are manually squirting a small amount of raw fuel directly into the carburetor’s throat. This gives the engine a quick shot of fuel to help it start, especially when cold. It’s a manual alternative to the choke system on some models.
Adjustment Screws (Idle and Mixture)
Most carburetors have one or two small screws used for fine-tuning. The idle speed screw simply controls how far the throttle plate stays open at idle, setting the engine’s resting speed. The air-fuel mixture screw (sometimes called a pilot screw) adjusts the ratio of fuel to air at idle. Not all modern carburetors have adjustable mixture screws due to emissions regulations, but many older ones do.
Carburetor Parts and Their Jobs
Here is a simple table to help you remember each part and what it does. This is your quick-reference guide!
| Carburetor Part | Primary Function |
|---|---|
| Fuel Bowl | Holds a small reservoir of gasoline ready for the engine. |
| Float | Rises and falls with the fuel level to control the needle valve. |
| Needle Valve | Opens and closes to let fuel into the bowl, preventing overflows. |
| Choke Plate | Restricts airflow to create a rich fuel mixture for cold starts. |
| Throttle Plate | Controls engine speed by regulating how much air-fuel mix enters the engine. |
| Main Jet | Supplies fuel when the engine is running at medium to high speeds. |
| Pilot (Idle) Jet | Supplies a small amount of fuel for the engine to idle. |
| Primer Bulb | Manually injects fuel into the carburetor to help with starting. |
| Adjustment Screws | Fine-tunes the idle speed and/or the air-fuel mixture. |
How a Carburetor Works: A Simple Step-by-Step
Now that you know the parts, let’s put them all in motion. The process is surprisingly simple and relies on a basic principle of physics.
- Air Enters the Carburetor: When you pull the start cord, the engine’s piston moves, creating a vacuum that sucks air through the air filter and into the carburetor’s main opening, called the throat or venturi.
- The Venturi Effect Takes Over: The carburetor’s throat is designed to be narrower in the middle. As air rushes through this narrow section, it speeds up. Just like when you put your thumb over the end of a garden hose, faster-moving air has lower pressure. This is known as the Venturi effect.
- Fuel is Drawn Up: The main jet and pilot jet are positioned right in this low-pressure area. The higher atmospheric pressure inside the sealed fuel bowl pushes fuel up through the jets and into the fast-moving airstream.
- Air and Fuel Mix: As the fuel sprays out of the jets, it turns into a fine mist and mixes evenly with the air rushing past. This creates the combustible vapor the engine needs.
- The Mixture Enters the Engine: This perfectly mixed vapor flows past the throttle plate and directly into the engine’s combustion chamber, where the spark plug ignites it to create power.
Common Carburetor Problems You Can Diagnose
With your new knowledge of the basic small engine carburetor diagram, you can start playing detective. Most carburetor issues fall into a few common categories.
Engine Won’t Start
If an engine won’t start at all, it’s usually a fuel problem. The carburetor might be completely starved of gas.
- Likely Cause: A clogged pilot jet from old, gummy fuel. A stuck needle valve that won’t let fuel into the bowl. A blocked fuel line leading to the carburetor.
- Quick Check: Press the primer bulb. Does it feel firm and fill with fuel? If it stays squishy, there’s a blockage somewhere before it.
Engine Runs Rough or Stalls
This is a classic symptom of a dirty carburetor. The engine might start but will sputter, surge, or die, especially under load.
- Likely Cause: The main jet is partially clogged, so it can’t deliver enough fuel at high speeds. The pilot jet could also be dirty, causing a poor idle. Water in the fuel bowl from condensation can also cause this.
- Quick Check: Try running the engine with the choke partially on. If it smooths out, it’s a sure sign that the engine isn’t getting enough fuel, pointing to a clogged jet.
Black Smoke from the Exhaust
Black smoke is a clear sign that the engine is running too rich, meaning there’s too much fuel and not enough air in the mixture.
- Likely Cause: The choke plate is stuck closed. The float is stuck or damaged, causing the needle valve to stay open and flood the bowl. A dirty air filter can also restrict airflow and cause a rich condition.
- Quick Check: First, make sure the choke is fully open. Then, check your air filter. If it’s filthy, replace it.
Fuel Leaking from the Carburetor
A fuel leak is not just messy; it’s a safety hazard. This needs to be addressed immediately.
- Likely Cause: A bad gasket or O-ring on the fuel bowl. The float is stuck, causing the bowl to overflow. A cracked fuel line.
- Quick Check: Carefully identify where the leak is coming from. Most often, it’s the bowl gasket at the bottom of the carburetor.
Troubleshooting Quick Guide
| Symptom | Likely Carburetor Part to Blame | Simple First Step |
|---|---|---|
| Engine won’t start | Clogged Pilot Jet or Stuck Needle Valve | Spray carburetor cleaner into the air intake and try to start. |
| Engine runs rough/stalls | Clogged Main Jet or Pilot Jet | Try running with the choke halfway on. If it improves, a cleaning is needed. |
| Black smoke from exhaust | Stuck Choke Plate or Stuck Float | Check that the choke linkage moves freely and the air filter is clean. |
| Fuel is leaking | Bad Bowl Gasket or Stuck Float/Needle | Turn off the fuel supply. Inspect the bowl and gaskets for damage. |
Essential Tools for Basic Carburetor Maintenance
You don’t need a professional garage to work on a small engine carburetor. A few basic tools will get you through most jobs.
- Screwdriver Set: You’ll need both Phillips and flathead screwdrivers for removing covers, linkages, and sometimes jets.
- Socket or Wrench Set: A small set is essential for removing the bolts that hold the carburetor and air filter housing to the engine.
- Carburetor Cleaner Spray: This is a must-have. An aerosol can with a thin straw allows you to spray cleaner into the tiny passages and jets to dissolve varnish and grime.
- Small Wire or Jet Cleaning Tools: Sometimes a spray isn’t enough. A very fine wire (like one strand from a wire brush) or a dedicated jet cleaning tool can help clear stubborn clogs. Be gentle!
- Safety Gear: Always protect yourself. Wear safety glasses to protect your eyes from fuel and cleaner spray, and nitrile gloves to keep your hands clean. Safety is paramount, a point emphasized by agencies like the Occupational Safety and Health Administration (OSHA).
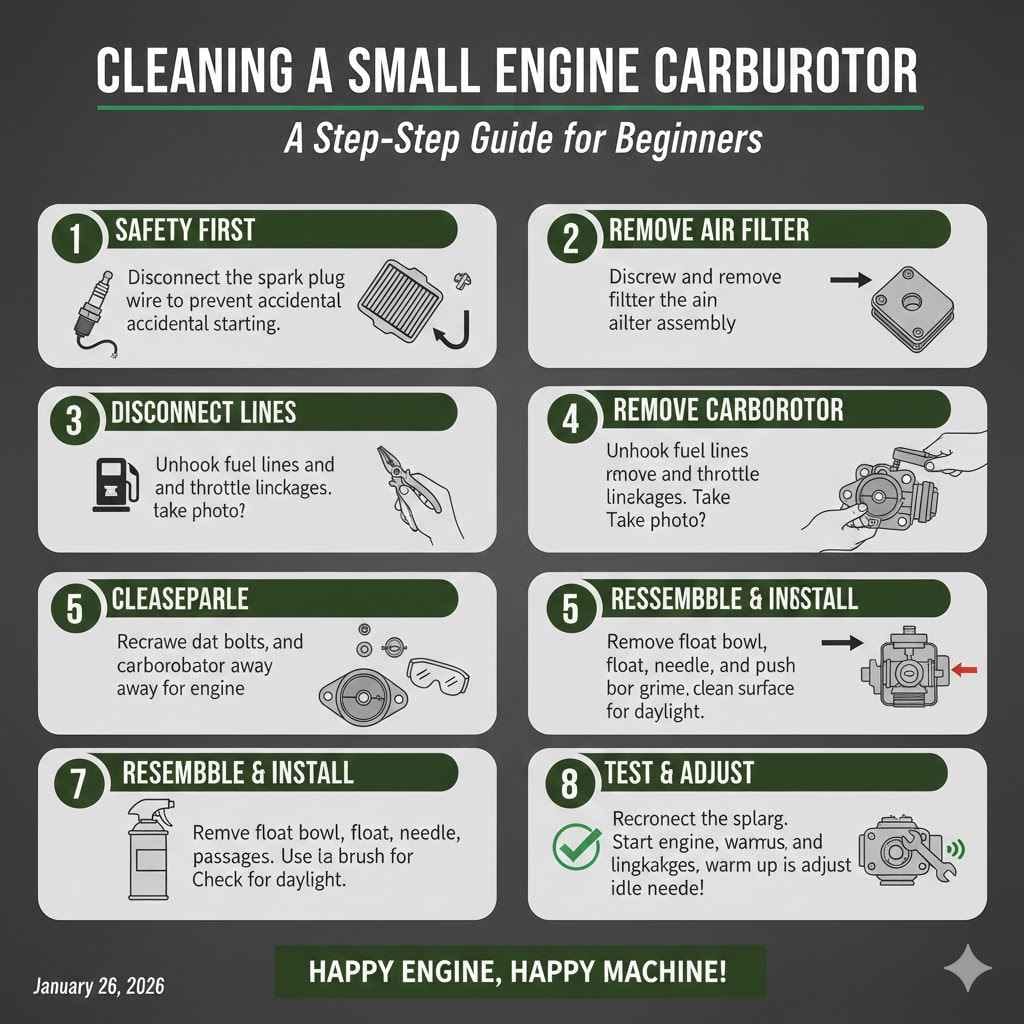
A Step-by-Step Guide to Cleaning a Small Engine Carburetor
Ready to put your knowledge into action? Here’s a beginner-friendly guide to cleaning your carburetor. Take your time, and work in a well-ventilated area away from any open flames.
- Safety First: The most important step! Disconnect the spark plug wire from the spark plug. This prevents any chance of the engine accidentally starting while you’re working on it.
- Remove the Air Filter Assembly: Usually held on by a couple of screws or bolts, the air filter and its housing need to come off first to give you access to the carburetor.
- Disconnect Fuel Lines and Linkages: Use pliers to slide the clamp off the fuel line and gently pull the line off the carburetor. Be prepared for a little gas to spill. Then, carefully note how the throttle and choke linkages are connected before unhooking them. Taking a photo with your phone is a great idea!
- Remove the Carburetor: Unscrew the two bolts that hold the carburetor to the engine. Support the carburetor as you remove the last bolt, and gently pull it away.
- Disassemble with Care: Find a clean work surface. Remove the screw holding the fuel bowl on. Carefully lower the bowl, watching for the gasket. Remove the pin that the float pivots on, and the float and needle valve will come out. Unscrew the main and pilot jets if you can.
- Clean Every Part: Put on your safety glasses. Use the carburetor cleaner spray to thoroughly clean every part. Spray through all the tiny holes and passages in the carburetor body, jets, and bowl. Use a soft brush or wire to gently scrub any stubborn grime. Make sure you can see daylight through the holes in the jets.
- Reassemble and Reinstall: Put everything back together in the reverse order you took it apart. Make sure gaskets are seated properly and that the float moves freely. Reconnect the linkages and fuel line.
- Test and Adjust: Reconnect the spark plug wire. Prime the engine or apply the choke and try to start it. It might take a few pulls to get fuel back into the carburetor. If it runs, let it warm up and make any small adjustments to the idle speed screw if needed. For more advanced tuning, resources like the Penn State Extension offer great troubleshooting advice.
Frequently Asked Questions (FAQ)
What is the most common part to fail in a small engine carburetor?
The jets are the most common culprits. Specifically, the pilot (idle) jet has a very tiny opening that gets clogged easily by ethanol-heavy fuel that has been left sitting for a long time. This is the number one cause of no-start issues after storage.
Can I clean a carburetor without removing it?
Sometimes, yes. For a light cleaning, you can remove the air filter and spray carburetor cleaner directly into the carburetor’s throat while the engine is running. This can sometimes clear minor blockages. However, for a proper, thorough cleaning, removing and disassembling the carburetor is the best way.
What happens if the fuel-to-air mixture is wrong?
If the mixture is too lean (too much air), the engine may run hot, hesitate, or have low power. If it’s too rich (too much fuel), the engine will run rough, produce black smoke, have poor fuel economy, and can foul the spark plug.
How often should I clean my small engine carburetor?
You don’t need to clean it on a fixed schedule. The best practice is to clean it whenever you notice symptoms like rough running, stalling, or hard starting. The best prevention is to use fresh, stabilized fuel and to run the engine dry before storing it for long periods.
What is ethanol’s effect on carburetors?
Ethanol in gasoline attracts and absorbs water. This water can cause corrosion inside the carburetor. When the fuel evaporates, it can also leave behind gummy deposits that clog the tiny passages and jets. Using an ethanol-free fuel or a good fuel stabilizer is highly recommended for small engines.
Is rebuilding a carburetor hard for a beginner?
It’s not as hard as it sounds! A “rebuild” usually just means taking it apart, cleaning it thoroughly, and replacing the gaskets, O-rings, and needle valve with parts from a rebuild kit. If you are patient, organized, and take photos during disassembly, it is a very achievable DIY project.
Where are the adjustment screws located?
The idle speed screw is typically easy to spot. It physically touches the throttle linkage and stops it from closing completely. The air-fuel mixture screw is usually a smaller, recessed screw, often near the engine side of the carburetor. Some may be hidden behind a plastic cap for emissions reasons.
You’ve Got This!
See? The small engine carburetor isn’t so mysterious after all. By understanding the basic diagram and what each part does, you’ve taken a huge step toward becoming more confident and capable with your own equipment. You now have the knowledge to look at your sputtering lawnmower or stubborn snow blower not with frustration, but with a plan.
Remember that the key to keeping these simple machines running well is clean, fresh fuel and a little bit of maintenance. The next time you face an engine problem, come back to this guide, look at the diagram, and start troubleshooting. You’ll be amazed at what you can fix yourself, saving time, money, and the headache of another trip to the repair shop. Happy fixing!