
If your V8 engine unexpectedly has 16 spark plugs instead of the usual eight, you likely have a modern, direct-injection (GDI) engine that uses dual spark plugs per cylinder—one for timing and one for combustion control. Fixing this requires using the correct, high-quality dual-plug sets and following the proper gap settings for both plugs in each cylinder to ensure smooth, efficient performance.
Running your car should be simple, but sometimes auto mechanics throw us curveballs. If you popped the hood on your V8 and saw 16 shiny spark plugs instead of the expected eight, you might think your engine is broken or that you bought the wrong parts! Don’t panic. You haven’t made a huge mistake; you’ve just encountered modern engine technology. Many newer V8s use a dual-plug system, meaning two plugs per cylinder. This might sound complicated, but fixing it is very manageable once you understand why they are there. Today, we are going to walk through exactly what this system means, how to safely replace those 16 plugs, and the key fixes necessary to keep your powerful V8 running smoothly.
Why Does My V8 Have 16 Spark Plugs Instead of Eight?
It’s natural to expect a V8 engine to have eight spark plugs—one for each cylinder. For decades, this was the standard. However, technology evolves quickly under the hood!
The Rise of Dual Spark Plug Systems
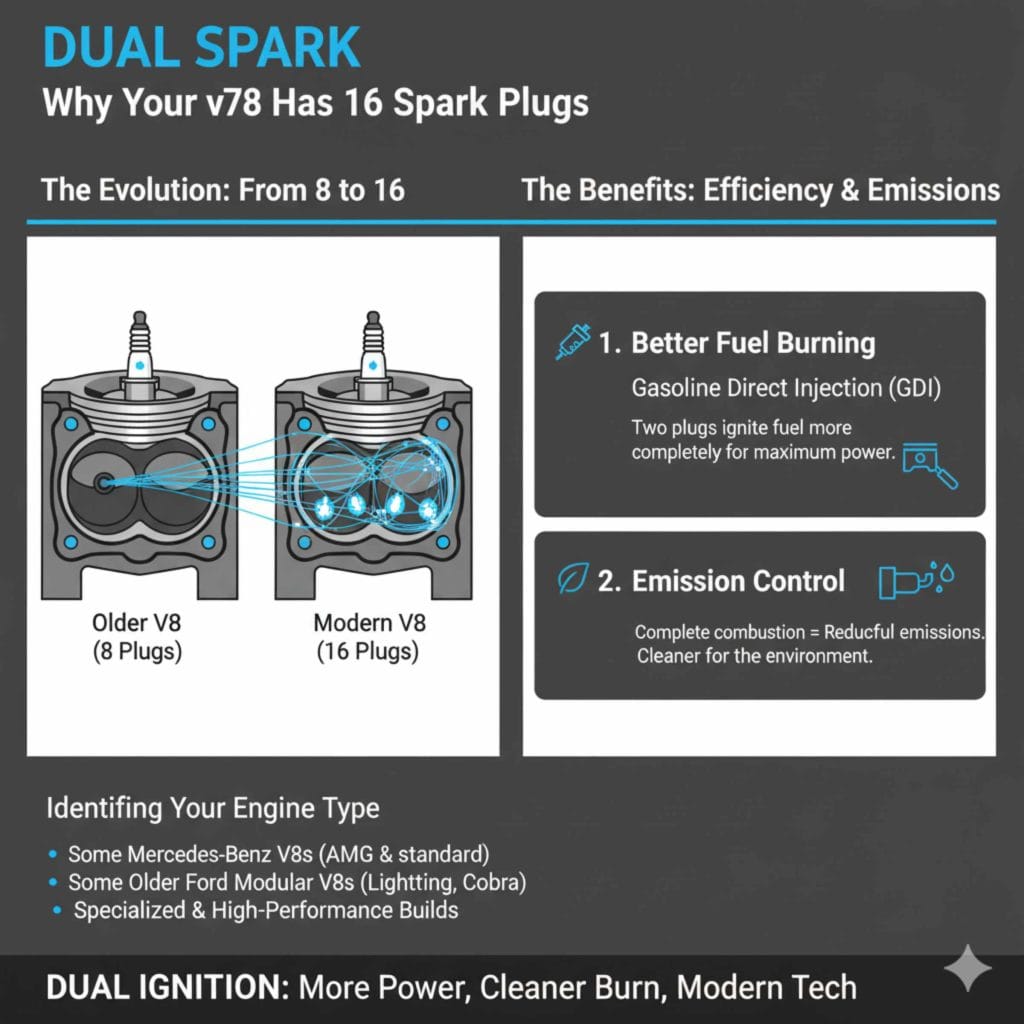
The change from eight to 16 plugs usually means your V8 is equipped with Gasoline Direct Injection (GDI) technology, often coupled with advanced variable valve timing. Manufacturers use this dual-plug setup for two primary reasons: efficiency and reduced emissions.
1. Better Fuel Burning
Direct injection sprays fuel directly into the cylinder under very high pressure, which helps mix the air and fuel better. When you have two spark plugs firing at slightly different times, the flame front—the wave of combustion—travels across the cylinder much quicker and more completely. This ensures almost every drop of fuel is burned efficiently.
2. Emission Control
When fuel burns completely, harmful emissions like unburned hydrocarbons decrease significantly. This helps modern vehicles pass stricter environmental standards set by agencies like the EPA. Think of the second plug as a cleanup crew to ensure excellent combustion every time.
Identifying Your Engine Type
Not all V8s are the same. If you see 16 plugs, you are likely dealing with one of these common setups:
- Some Mercedes-Benz V8s: Certain AMG and standard V8 models use this configuration.
- Some older Ford Modular V8s (like certain Lightning or Cobra models): While many use eight, some specialized versions employed dual-plug setups.
- Some specialized or high-performance engines: Certain aftermarket builds or rare OEM setups utilize this for maximum power potential.
If you are unsure, the easiest way to confirm is to check your owner’s manual or look up your specific Engine Control Unit (ECU) code. A quick search on a reputable site like the National Highway Traffic Safety Administration (NHTSA) vehicle recalls database or a trusted forum for your specific model year can confirm your engine’s requirements.
The Essential Differences: Single Plug vs Dual Plug Replacement
Replacing 16 plugs takes more time and requires slightly more attention to detail than replacing eight. The key difference lies in how the two plugs interact and the precise gap settings required.
Tool Checklist for 16 Plugs
Before you start, gather everything you need. Having the right tools makes the job much smoother.
| Tool | Purpose |
|---|---|
| Torque Wrench | Crucial for tightening plugs to exact specifications, preventing damage. |
| Spark Plug Socket Set | Usually 5/8″ or 13/16″, often needs a rubber boot inside. |
| Gapping Tool (Wire Type) | To set the exact space between the electrodes. |
| Dielectric Grease | Protects the coil boot ends from heat and moisture. |
| Long Extensions | To reach deep plugs, common on V8s. |
| Compressed Air or Vacuum | To clean debris around the plug wells before removal. |
Understanding Dual Plug Roles
In a dual-plug cylinder, the two plugs often have different jobs or slightly different timing.
- Plug A (Primary): This is usually the electrode closest to the combustion chamber entry or the one timed first. It starts the main fire.
- Plug B (Secondary/Scavenger): This plug fires milliseconds later. Its job is to ensure that any lingering pockets of unburned fuel or air are ignited, leading to a more complete burn.
Crucial Tip: Always check your manual to see if Plug A and Plug B require different gap settings. Sometimes they are identical, but sometimes they are intentionally different by a tiny fraction of a millimeter.
Step-by-Step Guide: Replacing Your 16 V8 Spark Plugs
Safety and precision are our goals. Take your time, follow these steps, and you will achieve fantastic results.
Phase 1: Preparation and Safety First
- Cool Down the Engine: Never work on a hot engine. Allow the car to sit for several hours so all metal components are cool to the touch. Working on a hot engine component risks burns and can damage aluminum cylinder heads.
- Disconnect the Battery: For safety, pull the negative terminal cable first. This prevents accidental shorts while working near ignition components.
- Gain Access: On many V8s, especially those with complicated intake manifold designs, you may need to remove plastic engine covers or even the entire intake system depending on which bank of cylinders you are accessing. Take photos as you remove brackets or wiring harnesses.
- Clean the Area: Use compressed air or a shop vacuum right around the base of the ignition coil packs or spark plug boots. You want zero dirt or debris to fall into the cylinder once the plug is removed.
Phase 2: Removal and Inspection
When dealing with 16 plugs, you must treat each pair as a single unit that needs replacement simultaneously.
- Remove Coil Packs: Locate the ignition coil pack sitting directly over the first cylinder’s plug(s). Carefully disconnect the electrical connector (it might have a retainer clip) and remove the bolts holding the coil pack down. Gently twist and pull straight up to remove the entire coil assembly.
- Identify Plug A and B: Since you pulled the coil pack, you will see the two spark plug wells. Note which physical location corresponds to Plug A and which corresponds to Plug B.
- Remove the First Plug: Using your spark plug socket and extension, gently turn the first plug counter-clockwise to loosen it. Once loose, use the rubber boot in the spark plug socket to carefully draw the old plug straight out.
- Inspect the Old Plug: Look closely at the tip of the old plug. It tells a story! A healthy plug looks tan or light gray. Black, sooty plugs suggest a rich fuel mixture. Oily plugs suggest potential internal engine issues. Document the condition of all 16 as you pull them—this is vital diagnostic information.
- Remove the Second Plug: Repeat the process for the secondary plug in the same cylinder.
Phase 3: Installing the New Plugs
This is where precision matters most for your 16-plug setup.
- Gap The New Plugs: This is non-negotiable. Use your wire-type gapping tool to check that the gap on Plug A matches the specification for Plug A, and the gap on Plug B matches its specification. Gently file or adjust the electrode if necessary.
- Apply Anti-Seize (Optional but Recommended): Apply a tiny amount of anti-seize compound to the threads (not the electrode tip) of the new plugs. This prevents them from fusing to the cylinder head over time.
- Hand-Thread the Plugs: This is the most important step for preventing cross-threading. Carefully place the first new plug into the socket. Lower it gently into the well and begin threading it by hand, turning only the socket extension (no ratchet yet). If you feel any resistance, stop immediately, remove the plug, and start again.
- Torque to Spec: Once the plug is finger-tight, attach your calibrated torque wrench. Tighten the plug to the exact specification listed in your vehicle’s service manual. Over-tightening cracks plugs; under-tightening causes blow-out and poor performance.
- Repeat for Plug B: Install the second spark plug for that cylinder, ensuring it also receives the correct gap and torque.
- Reinstall Coils: Place a small dab of dielectric grease inside the boot of the coil pack. Slide the coil pack over both new plugs, ensuring it seats fully. Secure the bolts to the manufacturer’s torque setting and reconnect the electrical connector.
- Complete the Set: Repeat steps 1 through 6 for the remaining 15 spark plugs.
Troubleshooting Common Dual-Plug Missteps
Since you have twice the components, you have twice the chances for minor errors. Here are the most common problems when dealing with 16 spark plugs.
Problem 1: Rough Idle or Misfire Immediately After Installation
This is the classic sign that something is electrically disconnected or improperly gapped.
Essential Fixes:
- Check Connections: Go back to all 16 coil pack connectors. Listen for a definitive “click” confirming they are locked in place.
- Inspect Plug Depth: If one plug isn’t seated correctly or is spaced too far away (wrong gap), the ignition coil won’t be able to jump the spark reliably. Re-check the gap on the suspected cylinder.
- Verify Plug Type: Did you accidentally install an incorrect plug (e.g., using a standard plug where a platinum or iridium plug was required)? Modern systems are sensitive to the heat range and material of the electrode.
Problem 2: Poor Fuel Economy Despite New Plugs
Modern GDI engines require precise timing. If the two plugs are firing out of sync, the computer gets confused, often defaulting to a richer fuel map to protect components, leading to wasted gas.
Essential Fixes:
- Timing Check: If your vehicle has adjustable plugs, they must fire relative to each other as per the manual (e.g., Primary spark at 10 degrees BTDC, Secondary spark at 15 degrees BTDC—these are just examples; check your manual!). Incorrect timing throws off the entire cylinder’s combustion efficiency.
- Coil Integrity: A failing ignition coil pack can weakly fire the second plug, leading to incomplete combustion even if the gap is technically correct. If you have an ongoing misfire, swap the coil pack from the problem cylinder with a known good one to see if the misfire follows the coil.
Problem 3: Stripped Threads During Installation
This creates an expensive headache. If you felt strong resistance while threading any plug by hand or ratchet, you may have damaged the aluminum threads in the cylinder head.
Essential Fixes:
- Stop Immediately: Do not force the plug in further. Back it out gently.
- Use a Thread Chaser (Carefully): For minor damage, a special thread chaser (different from a tap, as it does not cut new metal) can sometimes clean up the existing threads enough to safely install a new plug with anti-seize. Search for “spark plug thread chaser kit” for your specific engine size if this occurs. You can find reputable thread repair guides online from safety-focused organizations.
- Heli-Coil Insert: For severe damage, the cylinder head will need repair using an insert like a Heli-Coil or similar thread repair system, which usually requires removing the cylinder head entirely for professional service if you are uncomfortable doing that intensive repair yourself.
Maintenance Schedule for Dual-Spark V8s
Because these engines are high-tech, their maintenance intervals are often different than older V8s.
Table: Spark Plug Replacement Intervals Comparison
| Engine Type | Typical Interval (Miles) | Key Consideration |
| :— | :— | :— |
| Standard V8 (Older) | 30,000 – 45,000 | Copper or standard platinum wear quickly. |
| V8 with 16 Plugs (GDI) | 60,000 – 100,000+ | Iridium or specialized plugs are usually required. |
If your manual specifies 100,000 miles, it demands high-grade iridium or platinum plugs. Using cheaper plugs in a high-mileage dual-plug system is a guaranteed way to cause performance issues long before the scheduled replacement interval.
Why Quality Matters with 16 Plugs
Think about it: you have 16 chances for a weak spark. If you buy cheaper plugs that wear out faster, you are essentially degrading your engine’s performance and efficiency eight times faster than a standard V8.
Iridium: Offers the sharpest, longest-lasting spark. Essential for the small gap required in many high-compression direct injection engines.
Consistent Heat Range: Ensure that Plug A and Plug B (if they are different types) are both rated for the correct heat range specified by the manufacturer to prevent pre-ignition or fouling.
Final Checks Before Firing It Up
You’ve successfully navigated the complexity of 16 spark plugs. Before you reconnect that battery and start the engine, do a quick mental checklist.
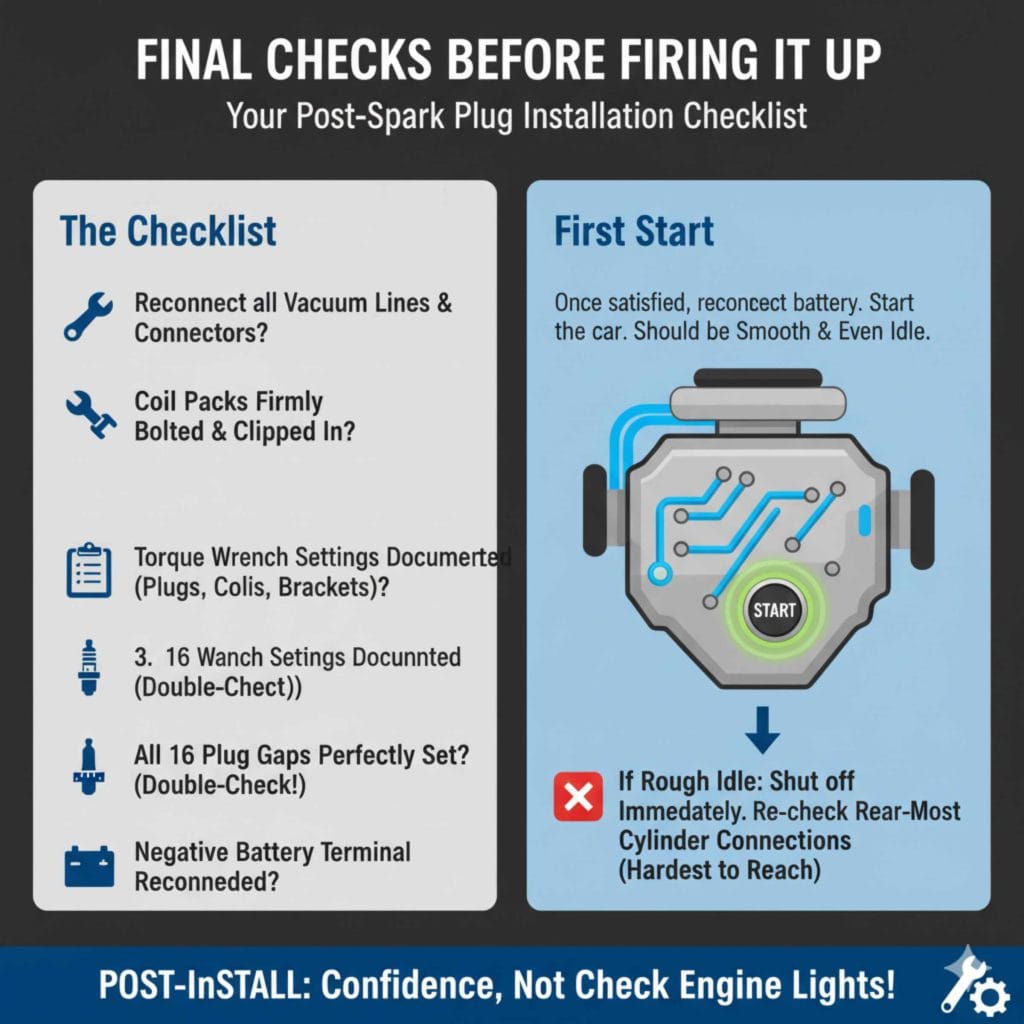
- Did I connect all vacuum lines and electrical connectors that I removed to access the coils?
- Is every coil pack firmly bolted down, and is the wiring harness securely clipped in?
- Is the torque wrench setting documented for the plugs, coils, and any mounting brackets I removed?
- Are the gaps on all 16 plugs perfectly set? (Trust me, checking one more time is worth it!)
Once satisfied, reconnect the negative battery terminal. Start the car. It should fire up smoothly and idle evenly. If it idles rough, shut it off right away and re-check the connections on the rear-most cylinders first, as they are often the hardest to reach and easiest to accidentally leave disconnected.
Frequently Asked Questions (FAQ)
Q1: Can I use only eight spark plugs in my V8 if it came with 16?
No. Your engine’s computer (ECU) and the physical design of the cylinder head are calibrated specifically for two ignition events per cycle. Running only eight plugs will result in massive misfires, poor engine performance, incredibly high hydrocarbon emissions, and potential damage to the catalytic converter due to unburned fuel entering the exhaust.
Q2: How much should I expect to pay a mechanic to replace 16 spark plugs?
Labor costs vary widely by location and vehicle complexity. For a complex V8 where the intake manifold must be removed to access the plugs (common on modern designs), be prepared for 4 to 8 hours of labor. Parts (16 high-quality plugs) might cost between $100 and $250. Always get a quote first!
Q3: Is tightening the spark plugs by hand enough?
No, absolutely not. Spark plugs require precise clamping force, which is measured in foot-pounds (torque). Using just “hand tight” plus a quarter turn often leads to either insufficient clamping (causing overheating and blow-out) or over-tightening (cracking the plug or stripping the head threads). A calibrated torque wrench is essential.
Q4: Do I need to gap iridium plugs?
Yes, always. Even if the manufacturer pre-gaps them, shipping, handling, and inspection can slightly alter the fine electrode tips of iridium or platinum plugs. Since the required gap on a dual-plug system is often very small and precise, checking and setting the gap yourself ensures optimal performance before installation.
Q5: What is the risk of damaging my engine when changing 16 plugs?
The biggest risk for beginners is cross-threading the plugs when installing them, which ruins the cylinder head threads. The second risk is dropping tools or debris into the open cylinder chamber. Following the hand-threading rule and cleaning around the wells minimizes both risks significantly.
Putting the Power Back Where It Belongs
Seeing 16 spark plugs in your V8 might feel like a homework assignment you didn’t sign up for, but it’s just evidence of advanced engineering designed to give you excellent power and efficiency. By understanding that you are servicing two ignition points per cylinder—and by respecting the critical need for precise gapping and correct torque—you conquer this job easily. Tools are just objects; confidence and clear steps are what truly fix the car. You’ve got the know-how now to keep that V8 firing perfectly on all 16 cylinders. Happy driving!